DevExpress crack full
Download
Wednesday, September 2, 2015
Thursday, August 27, 2015
Strut1_login_MultiLanguage_ValidateByJavaScript
Trang index.jsp

Souce
[sourcecode language="html"]
<%@page import="java.util.Locale"%>
<%@ taglib prefix="c" uri="http://java.sun.com/jsp/jstl/core" %>
<%@taglib prefix="bean" uri="/WEB-INF/struts-bean.tld" %>
<%@page contentType="text/html" pageEncoding="UTF-8"%>
<!DOCTYPE html>
<html>
<head>
<meta http-equiv="Content-Type" content="text/html; charset=UTF-8">
<title><bean:message key="HomeTitle"/></title>
</head>
<script type="text/javascript">
function change(code)
{
document.getElementById('code').value = code;
document.forms[0].submit();
}
</script>
<body>
<div align="center">
<h1><bean:message key="SelectLanguage"/></h1>
<c:set var="cLang" scope="request"
value="${requestScope.locale.language}}"/>
<c:if test="${not empty param.code}">
<c:set var="cLang" scope="request" value="${param.code}"/>
</c:if>
<c:if test="${not empty param.code}">
<c:set value='<%= new Locale(request.getAttribute("cLang") + "")%>'
var="org.apache.struts.action.LOCALE" scope="session"/>
<c:redirect url="login.jsp"/>
</c:if>
<form method="POST">
<input type="hidden" id="code" name="code" value=""/>
<img src="vn.svg.png" width="32px"
onclick="change('vi');"/>
<img src="us.svg.png" width="32px"
onclick="change('en');"/>
</form>
</div>
</body>
</html>
[/sourcecode]
Chức năng chứng thực với giao diện tiếng Việt và tiếng anh


Source
[sourcecode language="html"]
<%@page contentType="text/html" pageEncoding="UTF-8"%>
<%@taglib prefix="html" uri="/WEB-INF/struts-html.tld" %>
<%@taglib prefix="bean" uri="/WEB-INF/struts-bean.tld" %>
<link rel="stylesheet" type="text/css"
href="http://codeproject.com/App_Themes/CodeProject/Css/Main.min.css">
<!DOCTYPE html>
<html:html>
<html:link href="index.jsp">
<bean:message key="HomeTitle"/>
</html:link>
<html:form action="/Login">
<table>
<tr>
<td colspan="2">
<font color="red">
<ol>
<html:errors header="Errors"/>
</ol>
</font>
</td>
</tr>
<tr>
<td><bean:message key="UserNameLabel"/></td>
<td><html:text property="userName"/> </td>
</tr>
<tr>
<td><bean:message key="PasswordLabel"/></td>
<td><html:text property="password"/></td>
</tr>
<tr>
<td></td>
<td><html:submit>
<bean:message key="LoginKey"/>
</html:submit>
</td>
</tr>
</table>
</html:form>
</html:html>
[/sourcecode]
Tạo thêm một số key cho resource file như sau

Hiểu chỉnh lại actionForm của trang login như sau
[sourcecode language="java"]
package codes;
import javax.servlet.http.HttpServletRequest;
import org.apache.struts.action.ActionErrors;
import org.apache.struts.action.ActionMapping;
import org.apache.struts.action.ActionMessage;
public class frmLogin extends org.apache.struts.action.ActionForm {
private String userName;
private String password;
public frmLogin() {
super();
userName ="admin";
password ="admin";
}
public ActionErrors validate(ActionMapping mapping, HttpServletRequest request) {
ActionErrors errors = new ActionErrors();
if (getUserName() == null || getUserName().length() < 1) {
errors.add("username", new ActionMessage("username"));
}
if (getPassword() == null || getPassword().length() < 1) {
errors.add("password", new ActionMessage("password"));
}
return errors;
}
public String getUserName() {
return userName;
}
public void setUserName(String userName) {
this.userName = userName;
}
public String getPassword() {
return password;
}
public void setPassword(String password) {
this.password = password;
}
}
[/sourcecode]
Chạy giao diện trang login.jsp và xóa rỗng 2 textfield, nhấn nút login chúng ta có như sau


Như vậy là căn bản chúng ta đã có thể thay đổi được giao diên (ngôn ngữ) với strut1x. Tuy nhiên, các cách kiểm tra này không hiệu quả khi phải gởi đi rồi nhận về lỗi thông báo. Phần tiếp theo chúng ta sẽ kiểm tra và thông báo với javascript
Strut1 cung cấp cho chúng ta co chế tạo action form động với lớp org.apache.struts.validator.DynaValidatorForm.
Bổ sung thêm vào giữa thẻ trong file struts-config.xml nội dung sau để tạo form
[sourcecode language="xml"]
<form-bean name="addForm" type="org.apache.struts.validator.DynaValidatorForm">
<form-property name="username" type="java.lang.String"/>
<form-property name="password" type="java.lang.String"/>
</form-bean>
[/sourcecode]
Tiếp tục mở file validation.xml trong thư mục WEB_INF và thêm vào nội dung sau:
[sourcecode language="xml"]
<formset>
<form name="addForm">
<field
property="username"
depends="required">
<arg key="logonForm.username"/>
</field>
<field
property="password"
depends="required,mask">
<arg key="logonForm.password"/>
<var>
<var-name>mask</var-name>
<var-value>^[0-9a-zA-Z]*$</var-value>
</var>
</field>
</form>
</formset>
[/sourcecode]
Đến đây, chúng ta sẽ tạo view với trang add.jsp như sau:
[sourcecode language="html"]
<%--
Document : add
Created on : Aug 25, 2015, 3:08:26 PM
Author : ntdan
--%>
<%@page contentType="text/html" pageEncoding="UTF-8"%>
<%@taglib prefix="html" uri="/WEB-INF/struts-html.tld" %>
<%@taglib prefix="bean" uri="/WEB-INF/struts-bean.tld" %>
<!DOCTYPE html>
<html>
<head>
<meta http-equiv="Content-Type" content="text/html; charset=UTF-8">
<link rel="stylesheet" type="text/css"
href="http://codeproject.com/App_Themes/CodeProject/Css/Main.min.css">
<title>JSP Page</title>
</head>
<body>
<h1>Register!</h1>
<html:form action="/AddAction"
onsubmit="validateAddForm(this);">
<html:javascript formName="addForm"/>
Username:<br/>
<html:text property="username"/><br/>
Password:<br/>
<html:password property="password"/><br/>
<html:submit><bean:message key="btnAdd"/> </html:submit>
</html:form>
</body>
</html>
[/sourcecode]
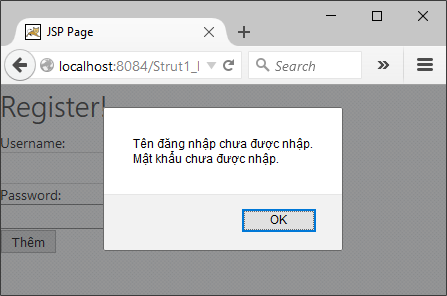
Chạy trang add.jsp và xóa rỗng hai textfield và nhấn nút Thêm chúng ta co giao diện như sau;


Ok như vậy là chúng ta đã có thể kết hợp js để thông báo và khai thác tài nguyên để đa ngôn ngữ cho giao viện trang web trên nền strut1 rồi.
Để có thể hiểu rõ hơn có thể tham khảo mã nguồn ở đây hay trao đổi với tôi.
Mã nguồn ở đây

Souce
[sourcecode language="html"]
<%@page import="java.util.Locale"%>
<%@ taglib prefix="c" uri="http://java.sun.com/jsp/jstl/core" %>
<%@taglib prefix="bean" uri="/WEB-INF/struts-bean.tld" %>
<%@page contentType="text/html" pageEncoding="UTF-8"%>
<!DOCTYPE html>
<html>
<head>
<meta http-equiv="Content-Type" content="text/html; charset=UTF-8">
<title><bean:message key="HomeTitle"/></title>
</head>
<script type="text/javascript">
function change(code)
{
document.getElementById('code').value = code;
document.forms[0].submit();
}
</script>
<body>
<div align="center">
<h1><bean:message key="SelectLanguage"/></h1>
<c:set var="cLang" scope="request"
value="${requestScope.locale.language}}"/>
<c:if test="${not empty param.code}">
<c:set var="cLang" scope="request" value="${param.code}"/>
</c:if>
<c:if test="${not empty param.code}">
<c:set value='<%= new Locale(request.getAttribute("cLang") + "")%>'
var="org.apache.struts.action.LOCALE" scope="session"/>
<c:redirect url="login.jsp"/>
</c:if>
<form method="POST">
<input type="hidden" id="code" name="code" value=""/>
<img src="vn.svg.png" width="32px"
onclick="change('vi');"/>
<img src="us.svg.png" width="32px"
onclick="change('en');"/>
</form>
</div>
</body>
</html>
[/sourcecode]
Chức năng chứng thực với giao diện tiếng Việt và tiếng anh


Source
[sourcecode language="html"]
<%@page contentType="text/html" pageEncoding="UTF-8"%>
<%@taglib prefix="html" uri="/WEB-INF/struts-html.tld" %>
<%@taglib prefix="bean" uri="/WEB-INF/struts-bean.tld" %>
<link rel="stylesheet" type="text/css"
href="http://codeproject.com/App_Themes/CodeProject/Css/Main.min.css">
<!DOCTYPE html>
<html:html>
<html:link href="index.jsp">
<bean:message key="HomeTitle"/>
</html:link>
<html:form action="/Login">
<table>
<tr>
<td colspan="2">
<font color="red">
<ol>
<html:errors header="Errors"/>
</ol>
</font>
</td>
</tr>
<tr>
<td><bean:message key="UserNameLabel"/></td>
<td><html:text property="userName"/> </td>
</tr>
<tr>
<td><bean:message key="PasswordLabel"/></td>
<td><html:text property="password"/></td>
</tr>
<tr>
<td></td>
<td><html:submit>
<bean:message key="LoginKey"/>
</html:submit>
</td>
</tr>
</table>
</html:form>
</html:html>
[/sourcecode]
Tạo thêm một số key cho resource file như sau

Hiểu chỉnh lại actionForm của trang login như sau
[sourcecode language="java"]
package codes;
import javax.servlet.http.HttpServletRequest;
import org.apache.struts.action.ActionErrors;
import org.apache.struts.action.ActionMapping;
import org.apache.struts.action.ActionMessage;
public class frmLogin extends org.apache.struts.action.ActionForm {
private String userName;
private String password;
public frmLogin() {
super();
userName ="admin";
password ="admin";
}
public ActionErrors validate(ActionMapping mapping, HttpServletRequest request) {
ActionErrors errors = new ActionErrors();
if (getUserName() == null || getUserName().length() < 1) {
errors.add("username", new ActionMessage("username"));
}
if (getPassword() == null || getPassword().length() < 1) {
errors.add("password", new ActionMessage("password"));
}
return errors;
}
public String getUserName() {
return userName;
}
public void setUserName(String userName) {
this.userName = userName;
}
public String getPassword() {
return password;
}
public void setPassword(String password) {
this.password = password;
}
}
[/sourcecode]
Chạy giao diện trang login.jsp và xóa rỗng 2 textfield, nhấn nút login chúng ta có như sau


Như vậy là căn bản chúng ta đã có thể thay đổi được giao diên (ngôn ngữ) với strut1x. Tuy nhiên, các cách kiểm tra này không hiệu quả khi phải gởi đi rồi nhận về lỗi thông báo. Phần tiếp theo chúng ta sẽ kiểm tra và thông báo với javascript
Strut1 cung cấp cho chúng ta co chế tạo action form động với lớp org.apache.struts.validator.DynaValidatorForm.
Bổ sung thêm vào giữa thẻ trong file struts-config.xml nội dung sau để tạo form
[sourcecode language="xml"]
<form-bean name="addForm" type="org.apache.struts.validator.DynaValidatorForm">
<form-property name="username" type="java.lang.String"/>
<form-property name="password" type="java.lang.String"/>
</form-bean>
[/sourcecode]
Tiếp tục mở file validation.xml trong thư mục WEB_INF và thêm vào nội dung sau:
[sourcecode language="xml"]
<formset>
<form name="addForm">
<field
property="username"
depends="required">
<arg key="logonForm.username"/>
</field>
<field
property="password"
depends="required,mask">
<arg key="logonForm.password"/>
<var>
<var-name>mask</var-name>
<var-value>^[0-9a-zA-Z]*$</var-value>
</var>
</field>
</form>
</formset>
[/sourcecode]
Đến đây, chúng ta sẽ tạo view với trang add.jsp như sau:
[sourcecode language="html"]
<%--
Document : add
Created on : Aug 25, 2015, 3:08:26 PM
Author : ntdan
--%>
<%@page contentType="text/html" pageEncoding="UTF-8"%>
<%@taglib prefix="html" uri="/WEB-INF/struts-html.tld" %>
<%@taglib prefix="bean" uri="/WEB-INF/struts-bean.tld" %>
<!DOCTYPE html>
<html>
<head>
<meta http-equiv="Content-Type" content="text/html; charset=UTF-8">
<link rel="stylesheet" type="text/css"
href="http://codeproject.com/App_Themes/CodeProject/Css/Main.min.css">
<title>JSP Page</title>
</head>
<body>
<h1>Register!</h1>
<html:form action="/AddAction"
onsubmit="validateAddForm(this);">
<html:javascript formName="addForm"/>
Username:<br/>
<html:text property="username"/><br/>
Password:<br/>
<html:password property="password"/><br/>
<html:submit><bean:message key="btnAdd"/> </html:submit>
</html:form>
</body>
</html>
[/sourcecode]
Chạy trang add.jsp và xóa rỗng hai textfield và nhấn nút Thêm chúng ta co giao diện như sau;

Ok như vậy là chúng ta đã có thể kết hợp js để thông báo và khai thác tài nguyên để đa ngôn ngữ cho giao viện trang web trên nền strut1 rồi.
Để có thể hiểu rõ hơn có thể tham khảo mã nguồn ở đây hay trao đổi với tôi.
Mã nguồn ở đây
Wednesday, August 26, 2015
Thursday, August 20, 2015

Wednesday, August 12, 2015

Monday, June 8, 2015
Jersey file upload (java restful)
Objectives
- Describe step by step upload media to server through Restful services (using jersey)
- Demo: build register page with text field and file field
Input user info

Upload result

First:
Design client page
[sourcecode language="html"]
<html>
<head>
<title>Demo jersey file upload</title>
<meta charset="UTF-8">
<meta name="viewport"
content="width=device-width, initial-scale=1.0">
</head>
<body>
<H1>Demo jersey file upload</H1>
<form action="rest/files/reg" method="POST"
enctype="multipart/form-data">
Name:<br/>
<input type="Text" name="txtName"/><br/>
Picture:<br/>
<input type="file" name="file"/><br/><br/>
<input type="submit" value="Upload" />
</form>
</body>
</html>
[/sourcecode]
Next:
- Create restful service with uri as rest/files/reg
- Design function to handle above uri as below
[sourcecode language="java"]
@POST
@Path("/reg")
@Consumes(MediaType.MULTIPART_FORM_DATA)
@Produces("text/xml")
public String uploadFile(FormDataMultiPart form,
@FormDataParam("txtName") String name) {
FormDataBodyPart filePart = form.getField("file");
ContentDisposition headerOfFile = filePart.getContentDisposition();
InputStream fileInput = filePart.getValueAs(InputStream.class);
String imgPath = application.getRealPath("") + "\\imgs\\" + headerOfFile.getFileName();
int size = 0;
int read = 0;
try (OutputStream outpuStream = new FileOutputStream(new File(imgPath))) {
byte[] bytes = new byte[1024];
while ((read = fileInput.read(bytes)) != -1) {
outpuStream.write(bytes, 0, read);
size += read;
}
outpuStream.flush();
} catch (Exception e) {
return "<result>"+e.toString()+"</result>";
}
NumberFormat f = NumberFormat.getNumberInstance(Locale.ENGLISH);
String rs = "<result>"
+ "<name>" + name + "</name>"
+ "<url>"
+ application.getContextPath() + "/imgs/" + headerOfFile.getFileName()
+ "</url>"
+ "<fileInfo>"
+ "<size>" + f.format(size) + " bytes</size>"
+ "<type>" + filePart.getMediaType()+ "</type>"
+ "<uploadDate>"
+ Calendar.getInstance().getTime().toString()
+ "</uploadDate>"
+ "</fileInfo>"
+ "</result>";
return rs;
}
[/sourcecode]
- @Consumes(MediaType.MULTIPART_FORM_DATA) map a data from to restful function
- FormDataBodyPart filePart = form.getField("file"); extract file field on the form
- ContentDisposition headerOfFile = filePart.getContentDisposition(); get user file information
notes:
- lib for this demo: jersey, jersey-multipart.
Download source code
Monday, April 20, 2015
SyndicationFeed - Đọc RSS với .Net 4.0 trở nên đơn giản
Sử dụng thư viện System.ServiceModel với 02 lớp
Code ví dụ
[sourcecode language="csharp"]
List<SyndicationItem> rss = new List<SyndicationItem>();
string url = "http://vnexpress.net/rss/the-thao.rss";
XmlReader xmlreader = XmlReader.Create(url);
SyndicationFeed rssfeed = SyndicationFeed.Load(xmlreader);
xmlreader.Close();
foreach (SyndicationItem item in rssfeed.Items)
{
rss.Add(item);
}
[/sourcecode]
Demo ví dụ:


Mã nguồn demo
[sourcecode language="csharp"]
using System;
using System.Collections.Generic;
using System.ComponentModel;
using System.Data;
using System.Diagnostics;
using System.Drawing;
using System.Linq;
using System.ServiceModel.Syndication;
using System.Text;
using System.Threading.Tasks;
using System.Windows.Forms;
using System.Xml;
namespace WindowsFormsApplication1
{
public partial class Form1 : Form
{
List<SyndicationItem> rss;
public Form1()
{
InitializeComponent();
this.listBox1.MouseDoubleClick += new System.Windows.Forms.MouseEventHandler(this.listBox1_MouseDoubleClick);
this.button1.Click += new System.EventHandler(this.button1_Click);
}
private void Form1_Load(object sender, EventArgs e)
{
}
private void load()
{
rss = new List<SyndicationItem>();
string url = textBox1.Text;
XmlReader xmlreader = XmlReader.Create(url);
SyndicationFeed rssfeed = SyndicationFeed.Load(xmlreader);
xmlreader.Close();
foreach (SyndicationItem item in rssfeed.Items)
{
rss.Add(item);
listBox1.Items.Add(item.Title.Text);
}
}
private void button1_Click(object sender, EventArgs e)
{
load();
}
private void listBox1_MouseDoubleClick(object sender, MouseEventArgs e)
{
if (listBox1.SelectedItem == null)
return;
if (e.Clicks == 2)
{
Process.Start(rss[listBox1.SelectedIndex].Links[0].Uri.ToString());
}
}
}
}
[/sourcecode]
System.ServiceModel.Syndication.SyndicationFeed;
System.ServiceModel.Syndication.SyndicationItem;
Code ví dụ
[sourcecode language="csharp"]
List<SyndicationItem> rss = new List<SyndicationItem>();
string url = "http://vnexpress.net/rss/the-thao.rss";
XmlReader xmlreader = XmlReader.Create(url);
SyndicationFeed rssfeed = SyndicationFeed.Load(xmlreader);
xmlreader.Close();
foreach (SyndicationItem item in rssfeed.Items)
{
rss.Add(item);
}
[/sourcecode]
Demo ví dụ:


Mã nguồn demo
[sourcecode language="csharp"]
using System;
using System.Collections.Generic;
using System.ComponentModel;
using System.Data;
using System.Diagnostics;
using System.Drawing;
using System.Linq;
using System.ServiceModel.Syndication;
using System.Text;
using System.Threading.Tasks;
using System.Windows.Forms;
using System.Xml;
namespace WindowsFormsApplication1
{
public partial class Form1 : Form
{
List<SyndicationItem> rss;
public Form1()
{
InitializeComponent();
this.listBox1.MouseDoubleClick += new System.Windows.Forms.MouseEventHandler(this.listBox1_MouseDoubleClick);
this.button1.Click += new System.EventHandler(this.button1_Click);
}
private void Form1_Load(object sender, EventArgs e)
{
}
private void load()
{
rss = new List<SyndicationItem>();
string url = textBox1.Text;
XmlReader xmlreader = XmlReader.Create(url);
SyndicationFeed rssfeed = SyndicationFeed.Load(xmlreader);
xmlreader.Close();
foreach (SyndicationItem item in rssfeed.Items)
{
rss.Add(item);
listBox1.Items.Add(item.Title.Text);
}
}
private void button1_Click(object sender, EventArgs e)
{
load();
}
private void listBox1_MouseDoubleClick(object sender, MouseEventArgs e)
{
if (listBox1.SelectedItem == null)
return;
if (e.Clicks == 2)
{
Process.Start(rss[listBox1.SelectedIndex].Links[0].Uri.ToString());
}
}
}
}
[/sourcecode]
Subscribe to:
Posts (Atom)