Showing posts with label Java. Show all posts

Tuesday, December 8, 2015

Java – Simple TextEditor

Using java to building a simple text editor application

  1. – Create menu, contextual menu
  2. – Using toolbox component
  3. – Using JTextPane
  4. – Understand JFileChooser, JColorChooser


You can down load source =>> here <<==

Some app’s interface

Công cụ chuyển ngôn ngữ miễn phí

Convert .NET (Based on .NET 4.5)
Convert .NET phát triển một công cụ tích hợp, mạnh mẽ, đa mục đích chuyển đổi. Các tính năng: C # sang VB và ngược lại, LINQ tester, mã hóa / giải mã, Regular Expression tester, Base64 Encoding / Decoding và dịch văn bản đầy đủ.

Chi tiet tai day


Voi cong cu nay viet chuyen doi qua lai giua cac ngon ngu tro nen vo cung nhanh chong va chinh xac.

Monday, December 7, 2015

Xây dựng ứng dụng MDI với Java (netbean, ứng dụng form cha-con)

MDI application là loại giao diện ứng dụng rất phổ biến trên nền hệ điều hành window. Java hỗ trợ 02 đối tượng jDesktopPaneJInternalFrame cho phép lập trình viên tạo ra loại giao diện ứng dụng này đơn gian và nhanh chóng.

Trong bài này tôi hướng dẫn căn bản cho các bạn sinh viên (lập trình viên) từng bước tạo ứng dụng có kiểu giao diện này.
1. Tạo form chính (FrmMain)
2. Định nghĩa form con (Children form)
3. Chỉ đinh form cha-con.
4. Ràng buộc form con chỉ được mở 1 lần trong form cha.

Bước 1: Tạo ứng dụng Java destop với netbean.
+ File -> New Project -> chọn kiểu java application
Bước 2: Tạo đối tượng form cha
+ File -> New File -> chọn Swing GUI Forms -> chọn JFrame Form phía bên phải
+ Thiết kế menu chính của chương trình: Kéo thả Menu Bar và jDesktopPane vào form chính như hình dưới

[caption id="attachment_1086" align="aligncenter" width="300"]Giao diện tạo form chính Giao diện tạo form chính[/caption]

Bước 3: Xây dựng các form con, trong ví dụ này tôi tạo form Login
+ File -> New File chọn tiếp loại JInternalFrame

Các bạn thiết kế lại giao diện form con cho phù hợp

Bước 4: Gán form con và form cha
+ Chọn menu login trong form cha: Click chuột phải và chọn event => action performed
[sourcecode language="java"]
for (JInternalFrame frmChild : jDesktopPane1.getAllFrames()) {
frmChild.dispose();
}

FrmLogin frmLogin = new FrmLogin();
frmLogin.setTitle("Login to system");
frmLogin.setLocation(this.getWidth()/2 - frmLogin.getWidth()/2,(this.getHeight()-20)/2 - frmLogin.getHeight()/2 - 20);
jDesktopPane1.add(frmLogin);
frmLogin.setVisible(true);
[/sourcecode]

Dòng lệnh for đóng tất cả các form con đang mở.
[sourcecode language="java"]
jDesktopPane1.add(frmLogin);
frmLogin.setVisible(true);
[/sourcecode]
Đoạn gán form login vào form main.

OK, bây giờ chạy form cha và chọn menu login ta sẽ có kết quả

[caption id="attachment_1087" align="aligncenter" width="300"]Form con Form con[/caption]

Bước 5: Qui định form chỉ được mở 1 lần, nếu trước đó đã mở và hiện đang bị che khuất thì chỉ hiển thị form con lên trên (active). Trong ví dụ này tôi chọn form About để làm demo
+ Định nghĩa biên frmAbout có kiểu là FrmAbout
+ Trong sự kiện Action Performed của menu About ta cung cấp code như sau
[sourcecode language="java"]
private void jMenuItem3ActionPerformed(java.awt.event.ActionEvent evt) {
// TODO add your handling code here:
if(frmAbout == null || frmAbout.isClosed())
{
frmAbout = new FrmAbout();
jDesktopPane1.add(frmAbout);
frmAbout.setLocation(this.getWidth()/2 - frmAbout.getWidth()/2,(this.getHeight()-20)/2 - frmAbout.getHeight()/2 - 20);
frmAbout.setVisible(true);
}
else
{
frmAbout.setLocation(this.getWidth()/2 - frmAbout.getWidth()/2,(this.getHeight()-20)/2 - frmAbout.getHeight()/2 - 20);
frmAbout.setVisible(true);
}
}
[/sourcecode]

Như vậy là chúng ta vừa sủ dụng jDesktopPane và jInternalFrame để xây dựng ứng dụng MDI rất đơn gian. Hi vọng nó sẽ cho các bạn một các nhìn ban đầu về các xây dựng MDI application trên java với sự hỗ trợ của netbean.

Video từng bước tại đây

Thursday, December 3, 2015

Java - Simple TextEditor

Using java to building a simple text editor application


- Create menu, contextual menu
- Using toolbox component
- Using JTextPane
- Understand JFileChooser, JColorChooser

You can down load source =>> here <<==

Video step by step ==>> at here <<==

Some app's interface


[gallery ids="1961,1963,1964,1962" type="rectangular"]


Load all system font on font combobox


private void loadFont() {
GraphicsEnvironment gEnv = GraphicsEnvironment.getLocalGraphicsEnvironment();
// get all font name&amp;amp;amp;amp;amp;amp;amp;nbsp;
String[] fontNames = gEnv.getAvailableFontFamilyNames();
// load to combobox
ComboBoxModel model = new DefaultComboBoxModel(fontNames);
jcbFont.setModel(model);
}

When user select font and size, we will setting font and size for textpane component

private void jcbFontActionPerformed(java.awt.event.ActionEvent evt) {
// Change font of text
jTextPane1.setFont(new Font(jcbFont.getSelectedItem().toString(),
Font.PLAIN, Integer.parseInt(jcbSelectSize.getSelectedItem().toString())));
}

private void jcbSelectSizeActionPerformed(java.awt.event.ActionEvent evt) {
// Select size of text
String getSize = jcbSelectSize.getSelectedItem().toString();
Font f = jTextPane1.getFont();
// setting new size
jTextPane1.setFont(new Font(f.getFontName(),
f.getStyle(), Integer.parseInt(getSize)));
}

JColorChooser API of Java swing help our get a color from system color dialog, using code below for ActionPerformed event of color button.

private void btnSelectColorActionPerformed(java.awt.event.ActionEvent evt) {
Color jColor = selectColor;
// open color dialog and select Color
if ((jColor = JColorChooser.showDialog(this, "Select color", jColor)) != null) {
selectColor = jColor;
// set text color
jTextPane1.setForeground(selectColor);
}
}

RTFEditorKit can help reading formatted text on JTextPane and write down file system with rich text format


When user click on Save button or save as menu

private void save() {
JFileChooser file = new JFileChooser();
TextFilter filter = new TextFilter();
file.setFileFilter(filter);
String fileName = "";
// show save file dialog
if (file.showSaveDialog(this) == JFileChooser.APPROVE_OPTION) {
// get full path of selected file
fileName = file.getSelectedFile().getAbsolutePath();
// get meta of text
StyledDocument doc = (StyledDocument) jTextPane1.getDocument();
// convert to richtext format
RTFEditorKit kit = new RTFEditorKit();
BufferedOutputStream out;
try {
out = new BufferedOutputStream(new FileOutputStream(fileName));
// save content to file
kit.write(out, doc, doc.getStartPosition().getOffset(), doc.getLength());
out.flush();
out.close();
} catch (Exception e) {
System.out.println("Err:" + e.toString());
}

} else {
return;
}
}

Handing button Open file or menu Open file as

private void open() {
JFileChooser file = new JFileChooser();
TextFilter filter = new TextFilter();
file.setFileFilter(filter);
String fileName = "";
// show open file dialog
if (file.showOpenDialog(this) == JFileChooser.APPROVE_OPTION) {
fileName = file.getSelectedFile().getAbsolutePath();
} else {
return;
}
// using richtext format
RTFEditorKit rtf = new RTFEditorKit();
try {
// load file into jTextPane
FileInputStream fi = new FileInputStream(fileName);
rtf.read(fi, jTextPane1.getDocument(), 0);
fi.close();
} catch (Exception e) {
System.out.println("err:" + e.toString());
}
}

This is just demo java beginner.
I hope that, it is useful for you.

Thursday, November 5, 2015

jax-rs (sử dụng jersey) (P1)

jax-rs (sử dụng jersey) (P1)

  1. Tạo Rest service trên java sử dụng gói jersey

  2. Gọi Rest service từ trang html với java script


Trong bài này chúng ta sẽ tìm hiểu các tạo dich vụ vụ web theo kiến trúc Rest. Bài này chúng ta sẽ cài đặt cách giao tiếp qua phương thức GET.
B1: Tạo java web project
B2: Tạo rest service
rest1
rest2
rest3
Sau khi xong, mở file web.xml chúng ta sẽ thấy xuất hiện thêm đoạn xml sau:
[sourcecode language="xml"]
<servlet>
<servlet-name>ServletAdaptor</servlet-name>
<servlet-class>com.sun.jersey.spi.container.servlet.ServletContainer</servlet-class>
<load-on-startup>1</load-on-startup>
</servlet>
<servlet-mapping>
<servlet-name>ServletAdaptor</servlet-name>
<url-pattern>/rest/*</url-pattern>
</servlet-mapping>
[/sourcecode]

Hiệu chỉnh lại nội dung của lớp Student như sau:
[sourcecode language="java"]
package codes;
import javax.ws.rs.PathParam;
import javax.ws.rs.Path;
import javax.ws.rs.GET;
import javax.ws.rs.Produces;
import javax.ws.rs.QueryParam;

@Path("student")
public class Student {
public Student() {
}
/**
* Phuong thuc se duoc kich hoat khi nhan duoc
* yeu cau tu phia client theo phuong phap get
* Ket qua tra ve chuyen thanh chuoi
*/
@GET
@Produces("text/plain")
public String getText() {
return "hello moto";
}

/**
* Phuong thuc se duoc kich hoat khi nhan duoc
* yeu cau tu phia client theo phuong phap get
* Ket qua tra ve chuyen thanh chuoi XML
*/
@Path("/xml")
@GET
@Produces("text/xml")
public String getXML(@QueryParam("id") int id) {
try {
JAXBContext jaxbContext = JAXBContext.newInstance(Customer.class);
Marshaller jaxbMarshaller = jaxbContext.createMarshaller();
jaxbMarshaller.setProperty(Marshaller.JAXB_FORMATTED_OUTPUT, true);
Customer customer = new Customer(id, "Nguyen Van Mit", "Can Tho");
StringWriter sw = new StringWriter();
jaxbMarshaller.marshal(customer, sw);
String xmlString = sw.toString();
return xmlString;
} catch (JAXBException ex) {
return ex.toString();
}
}

/**
* Phuong thuc se duoc kich hoat khi nhan duoc
* yeu cau tu phia client theo phuong phap get
* nhan tham so id theo cach gan them vao URL
* Ket qua tra ve chuyen thanh chuoi xml
*/
@Path("/xml/{id}")
@GET
@Produces("text/xml")
// @PathParam("id") tim phan id tren URL
public String getXMLID(@PathParam("id") int id) {
return "<rs><id>"+id+"</id>"
+ "<name>hello moto</name>"
+ "</rs>";
}

/**
* Phuong thuc se duoc kich hoat khi nhan duoc
* yeu cau tu phia client theo phuong phap get
* Ket qua tra ve chuyen thanh chuoi JSON
*/
@Path("/json")
@GET
@Produces("text/json")
public String getJSON() {
return "{'id':1, "
+ "'name':'Nguyen Van Mit'}";
}
}
[/sourcecode]

Biên dịch và deploy website.
Mở trình duyệt và gõ địa chỉ như sau để test:
rest4

rest5

Như vậy là chúng ta đã có được dịch vụ web theo kiến trúc Rest
Các bước thực hiện chi tiết và tạo client để gọi dịch vụ với ajax tham khảo video này:

[embed]https://youtu.be/BOhU3gKGpKo[/embed]

Thử xem sao !

Friday, October 9, 2015

Hai cách quản lý một tập hợp trong Java

Trong java, bạn có thể quản lý tập hợp các phần tử theo 2 cách:

  • Sử dụng mảng

  • Sử dụng danh sách


Trong khuôn khổ bài này, chúng ta cùng tìm hiểu ArrayList – một lớp đơn giản để quản lý tập hợp.
Yêu cầu:
Tạo một chương trình để người dùng quản lý 5 phần tử kiểu int và lưu vào một mảng.

  • In giá trị các phần tử trong mảng.

  • In các phần tử theo thứ tự giảm dần.

  • In các phần tử trong mảng mà chia hết cho 5.

  • Cho người dùng nhập vào một số, hiển thị số lần xuất hiện của số vừa nhập có trong mảng ban đầu.


Output:
1

1. Cách 1: Khởi tạo mảng int theo cách thông thường:

int[] array = new int[5];


Nếu khởi tạo mảng dạng này, khi chúng ta gán mảng 5 phần tử thì số phần tử đó là cố định. Chúng ta muốn tăng số phần tử lên để quản lý nhiều hơn thì phải tốn nhiều công sức cho bước tăng trưởng. Đây cũng là sự bất tiện của cách quản lý này.

Code tham khảo:

[sourcecode language="java"]
public class Array_PrimitiveDataType {

int[] array;

public Array_PrimitiveDataType() {
array = new int[5];
}

/**
* input array
*/
void inputArray(){
System.out.println("-----Nhap mang-----");
Scanner input = new Scanner(System.in);
for (int i = 0; i &amp;lt; array.length; i++) {
System.out.print("Nhap phan tu thu " + (i+1) + ":");
array[i] = input.nextInt();
}
System.out.println("");
}

void printArray(){
System.out.println("-----In----");
for (int i = 0; i &amp;lt; array.length; i++) {
System.out.print(array[i] + "\t");
}
System.out.println("");
}

void sortDescArray(){
System.out.println("-----Sap xep-----");
for (int i = 0; i &amp;lt;= array.length - 2; i++) {
for (int j = i+1; j &amp;lt;= array.length -1; j++) {
if(array[i] &amp;lt; array[j]){
int temp = array[i];
array[i] = array[j];
array[j] = temp;
}
}
}
}

void searchNumber(){
System.out.println("----Tim mot so-----");
Scanner input = new Scanner(System.in);
System.out.print("Nhap mot so can tim:");
int so = input.nextInt();
int dem = 0;
for (int i = 0; i &amp;lt; array.length; i++) {
if(array[i] == so) dem++;
}
System.out.println("Co " + dem + " phan tu trong mang co gia tri " + so);
}

/**
* @param args the command line arguments
*/
public static void main(String[] args) {
Array_PrimitiveDataType demo = new Array_PrimitiveDataType();
demo.inputArray();
demo.printArray();
demo.sortDescArray();
demo.printArray();
}
}
[/sourcecode]

Video:

[embed]https://www.youtube.com/watch?v=3-Vu-y7SoTk[/embed]

2. Cách 2: Khởi tạo một đối tượng của lớp ArrayList được hỗ trợ sẵn trong API của Java.

Với việc quản lý này, người dùng tự do thêm bớt phần tử nếu muốn thông qua các phương thức của nó. Vì nó không giới hạn số phần tử được quản lý. Đây là sự thuận tiện khi sử dụng lớp ArrayList so với cách khai báo thông thường.

ArrayList array = new ArrayList();


Đặc biệt: đối tượng trong tập hợp trên chỉ quản lý các đối tượng mà không quản lý các biến kiểu dữ liệu nguyên thủy. Vì vậy, khi thêm dữ liệu mới hoặc lấy ra một phần tử trong tập hợp, chúng ta luôn thao tác với đối tượng (Có thể sử dụng Wrapper Class để quản lý các kiểu dữ liệu nguyên thủy khi cần thiết).

Code tham khảo:

[sourcecode language="java"]
import java.util.ArrayList;
import java.util.Collection;
import java.util.Collections;
import java.util.Iterator;
import java.util.Scanner;

/**
*
* @author maithicamnhung
*/
public class Bai1_ArrayList {
ArrayList arr = new ArrayList();

// Nhap du lieu
public void inputList(){
System.out.println("Enter elements:");
Scanner input = new Scanner(System.in);
for(int i = 0 ; i < 4 ; i++){
System.out.println("Element " + (i+1) + ":");
int value = input.nextInt();
arr.add(value);
}
}

// In du lieu mang
public void printList(){
System.out.println("======List=====");
Iterator iarr = arr.iterator();
while(iarr.hasNext()){
System.out.println(iarr.next());
}
}

// Sap xep mang tang dan
public void printListOrderAsc(){
Collections.sort(arr);
System.out.println("======List Order Asc=====");
Iterator iarr = arr.iterator();
while(iarr.hasNext()){
System.out.println(iarr.next());
}
}

// Sap xep mang giam dan
public void printListOrderDes(){
Collections.sort(arr, Collections.reverseOrder());
System.out.println("======List Order Des=====");
Iterator iarr = arr.iterator();
while(iarr.hasNext()){
System.out.println(iarr.next());
}
}

// Chia het cho 5
public void divideFive(){
System.out.println("Element divide 5:");
Iterator iarr = arr.iterator();
while(iarr.hasNext()){
Integer value = (Integer) iarr.next();
if(value.intValue() % 5 == 0){
System.out.println(value);
}
}
}

public void searchNumber(){
Scanner input = new Scanner(System.in);
System.out.println("Enter number to search:");
int count = 0;
int number = input.nextInt();
Iterator iarr = arr.iterator();
while(iarr.hasNext()){
Integer value = (Integer)iarr.next();
if(value.intValue() == number){
count++;
}
}
System.out.println("Count: " + count);
}

public static void main(String[] args) {
Bai1_ArrayList arrList = new Bai1_ArrayList();
arrList.inputList();
arrList.printList();
arrList.printListOrderAsc();
arrList.printListOrderDes();
arrList.divideFive();
arrList.searchNumber();
}
}
[/sourcecode]

Video:

[embed]https://www.youtube.com/watch?v=lHJ0r_SHDMA[/embed]

Chúc các bạn thành công.

Thursday, September 24, 2015

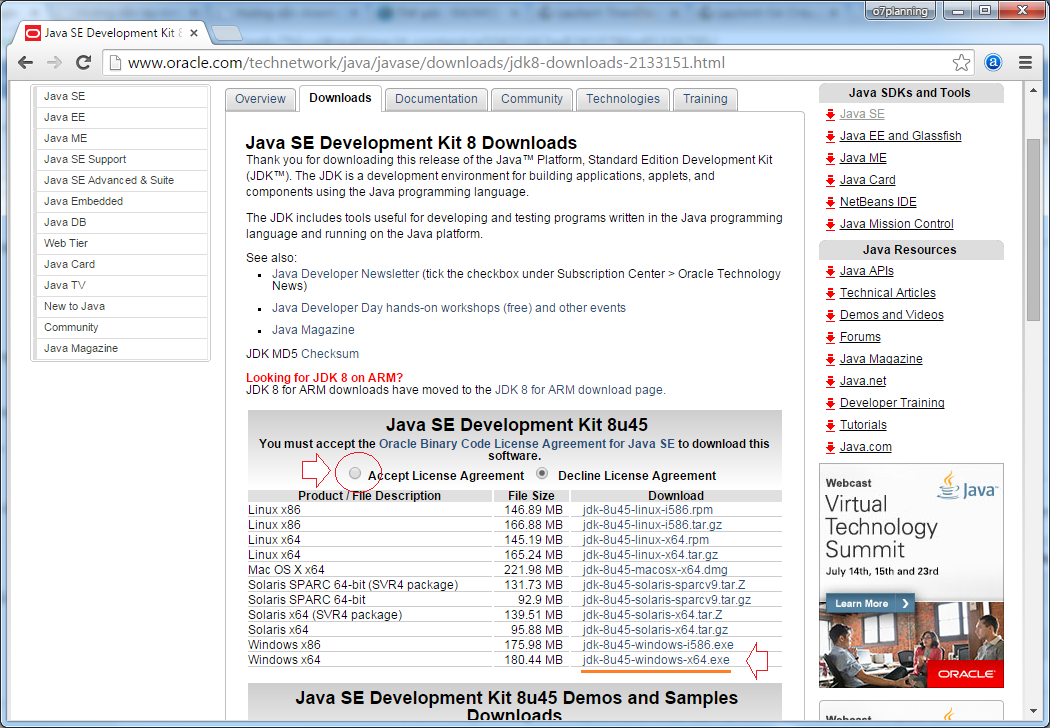
Hướng dẫn cài đặt, cấu hình và chạy chương trình Java đơn giản đầu tiên


  1. Download JDK


Các bạn vào địa chỉ sau để download JDK (hỗ trợ nhiều phiên bản):
http://www.oracle.com/technetwork/java/javase/downloads/index.html
JDK
Chọn Accept License Agreement -> Chọn hệ điều hành đúng để tiến hành tải về.
JDK2
Sau khi tải về, cài đặt như các ứng dụng bình thường.
JDK3
2. Cài đặt JDK
caidat1
Các bạn có thể để đường dẫn mặc định khi cài đặt (C:\) hoặc chọn nơi cài đặt tùy chọn.
Sau khi cài đặt, chúng ta sẽ có 2 thư mục để có thể biên dịch và thông dịch một chương trình java:
caidat2
3. Cấu hình biến môi trường cho java
Cấu hình trên CMD mỗi lần chạy 1 chương trình java bằng dòng lệnh:

- Copy thư mục JDK đã cài đặt : C:\Program Files\Java\jdk1.8.0_20\bin
Thiết lập 2 biến PATH và CLASSPATH mỗi lần thực thi chương trình:
Giả sử, chương trình nằm trong ổ đĩa D:\
path
Cấu hình trên biến môi trường của Window:
path2
Đi đến Advanced system settings, chọn Enviroment Variables:
path3
Tìm đến 2 biến Path và CLASSPATH để thiết lập các giá trị cho 2 biến này.
path4
4. Chạy chương trình đơn giản đầu tiên
Viết một chương trình đầu tiên với lớp Hello trong Notepad và lưu lại với tên Hello.java:
code1Biên dịch Hello.java thành file Hello.class bằng chương trình javac.exe trong bộ JDK vừa cài đặt ở trên:
code2- Vào thư mục chứa tập tin Hello.java, chúng ta sẽ thấy có tập tin Hello.class -> chính là tập tin sau khi biên dịch ra mã byte code.
- Tiến hành thông dịch tập tin Hello.class để thực thi bằng chương trình java.exe:
code3Vậy là, chúng ta đã thực thi được một chương trình java đơn giản.
Chúc các bạn thành công.

Code tham khảo Hello.java

[source language="java"]
public class Hello {

/**
* @param args the command line arguments
*/
public static void main(String[] args) {
System.out.println("Hello you");
}
}
[/source]

Tham khảo video:
[embed]https://youtu.be/rT0cldaEf0w[/embed]

Tuesday, September 22, 2015

Bài tập IXJ - Object/ Object List to XML File and XML File to Object/ Object List

Trong bài tập này chúng ta sẽ chuyển đổi qua lại giữa XML và List<Object>. Bài tập chuyển từ Object <-> XML

Ví dụ danh sách chứa các Emp như sau:

[sourcecode language="java"]
Emp emp = new Emp();
emp.setCode("A001");
emp.setName("Nguyen Van Mit");
emp.setAddress("Can Tho");
emp.setTel("+8499999999");

Emp emp1 = new Emp();
emp1.setCode("A002");
emp1.setName("Tran Van Cam");
emp1.setAddress("Can Tho");
emp1.setTel("+848888888");

List<Emp> emplist = new ArrayList<Emp>();
emplist.add(emp);
emplist.add(emp1);
[/sourcecode]
Sẽ được chuyển thành file XML có nội dung như sau:
[sourcecode language="xml"]
<?xml version="1.0" encoding="UTF-8" standalone="yes"?>
<emplist>
<emp code="A001">
<address>Can Tho</address>
<name>Nguyen Van Mit</name>
<tel>+8499999999</tel>
</emp>
<emp code="A002">
<address>Can Tho</address>
<name>Tran Van Cam</name>
<tel>+848888888</tel>
</emp>
</emplist>
[/sourcecode]

Để thực thực việc chuyển đổi này chúng ta sử dụng thư viện JAXB của Java.
1. Tạo lớp Emp
[sourcecode language="java"]
package jaxb_object_list;
import javax.xml.bind.annotation.XmlAttribute;
import javax.xml.bind.annotation.XmlRootElement;
//the goc
@XmlRootElement(name = "emp")
public class Emp {
private String code;
private String name;
private String address;
private String tel;
public String getAddress() {
return address;
}
public void setAddress(String address) {
this.address = address;
}
public String getCode() {
return code;
}
@XmlAttribute
public void setCode(String code) {
this.code = code;
}
public String getName() {
return name;
}
public void setName(String name) {
this.name = name;
}
public String getTel() {
return tel;
}
public void setTel(String tel) {
this.tel = tel;
}

@Override
public String toString() {
return "Emp [code:" + code + ", name:" + name + ", address:"
+ address + ", tel:" + tel + "]";
}
}
[/sourcecode]
2. EmpList
[sourcecode language="java"]
package jaxb_object_list;
import java.util.ArrayList;
import java.util.List;
import javax.xml.bind.annotation.XmlAccessType;
import javax.xml.bind.annotation.XmlAccessorType;
import javax.xml.bind.annotation.XmlElement;
import javax.xml.bind.annotation.XmlRootElement;
// cac thuoc tinh duoc luu duoi dang the
@XmlAccessorType(XmlAccessType.FIELD)
// the goc
@XmlRootElement(name = "emplist")
public class EmpList {
// moi phan tu trong danh sach luu thanh the emp
// cau truc the emp mo ta qua lop Emp
@XmlElement(name = "emp", type = Emp.class)
private List<Emp> emplist = new ArrayList<Emp>();
public EmpList() {}
public EmpList(List<Emp> emplist) {
this.emplist = emplist;
}
public List<Emp> getEmpList() {
return emplist;
}
public void setEmpList(List<Emp> emplist) {
this.emplist = emplist;
}
}
[/sourcecode]

3. Tạo 2 phương thức để chuyển đổi
[sourcecode language="java"]
// chuyen ds doi tuong thanh xml
public static void marshal(List<Emp> emplist, File selectedFile)
throws IOException, JAXBException {
JAXBContext context;
BufferedWriter writer = null;
writer = new BufferedWriter(new FileWriter(selectedFile));
context = JAXBContext.newInstance(EmpList.class);
Marshaller m = context.createMarshaller();
m.setProperty(Marshaller.JAXB_FORMATTED_OUTPUT, true);
m.marshal(new EmpList(emplist), writer);
writer.close();
}

// chuyen XML thanh danh sach doi tuong
public static List<Emp> unmarshal(File importFile) throws JAXBException {
EmpList empList = new EmpList();
JAXBContext context = JAXBContext.newInstance(EmpList.class);
Unmarshaller um = context.createUnmarshaller();
empList = (EmpList) um.unmarshal(importFile);
return empList.getEmpList();
}
[/sourcecode]

4. Test
[sourcecode language="java"]
public static void main(String[] args) {
Emp emp = new Emp();
emp.setCode("A001");
emp.setName("Nguyen Van Mit");
emp.setAddress("Can Tho");
emp.setTel("+8499999999");

Emp emp1 = new Emp();
emp1.setCode("A002");
emp1.setName("Tran Van Cam");
emp1.setAddress("Can Tho");
emp1.setTel("+848888888");

List<Emp> emplist = new ArrayList<Emp>();
emplist.add(emp);
emplist.add(emp1);
//Marshalling: ghi ds doi tuong ra file xml
try {
JAXBXMLHandler.marshal(emplist, new File("src/jaxb_object_list/EmpList.xml"));
} catch (IOException e) {
e.printStackTrace();
} catch (JAXBException e) {
e.printStackTrace();
}

try {
// khoi tao ds tu XML
emplist = JAXBXMLHandler.unmarshal(new File("src/jaxb_object_list/EmpList.xml"));
} catch (JAXBException e) {
e.printStackTrace();
}
System.out.println(emplist);
}
[/sourcecode]

Tới đây chạy ứng dụng chúng ta sẽ có file xml sinh ra và mẫu in ra của sổ output
[sourcecode language="text"]
[Emp [code:A001, name:Nguyen Van Mit, address:Can Tho, tel:+8499999999], Emp [code:A002, name:Tran Van Cam, address:Can Tho, tel:+848888888]]
[/sourcecode]

Mã nguồn tham khảo tại đây

Monday, September 21, 2015

Bài tập IXJ - Import XML to WebApplication

Trong bài này chúng ta sẽ upload file XML có mẫu qui định trước lên web server và rút trích dữ liệu đề đưa vào SQL server.
Nội dung mẫu XML
[sourcecode language="xml"]
<emplist>
<emp status="off">
<id>1</id>
<name>Been</name>
</emp>
<emp status="on">
<id>2</id>
<name>Andrew</name>
</emp>
</emplist>
[/sourcecode]

Tạo một web site, sử dụng JSF 2.2
Tạo managebean như sau:
[sourcecode language="java"]
package codes;
import java.io.File;
import java.io.IOException;
import java.sql.Connection;
import java.sql.DriverManager;
import java.sql.PreparedStatement;
import java.sql.SQLException;
import java.util.logging.Level;
import java.util.logging.Logger;
import javax.faces.bean.ManagedBean;
import javax.faces.bean.RequestScoped;
import javax.faces.context.FacesContext;
import javax.servlet.http.Part;
import javax.xml.parsers.DocumentBuilder;
import javax.xml.parsers.DocumentBuilderFactory;
import javax.xml.parsers.ParserConfigurationException;
import org.w3c.dom.Document;
import org.w3c.dom.NodeList;
import org.xml.sax.SAXException;
/**
*
* @author ntdan
*/
@ManagedBean
@RequestScoped
public class FileUploadBean {

private Part file;
private String fileName = "";

/**
* Creates a new instance of FileUploadBean
*/
public FileUploadBean() {
}

public Part getFile() {
return file;
}

public void setFile(Part file) {
this.file = file;
}

public String upload() {
try {
fileName = file.getSubmittedFileName() + " "
+ file.getSize() + " bytes";
String filePath = FacesContext.getCurrentInstance().getExternalContext()
.getRealPath("/upload") + "/" + file.getSubmittedFileName();
// luu file
file.write(filePath);
// luu du lieu
importXML(filePath);
} catch (Exception ex) {
System.out.println(ex.toString());
}
return "index";
}

public String getFileName() {
return fileName;
}

public void setFileName(String fileName) {
this.fileName = fileName;
}

private void importXML(String filename) {
try {
Class.forName("com.microsoft.sqlserver.jdbc.SQLServerDriver");
Connection conn = DriverManager.getConnection("jdbc:sqlserver://172.16.160.54\\sql2008;database=northwind;user=sa;password=sa;");
PreparedStatement comm = conn.prepareStatement("insert into Employees(FirstName,LastName) values(?,?)");

DocumentBuilderFactory fac = DocumentBuilderFactory.newInstance();
DocumentBuilder db = fac.newDocumentBuilder();
Document doc = db.parse(new File(filename));

NodeList list = doc.getElementsByTagName("emp");
int pos = 0;
while (pos < list.getLength()) {
NodeList emp = list.item(pos).getChildNodes();
comm.setString(1, emp.item(3).getTextContent());
comm.setString(2, "L_" + emp.item(3).getTextContent());
// them du lieu
comm.executeUpdate();
pos++;
}

fileName += "\n" + pos +" rows added!";
} catch (ClassNotFoundException ex) {
Logger.getLogger(FileUploadBean.class.getName()).log(Level.SEVERE, null, ex);
} catch (SQLException ex) {
Logger.getLogger(FileUploadBean.class.getName()).log(Level.SEVERE, null, ex);
} catch (ParserConfigurationException ex) {
Logger.getLogger(FileUploadBean.class.getName()).log(Level.SEVERE, null, ex);
} catch (SAXException ex) {
Logger.getLogger(FileUploadBean.class.getName()).log(Level.SEVERE, null, ex);
} catch (IOException ex) {
Logger.getLogger(FileUploadBean.class.getName()).log(Level.SEVERE, null, ex);
}
}
}
[/sourcecode]

Hiệu chỉnh lại trang index.xhtml
[sourcecode language="html"]
<?xml version='1.0' encoding='UTF-8' ?>
<!DOCTYPE html PUBLIC "-//W3C//DTD XHTML 1.0 Transitional//EN" "http://www.w3.org/TR/xhtml1/DTD/xhtml1-transitional.dtd">
<html xmlns="http://www.w3.org/1999/xhtml"
xmlns:h="http://xmlns.jcp.org/jsf/html"
xmlns:f="http://xmlns.jcp.org/jsf/core">
<h:head>
<title>Upload</title>
</h:head>
<h:body>
<f:view>
<h:form enctype="multipart/form-data">
<h:inputFile value="#{fileUploadBean.file}"/>
<h:commandButton value="Upload"
action="#{fileUploadBean.upload()}"/><br/>
File: <h:outputText value="#{fileUploadBean.fileName}"/>
</h:form>
</f:view>
</h:body>
</html>
[/sourcecode]

Chạy trang index.xhtml --> chọn file emp.xml chứa nội dung và nhấn Upload chúng ta có giao diện như sau:
Snap 2015-09-21 at 15.16.34

Mã nguồn tham khảo -->> ở đây

OK vậy là chúng ta đã import nội dung XML vào csdl.

Bài tập IXJ - FO sử dụng Apache FOP chuyển XML sang PDF

XSL-FO (XSL Formatting Objects) chuyển đổi dữ liệu XML sang các định dạng khác.
XSL - FO
Trong bài thực hành này chúng ta sẽ sử dụng thư viện FOP của Apache tích hợp vào chương trình Java để chuyển tài liệu XML chứa CustomerOrders mua sản phẩm sang biểu mẩu PDF.

CustomerOrders

Snap 2015-09-21 at 13.34.42

Các thư viện hỗ trợ -->> đây

Mã nguồn tham khảo như sau:
[sourcecode language="java"]
package fop_ex;
import java.io.File;
import java.io.OutputStream;
import javax.xml.transform.Result;
import javax.xml.transform.Source;
import javax.xml.transform.Transformer;
import javax.xml.transform.TransformerFactory;
import javax.xml.transform.sax.SAXResult;
import javax.xml.transform.stream.StreamSource;
import org.apache.fop.apps.FOUserAgent;
import org.apache.fop.apps.Fop;
import org.apache.fop.apps.FopFactory;
import org.apache.fop.apps.MimeConstants;
public class FOP_EX {
public static void main(String[] args) {
try {
// Setup directories
File baseDir = new File(".");
File outDir = new File(baseDir, "src/out");
outDir.mkdirs();
// Setup input and output files
File xmlfile = new File(baseDir, "src/xml/CustomerOrders.xml");
File xsltfile = new File(baseDir, "src/xslt/Customer_fo.xsl");
File pdffile = new File(outDir, "CustomerOrders.pdf");
// configure fopFactory as desired
final FopFactory fopFactory = FopFactory.newInstance(new File(".").toURI());
// configure foUserAgent as desired
FOUserAgent foUserAgent = fopFactory.newFOUserAgent();
// Setup output
OutputStream out = new java.io.FileOutputStream(pdffile);
out = new java.io.BufferedOutputStream(out);
try {
// Construct fop with desired output format
Fop fop = fopFactory.newFop(MimeConstants.MIME_PDF, foUserAgent, out);
// Setup XSLT
TransformerFactory factory = TransformerFactory.newInstance();
Transformer transformer = factory.newTransformer(new StreamSource(xsltfile));
// Set the value of a <param> in the stylesheet
transformer.setParameter("author", "Nguyen Van Mit");
// Setup input for XSLT transformation
Source src = new StreamSource(xmlfile);
// Resulting SAX events (the generated FO) must be piped through to FOP
Result res = new SAXResult(fop.getDefaultHandler());
// Start XSLT transformation and FOP processing
transformer.transform(src, res);
} finally {
out.close();
}
} catch (Exception e) {
e.printStackTrace(System.err);
System.exit(-1);
}
}
}
[/sourcecode]
File XSL-FO như sau:
[sourcecode language="xml"]
<?xml version="1.0" encoding="UTF-8"?>
<xsl:stylesheet version="1.1" xmlns:xsl="http://www.w3.org/1999/XSL/Transform" xmlns:fo="http://www.w3.org/1999/XSL/Format" exclude-result-prefixes="fo">
<xsl:output method="xml" version="1.0" omit-xml-declaration="no" indent="yes"/>
<xsl:param name="author" select="'Tran Van Cam'"/>
<xsl:template match="customers">
<fo:root xmlns:fo="http://www.w3.org/1999/XSL/Format">
<fo:layout-master-set>
<fo:simple-page-master master-name="simpleA4" page-height="29.7cm" page-width="21cm" margin-top="2cm" margin-bottom="2cm" margin-left="2cm" margin-right="2cm">
<fo:region-body/>
</fo:simple-page-master>
</fo:layout-master-set>
<fo:page-sequence master-reference="simpleA4">
<fo:flow flow-name="xsl-region-body">
<fo:block font-size="16pt" text-align="center" font-weight="bold" space-after="5mm">CUSTOMER ORDER LIST<xsl:value-of select="customers"/>
</fo:block>
<fo:block font-size="12pt" text-align="center" space-after="5mm">----oOo----</fo:block>
<fo:block font-size="10pt">
<fo:table table-layout="fixed" width="100%"
border-collapse="separate" border="solid"
border-separation="3pt">
<xsl:attribute-set name="table.cell.padding">
<xsl:attribute name="padding-left">2pt</xsl:attribute>
<xsl:attribute name="padding-right">2pt</xsl:attribute>
<xsl:attribute name="padding-top">2pt</xsl:attribute>
<xsl:attribute name="padding-bottom">2pt</xsl:attribute>
</xsl:attribute-set>
<fo:table-column column-width="2cm"/>
<fo:table-column column-width="5cm"/>
<fo:table-column column-width="2cm"/>
<fo:table-column column-width="3cm"/>
<fo:table-header>
<fo:table-row background-color="#0000FF" color="#FFFFFF">
<fo:table-cell text-align="center">
<fo:block>Order.</fo:block>
</fo:table-cell>
<fo:table-cell>
<fo:block>Customer name</fo:block>
</fo:table-cell>
<fo:table-cell>
<fo:block>Product name</fo:block>
</fo:table-cell>
<fo:table-cell text-align="right">
<fo:block>Quantity</fo:block>
</fo:table-cell>
<fo:table-cell text-align="right">
<fo:block>Price</fo:block>
</fo:table-cell>
</fo:table-row>
</fo:table-header>
<fo:table-body>
<xsl:apply-templates select="customer"/>
</fo:table-body>
</fo:table>
</fo:block>
<fo:block font-size="12pt" text-align="right" space-before="1cm">Signature</fo:block>
<fo:block font-size="12pt" text-align="right" space-before="2cm" space-after="5mm"> <xsl:value-of select="$author"/> </fo:block>
</fo:flow>
</fo:page-sequence>
</fo:root>
</xsl:template>
<xsl:template match="customer">
<xsl:variable name="bgclr">
<xsl:choose>
<xsl:when test="position() mod 2">#A7BFDE</xsl:when>
<xsl:otherwise>#EDF2F8</xsl:otherwise>
</xsl:choose>
</xsl:variable>
<fo:table-row background-color="{$bgclr}">
<xsl:if test="item='Laptop'">
<xsl:attribute name="font-weight">bold</xsl:attribute>
</xsl:if>
<fo:table-cell text-align="center">
<fo:block>
<xsl:value-of select="position()" format="1."/>
</fo:block>
</fo:table-cell>
<fo:table-cell>
<fo:block>
<xsl:value-of select="name"/>
</fo:block>
</fo:table-cell>
<fo:table-cell>
<fo:block>
<xsl:value-of select="item"/>
</fo:block>
</fo:table-cell>
<fo:table-cell text-align="right">
<fo:block>
<xsl:value-of select="quantity"/>
</fo:block>
</fo:table-cell>
<fo:table-cell text-align="right">
<xsl:attribute name="font-weight">bold</xsl:attribute>
<fo:block>
<xsl:value-of select="price"/>
</fo:block>
</fo:table-cell>
</fo:table-row>
</xsl:template>
</xsl:stylesheet>
[/sourcecode]
Căn bản là vậy !!!

Saturday, September 19, 2015

Bài tập IXJ - Schema Validator (DOM, SAX)

Mục tiêu:

  • Căn bản schema

  • Sử dụng dụng Validator để kiểm tra tính hợp lệ của dữ liệu XML


  • DOM

  • SAX


XML Schema là dạng tài liệu theo chuẩn XML được đề xuất bởi tổ chức W3C năm 2001. XML Schema được dùng để mô tả cấu trúc và các kiểu dữ liệu của một tài liệu XML thay thế cho chuẩn DTD (Document Type Definition) trước đây. Việc này giúp định nghĩa một tài liệu XML hợp lệ cũng như các metadata cần thiết để sử dụng trong nhiều loại ứng dụng và công nghệ hiện nay như XAML, ADO.NET, WebService,… Với schema chúng ta có thể định nghĩa cấu trúc cũng như kiểu dữ liệu cho mẫu XML được rõ ràng hơn.

Ví dụ với mẫu XML sau

[sourcecode language="xml"]
<emplist>
<emp status="off">
<id>1</id>
<name>Ngo Ngo Tuong Dan</name>
</emp>
<emp status="on">
<id>2</id>
<name>Andrew Fuller</name>
</emp>
<emp status="on">
<id1>3</id1>
<name>Janet Leverling</name>
</emp>
</emplist>
[/sourcecode]

Chúng ta có thể định nghĩa schema như sau (có thể sử dụng netbean để tạo mẫu xsd)

[sourcecode language="xml"]
<?xml version="1.0"?> <!-- Một số kiểu dữ liệu
xs:string , xs:decimal , xs:integer
xs:boolean, xs:date , xs:time -->
<!-- tham chiếu đến namespace của schema-->
<xs:schema version="1.0" xmlns:xs="http://www.w3.org/2001/XMLSchema" elementFormDefault="qualified">
<xs:element name="emplist">
<!-- mô tả cho kiểu phức tạp-->
<xs:complexType>
<xs:sequence>
<!-- mô tả một element/node.
maxOccurs="unbounded" ==> là không hạn chế số thẻ con
maxOccurs="1" là giá trị mặc định ==> một thẻ con duy nhất
maxOccurs="0" là thẻ rổng -->
<xs:element name="emp" maxOccurs="unbounded">
<xs:complexType>
<!-- các thẻ con của thẻ hiện tại-->
<xs:sequence>
<xs:element name="id" type="xs:integer" />
<xs:element name="name" type="xs:string" />
</xs:sequence>
<!-- thuộc tính của thẻ hiện tại-->
<xs:attribute name="status" type="xs:string"/>
</xs:complexType>
</xs:element>
</xs:sequence>
</xs:complexType>
</xs:element>
</xs:schema>
[/sourcecode]

Tham khảo ghi chú trong ví dụ trên để biết thêm về xml schema
Trong Java để có thể kiểm tra tính hợp lệ của mẫu XML trên như sau:

[sourcecode language="java"]
import java.io.File;
import javax.xml.XMLConstants;
import javax.xml.parsers.DocumentBuilder;
import javax.xml.parsers.DocumentBuilderFactory;
import javax.xml.transform.Source;
import javax.xml.transform.stream.StreamSource;
import javax.xml.validation.Schema;
import javax.xml.validation.SchemaFactory;
import javax.xml.validation.Validator;
import org.w3c.dom.Document;
import javax.xml.transform.dom.DOMSource;
import org.xml.sax.ErrorHandler;
import org.xml.sax.SAXException;
import org.xml.sax.SAXParseException;

public class EMPValidator {

public static void main(String[] args) {
try {
// create an object of DocumentBuilder class
DocumentBuilder parser = DocumentBuilderFactory.newInstance().newDocumentBuilder();
// parse an XML document into a DOM tree
Document document = parser.parse("src/emp.xml");
// create a SchemaFactory capable of understanding WXS schemas
SchemaFactory factory = SchemaFactory.newInstance(XMLConstants.W3C_XML_SCHEMA_NS_URI);
// create an object of Source class
Source schemaFile = new StreamSource(new File("src/emp.xsd"));
// load a WXS schema, represented by a Schema instance
Schema schema = factory.newSchema(schemaFile);
// create a Validator instance, which can be used to validate an instance document
Validator validator = schema.newValidator();
// register for listening the error while XML parsing
ErrHandler err = new ErrHandler();
validator.setErrorHandler(err);
// validate the DOM tree
validator.validate(new DOMSource(document));

System.out.println("emp.xml document is valid!");
} catch (Exception ex) {
ex.printStackTrace();
}
}

public static class ErrHandler implements ErrorHandler
{
public void warning(SAXParseException exception) throws SAXException {
System.out.println("warning: "+ exception.toString());
}

public void error(SAXParseException exception) throws SAXException {
System.out.println("error: "+ exception.toString());
}

public void fatalError(SAXParseException exception) throws SAXException {
System.out.println("fatalError: "+ exception.toString());
}
}
}
[/sourcecode]

Đến đây chạy code trên chúng ta sẽ nhận được thông báo

emp.xml document is valid!

Việc quản lý lỗi trong quá trình kiểm tra sẽ do ErrorHandler xử lý như code trên.

Tương tự như vậy cho SAX

[sourcecode language="java"]
try {
System.out.println("Validating xml document with SAX");
InputSource is = new InputSource(new BufferedReader(new FileReader(xmlDocument2)));
SchemaFactory sf = SchemaFactory.newInstance(XMLConstants.W3C_XML_SCHEMA_NS_URI);
Source src = new StreamSource(schema2);

Schema schema = sf.newSchema(src);
Validator valid = schema.newValidator();

valid.validate(new SAXSource(is));

System.out.println("Document is valid !");
System.out.println("-----------------------------------------------");
} catch (Exception ex) {
System.out.println("Document is invalid !");
System.out.println("-----------------------------------------------");
}
[/sourcecode]

Thursday, September 17, 2015

Bài tập IXJ - Sử dụng XPath - XQuery trong Java

Mục tiêu: Tìm hiểu một số bước căn bản để chạy một đường dần theo qui ước XPath trong Java.
Về XPath là gì có thể tham khảo Căn bản XPath hay XPaht Tiếng việt trang 23

Ví dụ file XML như sau (Bài tập 1 DOM):

[sourcecode language="xml"]
<?xml version="1.0" encoding="UTF-8" standalone="no"?>
<emplist>
<!--danh sach nhan vien-->
<emp status="on">
<id>1</id>
<name>Nancy Davolio</name>
</emp>
<emp status="on">
<id>2</id>
<name>Andrew Fuller</name>
</emp>
<emp status="on">
<id>3</id>
<name>Janet Leverling</name>
</emp>
<emp status="on">
<id>4</id>
<name>Margaret Peacock</name>
</emp>
<emp status="on">
<id>5</id>
<name>Steven Buchanan</name>
</emp>
<emp status="on">
<id>6</id>
<name>Michael Suyama</name>
</emp>
<emp status="on">
<id>7</id>
<name>Robert King</name>
</emp>
<emp status="on">
<id>8</id>
<name>Laura Callahan</name>
</emp>
<emp status="on">
<id>9</id>
<name>Anne Dodsworth</name>
</emp>
<emp status="on">
<id>10</id>
<name> </name>
</emp>
<emp status="on">
<id>11</id>
<name> </name>
</emp>
<emp status="on">
<id>12</id>
<name>mit nguyen</name>
</emp>
<!--Nhan vien cuoi cung-->
<emp status="on">
<id>13</id>
<name>mit nguyen</name>
</emp>
</emplist>
[/sourcecode]

Thiết kế XPath lấy tên nhân viên có thuộc tính status = on

[sourcecode language="java"]
//emplist/emp[@status='on']/name
[/sourcecode]

Để phân tích XPath Java cung cấp 2 Interface XPathFactoryXPath.
Code mẫu phân tích và hiển thị tên nhân viên như sau:

[sourcecode language="java"]
public static void main(String[] args) {
int count = 0;
try {
// load XML tao DOM tree
DocumentBuilderFactory factory = DocumentBuilderFactory.newInstance();
DocumentBuilder builder = factory.newDocumentBuilder();
Document doc = builder.parse(new File("src/emp.xml"));
// Xu ly tim kiem qua XPath
// Khoi tao doi tuong phan tich xpath
XPathFactory xpathFactory = XPathFactory.newInstance();
// tao xpath
XPath xpath = xpathFactory.newXPath();
// tao duong dan tren xml va gan phan tich voi xpath
// ham evaluate de tien hanh phan tich
NodeList list = (NodeList) xpath.evaluate("//emplist/emp[@status='on']/name",
doc, XPathConstants.NODESET);
for (int i = 0; i < list.getLength(); i++) {
// hiển thị tên
System.out.println("Name:"+list.item(i).getTextContent());
}
} catch (Exception e) {
e.printStackTrace();
}
}
[/sourcecode]

Chạy code trên ta có như sau:
[sourcecode language="html"]
Name:Nancy Davolio
Name:Andrew Fuller
Name:Janet Leverling
Name:Margaret Peacock
Name:Steven Buchanan
Name:Michael Suyama
Name:Robert King
Name:Laura Callahan
Name:Anne Dodsworth
Name:
Name:
Name:mit nguyen
Name:mit nguyen
[/sourcecode]
Cùng ý nghĩa như trên chúng ta có thể sử dụng XQuery như sau:

[sourcecode language="java"]
import java.io.File;
import nu.xom.Builder;
import nu.xom.Document;
import nu.xom.Nodes;
import nux.xom.xquery.XQueryUtil;
public class XQueryExample {
public static void main(String[] args) {
try {
// Parse XML document with XOM
Document doc = new Builder().build(new File("src/emp.xml"));
// Call the xquery method of the XQueryUtil class to query the XML document.
Nodes nodes = XQueryUtil.xquery(doc, "//emplist/emp");
// Print employees
System.out.print("There are " + nodes.size() + " employees ");
nodes = XQueryUtil.xquery(doc, "//emplist/emp[@status='on']/name");
// Print employees who have been work
System.out.println("but " + nodes.size() + " of them is working !");
for (int i = 0; i < nodes.size(); i++) {
System.out.println("Name: "+nodes.get(i).getValue());
}
} catch (Exception e) {
System.out.println(e.toString());
}
}
}
[/sourcecode]
Kết quả:
[sourcecode language="html"]
There are 13 employees but 12 of them is working !
Name: Nancy Davolio
Name: Andrew Fuller
Name: Janet Leverling
Name: Margaret Peacock
Name: Steven Buchanan
Name: Michael Suyama
Name: Robert King
Name: Laura Callahan
Name: Anne Dodsworth
Name:
Name:
Name: mit nguyen
[/sourcecode]

Download thư viện hỗ trợ tại đây

OK, Trên đây chỉ là một ví dụ nhỏ đề hình dung về XPath trong môn học IXJ mà thôi.

Wednesday, September 16, 2015

Bài tập IXJ (JAXB)

JAXB, stands for Java Architecture for XML Binding, using JAXB annotation to convert Java object to / from XML file.
In this tutorial, we show you how to use JAXB to do following stuffs

  1. Marshalling – Convert a Java object into a XML file.

  2. Unmarshalling – Convert XML content into a Java Object.


Working with JAXB is easy, just annotate object with JAXB annotation, later use jaxbMarshaller.marshal() or jaxbMarshaller.unmarshal() to do the object / XML conversion.

Create Java class
[sourcecode language="java"]
import javax.xml.bind.annotation.XmlAttribute;
import javax.xml.bind.annotation.XmlElement;
import javax.xml.bind.annotation.XmlRootElement;

// Customer will become root node in XML file
@XmlRootElement
public class Customer {
String name;
int age;
int id;
public String getName() {
return name;
}
//Name as tag
@XmlElement
public void setName(String name) {
this.name = name;
}
public int getAge() {
return age;
}
// Age as tag
@XmlElement
public void setAge(int age) {
this.age = age;
}
public int getId() {
return id;
}
// id as attribute of customer tag
@XmlAttribute
public void setId(int id) {
this.id = id;
}
}
[/sourcecode]

Convert Object to XML: JAXB marshalling example, convert customer object into a XML file. The jaxbMarshaller.marshal() contains a lot of overloaded methods, find one that suit your output.
[sourcecode language="java"]
import java.io.File;
import javax.xml.bind.JAXBContext;
import javax.xml.bind.JAXBException;
import javax.xml.bind.Marshaller;

public class JAXBExample {
public static void main(String[] args) {
// create customer object
Customer customer = new Customer();
customer.setId(100);
customer.setName("nvmit");
customer.setAge(29);
try {
File file = new File("C:\\file.xml");
JAXBContext jaxbContext = JAXBContext.newInstance(Customer.class);
Marshaller jaxbMarshaller = jaxbContext.createMarshaller();
// output pretty printed
jaxbMarshaller.setProperty(Marshaller.JAXB_FORMATTED_OUTPUT, true);
// convert to XML and write to file
jaxbMarshaller.marshal(customer, file);
jaxbMarshaller.marshal(customer, System.out);
} catch (JAXBException e) {
e.printStackTrace();
}
}
}
[/sourcecode]
Run this code, we have XML as
[sourcecode language="xml"]
<?xml version="1.0" encoding="UTF-8" standalone="yes"?>
<customer id="100">
<age>29</age>
<name>nvmit</name>
</customer>
[/sourcecode]

Convert XML to Object: JAXB unmarshalling example, convert a XML file content into a customer object. The jaxbMarshaller.unmarshal() contains a lot of overloaded methods
[sourcecode language="java"]
import java.io.File;
import javax.xml.bind.JAXBContext;
import javax.xml.bind.JAXBException;
import javax.xml.bind.Unmarshaller;

public class JAXBExample {
public static void main(String[] args) {
try {
File file = new File("C:\\file.xml");
JAXBContext jaxbContext = JAXBContext.newInstance(Customer.class);
Unmarshaller jaxbUnmarshaller = jaxbContext.createUnmarshaller();
Customer customer = (Customer) jaxbUnmarshaller.unmarshal(file);
System.out.println(customer);
} catch (JAXBException e) {
e.printStackTrace();
}
}
}
[/sourcecode]

Run this code
Customer [name=nvmit, age=29, id=100]

OK, very simple.

Friday, September 11, 2015

SAX căn bản - phân tích XML (dữ liệu thời tiết trực tuyến)

Ví dụ sử dụng SAX phân tích nội dung XML trực tuyến (thông tin dự báo thời tiết)
Nội dung XML
Snap 2015-09-11 at 16.27.57
Nội dung hiện thị sau phân tích
Snap 2015-09-11 at 16.28.14
Mã nguồn ví dụ
[sourcecode language="java"]
package codes;
import java.io.IOException;
import java.net.MalformedURLException;
import java.net.URL;
import java.net.URLConnection;
import java.util.logging.Level;
import java.util.logging.Logger;
import javax.xml.parsers.ParserConfigurationException;
import javax.xml.parsers.SAXParser;
import javax.xml.parsers.SAXParserFactory;
import org.xml.sax.Attributes;
import org.xml.sax.InputSource;
import org.xml.sax.SAXException;
import org.xml.sax.helpers.DefaultHandler;
/**
* @author ntdan
*/
public class SAXParser_RSS extends DefaultHandler {
String urlPath = "http://api.openweathermap.org/data/2.5/forecast?q=can+tho,vn&mode=xml";
String strresult = "";
int count = 1;
boolean namefound = false;
boolean itemfound = false;

public String parse() {
try {
SAXParserFactory fac = SAXParserFactory.newInstance();
SAXParser sax = fac.newSAXParser();
// ket noi truc tiep
URL url = new URL(urlPath);
URLConnection conn = url.openConnection();
InputSource in = new InputSource(conn.getInputStream());
// phan tich tu luon truc tuyen
sax.parse(in, this);
return strresult;
} catch (ParserConfigurationException ex) {
Logger.getLogger(SAXParser_RSS.class.getName()).log(Level.SEVERE, null, ex);
} catch (SAXException ex) {
Logger.getLogger(SAXParser_RSS.class.getName()).log(Level.SEVERE, null, ex);
} catch (MalformedURLException ex) {
Logger.getLogger(SAXParser_RSS.class.getName()).log(Level.SEVERE, null, ex);
} catch (IOException ex) {
Logger.getLogger(SAXParser_RSS.class.getName()).log(Level.SEVERE, null, ex);
}
return strresult;
}

@Override
public void characters(char[] ch, int start, int length) throws SAXException {
super.characters(ch, start, length); //To change body of generated methods, choose Tools | Templates.

if (namefound) {
strresult += "<b>Location</b>: " + new String(ch, start, length) + "!<br/>";
namefound = false;
}
}

@Override
public void endElement(String uri, String localName, String qName) throws SAXException {
super.endElement(uri, localName, qName); //To change body of generated methods, choose Tools | Templates.

if (qName.equalsIgnoreCase("item")) {
strresult += "<br/>";
itemfound = false;
}
}

@Override
public void startElement(String uri, String localName, String qName, Attributes attributes) throws SAXException {
super.startElement(uri, localName, qName, attributes); //To change body of generated methods, choose Tools | Templates.
if (qName.equalsIgnoreCase("name")) {
namefound = true;
}

if (qName.equalsIgnoreCase("item")) {
itemfound = true;
}

if (qName.equalsIgnoreCase("time")) {
strresult += count++ + ". <i>Time<i> <b>From</b>: " + attributes.getValue("from")
+ " <b>To</b>: " + attributes.getValue("to");
}

if (qName.equalsIgnoreCase("humidity")) {
strresult += " <i>Humidity</i>: " + attributes.getValue("value")
+ attributes.getValue("unit") + "<br/>";
}

if (qName.equalsIgnoreCase("temperature")) {
strresult += " <b>Temperature</b>: <b>from</b> "
+ attributes.getValue("min") + " <b>to</b> "
+ attributes.getValue("max") + "-"
+ attributes.getValue("unit");
}
}

@Override
public void endDocument() throws SAXException {
super.endDocument(); //To change body of generated methods, choose Tools | Templates.
strresult += "<br/>End parsing ...";
}

@Override
public void startDocument() throws SAXException {
super.startDocument(); //To change body of generated methods, choose Tools | Templates.
strresult += "Start parsing ... <br/>";
}
}
[/sourcecode]

goodluck!!!

Parsing XML using DOM (Basic)

Objectives

  1. Overview XML parse using DOM

  2. Create DOM with content loaded from SQL Server

  3. Save DOM to XML file

  4. Find information in XML file

  5. Update content in XML file


    1. Load Data form XML
      Create java class JavaApplication1 and declare 02 variable
      static ResultSet rs;
      static Document doc;

      Load Data from Employees table
      [sourcecode language="java"]
      Class.forName("com.microsoft.sqlserver.jdbc.SQLServerDriver");
      Connection conn = DriverManager.getConnection("jdbc:sqlserver://"
      + "172.16.160.81\\sql2008;database=northwind;user=sa;password=sa;");
      PreparedStatement comm = conn.prepareStatement(""
      + "Select EmployeeID, FirstName,LastName From Employees");
      rs = comm.executeQuery();
      [/sourcecode]
      Create createDom method to transform RS to DOM
      [sourcecode language="java"]
      void createDom() {
      try {
      DocumentBuilderFactory fac = DocumentBuilderFactory.newInstance();
      DocumentBuilder db = fac.newDocumentBuilder();
      doc = db.newDocument();

      Element root = doc.createElement("emplist");
      // tao nut goc
      doc.appendChild(root);

      Comment comment = doc.createComment("danh sach nhan vien");
      // tao nut goc
      root.appendChild(comment);

      // doc du lieu va tao lai voi xml
      while (rs.next()) {
      // tao the emp
      Element emp = doc.createElement("emp");
      emp.setAttribute("status", "on");
      // the id
      Element id = doc.createElement("id");
      id.setTextContent(rs.getString("EmployeeID"));
      emp.appendChild(id);

      // the name
      Element name = doc.createElement("name");
      name.setTextContent(rs.getString("FirstName") + " " + rs.getString("LastName"));
      emp.appendChild(name);

      // gan vao root
      root.appendChild(emp);
      }
      Comment comment1 = doc.createComment("Nhan vien cuoi cung");
      // gan ghi chu vao phan tu cuoi cung
      root.insertBefore(comment1, root.getLastChild());
      } catch (Exception ex) {
      Logger.getLogger(JavaApplication1.class.getName()).log(Level.SEVERE, null, ex);
      }
      }
      [/sourcecode]
      Write DOM to XML file
      [sourcecode language="java"]
      void writeToXML(String filename) {
      try {

      if(new File(filename).exists())
      {
      if(JOptionPane.showConfirmDialog(
      null, filename + " đ? t?n t?i ! \nB?n có mu?n ghi đè không?",
      "Xác nh?n!", JOptionPane.YES_NO_OPTION) == JOptionPane.NO_OPTION)
      return;
      }

      // Create a DOM document for writing
      Source source = new DOMSource(doc);
      // Prepare the output file
      Result result = new StreamResult(filename);
      // Create an instance of Transformer
      Transformer xformer = TransformerFactory.newInstance().newTransformer();
      xformer.setOutputProperty(OutputKeys.OMIT_XML_DECLARATION, "no");
      xformer.setOutputProperty(OutputKeys.INDENT, "yes");
      xformer.setOutputProperty("{http://xml.apache.org/xslt}indent-amount", "4");
      // Write the DOM document to the file
      xformer.transform(source, result);
      } catch (TransformerException ex) {
      System.out.println(ex.toString());
      }
      }
      [/sourcecode]
      Update status attribute of emp tag with content of id tag equal id
      [sourcecode language="java"]
      void deactive(int id) {
      // lay danh sach cac the con
      NodeList list = doc.getElementsByTagName("emp");
      // duyet qua ca the con
      for (int i = 0; i < list.getLength(); i++) {
      // tim con dau tien (the id) va kiem tra gia tri
      // neu bang voi id thi thuc hien
      if (Integer.parseInt(list.item(i).getFirstChild().getTextContent()) == id) {
      // cap nhat gia tri thuoc tinh status cua the emp
      list.item(i).getAttributes().getNamedItem("status").setNodeValue("off");
      break;
      }
      }
      }
      [/sourcecode]
      Find an employee in XML file with id tag content equal id
      [sourcecode language="java"]
      boolean exist(int id) {
      try {
      DocumentBuilderFactory fac = DocumentBuilderFactory.newInstance();
      DocumentBuilder db = fac.newDocumentBuilder();
      doc = db.parse(new File("src/emp.xml"));
      // lay danh sach cac the con
      NodeList list = doc.getElementsByTagName("id");
      // duyet qua ca the con
      for (int i = 0; i < list.getLength(); i++) {
      // tim con dau tien (the id) va kiem tra gia tri
      // neu bang voi id thi thuc hien
      if (Integer.parseInt(list.item(i).getTextContent()) == id) {
      return true;
      }
      }
      } catch (ParserConfigurationException ex) {
      Logger.getLogger(JavaApplication1.class.getName()).log(Level.SEVERE, null, ex);
      } catch (SAXException ex) {
      Logger.getLogger(JavaApplication1.class.getName()).log(Level.SEVERE, null, ex);
      } catch (IOException ex) {
      Logger.getLogger(JavaApplication1.class.getName()).log(Level.SEVERE, null, ex);
      }

      return false;
      }
      [/sourcecode]
      Add new emp tag to existing XML file if emp id tag do not exist in XML file
      [sourcecode language="java"]
      void add(int newId, String newName) {
      try {
      DocumentBuilderFactory fac = DocumentBuilderFactory.newInstance();
      DocumentBuilder db = fac.newDocumentBuilder();
      doc = db.parse(new File("src/emp.xml"));

      if (exist(newId)) {
      JOptionPane.showMessageDialog(null, newId + " đ? t?n t?i !");
      return;
      }

      // lay the emplist
      Node root = doc.getDocumentElement();

      // tao the emp
      Element emp = doc.createElement("emp");
      emp.setAttribute("status", "on");
      // the id
      Element id = doc.createElement("id");
      id.setTextContent(newId + "");
      emp.appendChild(id);

      // the name
      Element name = doc.createElement("name");
      name.setTextContent(newName);
      emp.appendChild(name);

      // gan vao root
      root.appendChild(emp);

      } catch (ParserConfigurationException ex) {
      Logger.getLogger(JavaApplication1.class.getName()).log(Level.SEVERE, null, ex);
      } catch (SAXException ex) {
      Logger.getLogger(JavaApplication1.class.getName()).log(Level.SEVERE, null, ex);
      } catch (IOException ex) {
      Logger.getLogger(JavaApplication1.class.getName()).log(Level.SEVERE, null, ex);
      }
      }
      [/sourcecode]
      Test app
      [sourcecode language="java"]
      public class JavaApplication1 {

      static ResultSet rs;
      static Document doc;

      /**
      * @param args the command line arguments
      */
      public static void main(String[] args) {
      try {
      Class.forName("com.microsoft.sqlserver.jdbc.SQLServerDriver");
      Connection conn = DriverManager.getConnection("jdbc:sqlserver://"
      + "172.16.160.81\\sql2008;database=northwind;user=sa;password=sa;");
      PreparedStatement comm = conn.prepareStatement(""
      + "Select EmployeeID, FirstName,LastName From Employees");

      rs = comm.executeQuery();

      JavaApplication1 xmlDOM = new JavaApplication1();
      // tao doi tuong t? SQL Server
      xmlDOM.createDom();
      // ghi ra file
      xmlDOM.writeToXML("src/emp.xml");
      // cap nhat
      xmlDOM.deactive(5);
      // luu thay doi
      xmlDOM.writeToXML("src/emp.xml");
      // them node
      xmlDOM.add(100, "Nguyen Van Mit");
      // luu thay doi
      xmlDOM.writeToXML("src/emp.xml");

      } catch (Exception ex) {
      System.out.println(ex.toString());
      }
      }

      }
      [/sourcecode]

      }
      }

      Shifl + F6 to run
  • Tuesday, September 8, 2015

    Monday, June 8, 2015

    Jersey file upload (java restful)

    Objectives


    1. Describe step by step upload media to server through Restful services (using jersey)

    2. Demo: build register page with text field and file field


    Input user info


    rest1

    Upload result


    rest2

    First:


    Design client page
    [sourcecode language="html"]
    <html>
    <head>
    <title>Demo jersey file upload</title>
    <meta charset="UTF-8">
    <meta name="viewport"
    content="width=device-width, initial-scale=1.0">
    </head>
    <body>
    <H1>Demo jersey file upload</H1>
    <form action="rest/files/reg" method="POST"
    enctype="multipart/form-data">
    Name:<br/>
    <input type="Text" name="txtName"/><br/>
    Picture:<br/>
    <input type="file" name="file"/><br/><br/>
    <input type="submit" value="Upload" />
    </form>
    </body>
    </html>
    [/sourcecode]

    Next:


    - Create restful service with uri as rest/files/reg
    - Design function to handle above uri as below

    [sourcecode language="java"]
    @POST
    @Path("/reg")
    @Consumes(MediaType.MULTIPART_FORM_DATA)
    @Produces("text/xml")
    public String uploadFile(FormDataMultiPart form,
    @FormDataParam("txtName") String name) {
    FormDataBodyPart filePart = form.getField("file");
    ContentDisposition headerOfFile = filePart.getContentDisposition();
    InputStream fileInput = filePart.getValueAs(InputStream.class);
    String imgPath = application.getRealPath("") + "\\imgs\\" + headerOfFile.getFileName();
    int size = 0;
    int read = 0;
    try (OutputStream outpuStream = new FileOutputStream(new File(imgPath))) {
    byte[] bytes = new byte[1024];
    while ((read = fileInput.read(bytes)) != -1) {
    outpuStream.write(bytes, 0, read);
    size += read;
    }
    outpuStream.flush();
    } catch (Exception e) {
    return "<result>"+e.toString()+"</result>";
    }
    NumberFormat f = NumberFormat.getNumberInstance(Locale.ENGLISH);
    String rs = "<result>"
    + "<name>" + name + "</name>"
    + "<url>"
    + application.getContextPath() + "/imgs/" + headerOfFile.getFileName()
    + "</url>"
    + "<fileInfo>"
    + "<size>" + f.format(size) + " bytes</size>"
    + "<type>" + filePart.getMediaType()+ "</type>"
    + "<uploadDate>"
    + Calendar.getInstance().getTime().toString()
    + "</uploadDate>"
    + "</fileInfo>"
    + "</result>";
    return rs;
    }
    [/sourcecode]

    - @Consumes(MediaType.MULTIPART_FORM_DATA) map a data from to restful function
    - FormDataBodyPart filePart = form.getField("file"); extract file field on the form
    - ContentDisposition headerOfFile = filePart.getContentDisposition(); get user file information

    notes:
    - lib for this demo: jersey, jersey-multipart.

    Download source code

    Thursday, November 20, 2014

    Mã hóa dữ liệu khi lưu trữ trong ứng dụng Java + SQL Server

    Thông thường dữ liệu các nhân của người dùng khi lưu trữ vào csdl chúng ta nên che đi những dữ liệu nhạy cảm, trong ví dụ sau đây chúng ta cùng làm một demo nhỏ để che đi dữ liệu email và ngày sinh của người dùng (chỉ có ứng dụng của chúng ta mới giải mã được)

    Tạo bảng để lưu được thông tin sau:
    Order.    Name        Type
    1.    Username    Text
    2.    Password    Text
    3.    Fullname    Text
    4.    Address     Text
    5.    Email       Text
    6.    Birthdate   Date

    Yêu cầu

    Thiết kế form thêm thông tin người dùng vào bảng trên với các yêu cầu sau:
        1.    Mã hóa Password bằng giải thuật MD5
        2.    Mã hóa email và birthdate bằng giải thật mã hóa 02 chiều

    Thiết kế form hiển thị ds người dùng thể hiện các cột: Username, Fullname và Address
    Thiết kế form tìm người dùng dựa vào Username, kết quả hiển thị chi tiết người dùng gồm thông tin
           Username
        •    Fullname
        •    Address
        •    Email và Birthdate đã được giải mã

    Giao diên thêm và tìm thông tin

    image Dữ liệu đã mã hóa

    image Dữ liệu được giải mã (nhấn nút find)

    image

    Bước 1: Tạo CSDL tên data và bảng nguoidung

    1 SET ANSI_NULLS ON
    2 GO
    3
    4 SET QUOTED_IDENTIFIER ON
    5 GO
    6
    7 SET ANSI_PADDING ON
    8 GO
    9
    10 CREATE TABLE [dbo].[users](
    11 [username] [varchar](50) NULL,
    12 [password] [varchar](100) NULL,
    13 [fullname] [varchar](100) NULL,
    14 [address] [varchar](250) NULL,
    15 [email] [varbinary](max) NULL,
    16 [birthdate] [varbinary](max) NULL
    17 ) ON [PRIMARY] TEXTIMAGE_ON [PRIMARY]
    18
    19 GO
    20
    21 SET ANSI_PADDING OFF
    22 GO

    Bước 2: Tạo cập khóa cho ứng dụng và lưu trữ lại để sử dụng (file)


    1 class KeyGen {
    2 public static void main(String[] args) {
    3 try {
    4 if (!new File("src/lib/pri.key").exists()) {
    5 KeyPairGenerator key = KeyPairGenerator.getInstance("RSA");
    6 key.initialize(512);
    7 KeyPair keys = key.genKeyPair();
    8 // Tạo cặp khóa
    9 PrivateKey privateKey = keys.getPrivate();
    10 PublicKey publicKey = keys.getPublic();
    11 // Lưu thông tin khóa để tái sử dụng, khóa công khai để giải mã
    12 X509EncodedKeySpec x509EncodedKeySpec =
    13 new X509EncodedKeySpec(publicKey.getEncoded());
    14 FileOutputStream fos = new FileOutputStream("src/lib/pub.key");
    15 fos.write(x509EncodedKeySpec.getEncoded());
    16 fos.close();
    17 // khóa mật để mã hóa
    18 PKCS8EncodedKeySpec pkcs8EncodedKeySpec =
    19 new PKCS8EncodedKeySpec(privateKey.getEncoded());
    20 fos = new FileOutputStream("src/lib/pri.key");
    21 fos.write(pkcs8EncodedKeySpec.getEncoded());
    22 fos.close();
    23 } else {
    24 System.out.println("Khoa da co");
    25 }
    26 } catch (IOException ex) {
    27 Logger.getLogger(KeyGen.class.getName()).log(Level.SEVERE, null, ex);
    28 } catch (NoSuchAlgorithmException ex) {
    29 Logger.getLogger(KeyGen.class.getName()).log(Level.SEVERE, null, ex);
    30 }
    31 }
    32 }


    Tới đây chúng ta đã có được cặp khóa để có thể mã hóa và giải mã những dữ liệu cần thiết.


    Bước 3: Xây dựng lớp Encode để phục hồi khóa từ tập tin và tạo phương thức mã hóa, giải mã.


    1 public class Encode {
    2 private PrivateKey priKey;
    3 private PublicKey pubKey;
    4 public Encode() {
    5 getKeys();
    6 }
    7 private void getKeys() {
    8 try {
    9 File pubKeyFile = new File("src/lib/pub.key");
    10 File privKeyFile = new File("src/lib/pri.key");;
    11 // đọc dữ liệu từ file và khởi tọa lại khóa công khai
    12 DataInputStream dis = new DataInputStream(new FileInputStream(pubKeyFile));
    13 byte[] pubKeyBytes = new byte[(int) pubKeyFile.length()];
    14 dis.readFully(pubKeyBytes);
    15 dis.close();
    16
    17 // đọc dữ liệu từ file và khởi tọa lại khóa mật
    18 dis = new DataInputStream(new FileInputStream(privKeyFile));
    19 byte[] privKeyBytes = new byte[(int) privKeyFile.length()];
    20 dis.read(privKeyBytes);
    21 dis.close();
    22 //
    23 KeyFactory keyFactory = KeyFactory.getInstance("RSA");
    24 // Tạo khóa công khai
    25 X509EncodedKeySpec pubSpec = new X509EncodedKeySpec(pubKeyBytes);
    26 pubKey = (RSAPublicKey) keyFactory.generatePublic(pubSpec);
    27 // tạo khóa mật
    28 PKCS8EncodedKeySpec privSpec = new PKCS8EncodedKeySpec(privKeyBytes);
    29 priKey = (RSAPrivateKey) keyFactory.generatePrivate(privSpec);
    30 } catch (Exception ex) {
    31 System.out.println("ERR: " + ex.toString());
    32 }
    33 }
    34 // hàm mã hóa
    35 public byte[] TwowayEncrypt(byte[] data) {
    36 try {
    37 Cipher c = Cipher.getInstance("RSA");
    38 c.init(Cipher.ENCRYPT_MODE, priKey);
    39 byte[] rs = c.doFinal(data);
    40 return rs;
    41 } catch (Exception ex) {
    42 System.out.println("Err: " + ex.toString());
    43 }
    44 return null;
    45 }
    46 // hàm giải mã
    47 public byte[] TwowayDecrypt(byte[] data) {
    48 try {
    49 Cipher c = Cipher.getInstance("RSA");
    50 c.init(Cipher.DECRYPT_MODE, pubKey);
    51 byte[] rs = c.doFinal(data);
    52 return rs;
    53 } catch (Exception ex) {
    54 System.out.println("Err: " + ex.toString());
    55 }
    56 return null;
    57 }
    58 // dùng cho mã hóa mật khẩu
    59 public byte[] OnewayEncrypt(byte[] data){
    60 try {
    61 MessageDigest dig = MessageDigest.getInstance("MD5");
    62 return dig.digest(data);
    63 } catch (Exception ex) {
    64 System.out.println("ERR: "+ ex.toString());
    65 }
    66 return null;
    67 }
    68 }


    Bước 4: Tích hợp lên giao diện


    Xử lý sự kiện Click nút Add new


    1 private void btnAddActionPerformed(java.awt.event.ActionEvent evt) {
    2 try {
    3 Connection conn = DriverManager.getConnection("jdbc:sqlserver://ntdan;databasename=data;", "sa", "sa");
    4 PreparedStatement comm = conn.prepareStatement("Insert into users values(?,?,?,?,?,?)");
    5 comm.setString(1, txtUser.getText());
    6
    7 byte[] ba1 = Charset.forName("UTF-8").encode(CharBuffer.wrap(txtPass.getPassword())).array();
    8
    9 comm.setString(2, new String(encode.OnewayEncrypt(ba1), "UTF-8"));
    10 comm.setString(3, txtFull.getText());
    11 comm.setString(4, txtAdd.getText());
    12
    13 comm.setBytes(5,encode.TwowayEncrypt(txtEmail.getText().getBytes("UTF-8")));
    14 comm.setBytes(6, encode.TwowayEncrypt(txtBirth.getText().getBytes("UTF-8")));
    15
    16 comm.executeUpdate();
    17 } catch (Exception ex) {
    18 System.out.println("ERR: " + ex.toString());
    19 }
    20 }

    Xử lý sự kiện Click nút Find


    1 private void btnFindActionPerformed(java.awt.event.ActionEvent evt) {
    2 try {
    3 Connection conn = DriverManager.getConnection("jdbc:sqlserver://ntdan;databasename=data;", "sa", "sa");
    4 PreparedStatement comm = conn.prepareStatement("Select * from Users where username=?");
    5 comm.setString(1, txtUser.getText());
    6 ResultSet rs = comm.executeQuery();
    7 String found="";
    8 if(rs.next())
    9 {
    10 found = "User: ";
    11 found += rs.getString(1);
    12 found += "\nFullname: "+rs.getString(3);
    13 found += "\nAddress: "+rs.getString(4);
    14 found += "\nEmail: "+ new String(encode.TwowayDecrypt(rs.getBytes(5)),"UTF-8");
    15 found += "\nBirthDate: "+ new String(encode.TwowayDecrypt(rs.getBytes(6)),"UTF-8");
    16 }
    17
    18 JOptionPane.showMessageDialog(this, found);
    19 } catch (Exception ex) {
    20 System.out.println("Err: "+ ex.toString());
    21 }
    22 }


    OK, như vậy là cơ bản chúng ta đã một phần nào đó che đi dữ liệu email và ngày sinh khi lưu vào SQL Server.


    Đây là một ví dụ nhỏ hi vọng sẽ giúp chúng ta có cái nhìn rất cơ bản về việc bảo vệ dữ liệu riêng tư cho ứng dụng.

    Translate