Showing posts with label Web Service. Show all posts

Friday, October 30, 2015

HTML5 Lưu trữ dữ liệu web

Bài trước, chúng ta đã tìm hiểu một đặc điểm thú vị của HTML5: hỗ trợ vẽ các đối tượng 2D thông qua thẻ canvas. Hôm nay, chúng ta lại tiếp cận một API mới của HTML5, lưu trữ dữ liệu web ở phía máy khách.

Lưu trữ web là một đặc điểm kỹ thuật được đưa ra bởi W3C, hỗ trợ việc lưu trữ dữ liệu tại phiên làm việc của người dùng hoặc lưu trữ trong thời gian lâu dài. Nó cho phép lưu trữ 5 MB thông tin cho mỗi tên miền.

Có 2 loại:

  • sesionStorage: lưu trữ dữ liệu trong một phiên làm việc (sẽ bị xóa khi đóng cửa sổ trình duyệt)


Ví dụ: xây dựng phiên làm việc của người dùng sau khi đăng nhập, …

  • localStorage: lưu trữ cục bộ (thông tin được lưu trữ lâu dài, không giới hạn thời gian)


Ví dụ: đếm số lần người dùng đã truy cập trang; ghi nhớ thông tin tài khoản, mật khẩu cho lần đăng nhập sau, …

Trước khi sử dụng sessionStorage và localStorage, chúng ta phải kiểm tra trình duyệt hiện tại có hỗ trợ 2 dạng lưu trữ này không?
Code tham khảo kiểm tra trình duyệt:

[sourcecode language="html"]
<!DOCTYPE HTML>
<html>
<head>
<meta charset="utf-8">
<title>Kiểm tra lưu trữ phiên</title>
<script>
function checkSupport()
{
if (('sessionStorage' in window) && window['sessionStorage'] !== null)
{
alert("Trình duyệt hỗ trợ lưu trữ web");
return;
}
alert("Trình duyệt không hỗ trợ lưu trữ web");
}
</script>
</head>

<body onLoad="checkSupport()">
</body>
</html>
[/sourcecode]

Để kiểm tra localStorage trong trình duyệt: thay đổi dòng code:

[sourcecode language="html"]
if (('sessionStorage' in window) &amp;amp;&amp;amp; window['sessionStorage'] !== null)
[/sourcecode]

thành

[sourcecode language="html"]
if (('localStorage' in window) &amp;amp;&amp;amp; window['localStorage'] !== null)
[/sourcecode]

1. Cách lưu trữ dữ liệu:

Có 3 cách để lưu trữ:

  • Thông qua các hàm hỗ trợ sẵn: lưu trữ dạng key/value (biến/giá trị)
    + Gán giá trị cho biến: sessionStorage.setItem(“key”) = value (key,value có thể là chuỗi hoặc số)
    sessionStorage.setItem('name', 'user')
    + Lấy giá trị của biến: sessionStorage.getItem(“key”)
    sessionStorage.getItem('name')
    + Xóa một giá trị biến đã tạo: sessionStorage.removeItem(“key”)
    sessionStorage.removeItem('name')
    + Xóa tất cả các biến đã tạo: sessionStorage.clear()

  • Thông qua cú pháp mảng: sessionStorage[“key”] = value
    sessionStorage['name'] = 'user'

  • Thông qua toán tử dấu chấm: sessionStorage.key = value
    sessionStorage.name = “user”


Ghi chú: 3 cách lưu trữ này cũng áp dụng cho localStorage

Ví dụ đơn giản để lưu trữ dữ liệu:

[sourcecode language="html"]
<!DOCTYPE HTML>
<html>
<head>
<meta charset="utf-8">
<title>Working with Session Storage</title>
<script>
function testStorage()
{
if(('sessionStorage' in window) && window['sessionStorage'] != null){
sessionStorage.setItem('name', 'Sarah');
document.write("The name is:" + sessionStorage.getItem('name') + "
");
sessionStorage.setItem(6, 'Six');
document.write("The number 6 is : " + sessionStorage.getItem(6) + "
");
sessionStorage["age"] = 20;
document.write("The age is : " + sessionStorage.age);
}
}
</script>
</head>

<body onLoad="testStorage()">
</body>
</html>
[/sourcecode]

Kết quả:

1

2. Ví dụ: Sử dụng sessionStorage để tạo phiên làm việc khi người dùng đăng nhập:

Kịch bản xử lý như sau:

  • Tạo form đăng nhập.

  • Tạo một trang thanhcong.html để hiển thị thông báo đăng nhập thành công.

  • Nếu người dùng chưa đăng nhập -> hiển thị trang thanhcong.html thì có thông báo “Bạn chưa đăng nhập”

  • Nếu người dùng vào trang đăng nhập rồi tiến hành đăng nhập -> sau khi đăng nhập thành công, qua trang thanhcong.html và hiển thị “Chúc mừng bạn tên đăng nhập đã đăng nhập thành công”.


Code:

Trang đăng nhập (dangnhap.html)

[sourcecode language="html"]
<!DOCTYPE HTML>
<html>
<head>
<meta charset="utf-8">
<title>Phiên làm việc người dùng</title>
<script>
function kiemTra()
{
//kiem tra du lieu
if(('sessionStorage' in window) && window['sessionStorage'] !== null){
// bỏ qua bước bắt lỗi tài khoản, mật khẩu

// tạo sessionStorage với key là user lưu tài khoản người dùng
sessionStorage.setItem('user', document.frm.txtTK.value);
// tạo sessionStorage với key là pass lưu mật khẩu người dùng
sessionStorage.setItem('pass', document.frm.txtMK.value);
return true;
}else alert("Không hỗ trợ");
}
</script>
</head>
<body >

<form name="frm" onSubmit="return kiemTra()" action="thanhcong.html">

<table>

<tr>

<td>Tài khoản:</td>


<td><input name="txtTK" /></td>

</tr>


<tr>

<td>Mật khẩu:</td>


<td><input name="txtMK" type="password"/></td>

</tr>


<tr align="center">

<td colspan="2"><input type="submit" value="Đăng nhập" /></td>

</tr>

</table>

</form>

</body>
</html>
[/sourcecode]

Trang thông báo thành công (thanhcong.html):

[sourcecode language="html"]
<!doctype html>
<html>
<head>
<meta charset="utf-8">
<title>Thanh cong</title>
<script>
if(sessionStorage.getItem('user') != null)
document.write("Chúc mừng bạn "
+ sessionStorage.getItem('user')
+ " đã đăng nhập thành công");
else document.write('Bạn chưa đăng nhập');
/* Xử lý nút thoát : xóa biến lưu trữ user*/
function thoat(){
sessionStorage.removeItem('user');
location.href="thanhcong.html";
}
</script>
</head>

<body>

<form>
<input value="Thoát" type="button" onClick="thoat()" />
</form>

</body>
</html>
[/sourcecode]

Video:
[embed]https://youtu.be/ee7G5Y3A8WE[/embed]

3. Ví dụ: Sử dụng localStorage để đếm số lần người dùng truy cập vào trang web:

Mỗi lần người dùng vào trang web:

  • Nếu là lần đầu tiên: khởi tạo biến localStorage[‘truy cập’] là 1.

  • Nếu là lần thứ 2 về sau: cộng thêm 1 vào biến localStorage[‘truy cập’]


Chú ý: Tắt trình duyệt và mở lên lại thì biến localStorage[‘truy cập’] vẫn cập nhật từ giá trị cũ.

Code:

[sourcecode languange="html"]
<!DOCTYPE HTML>
<html>
<head>
<meta charset="utf-8">
<title>Lưu trữ cực bộ</title>
<script>
function store()
{
if(('localStorage' in window) && window['localStorage'] != null){
if(localStorage.getItem('truycap') == null)
localStorage.setItem('truycap', 1);
else
localStorage.setItem('truycap', parseInt(localStorage.getItem('truycap')) + 1);
document.write("Số lần đăng nhập = " + localStorage.getItem('truycap'));

}
else{
alert("Trình duyệt không hỗ trợ LocalStorage");
}
}
</script>
</head>
<body onLoad="store()">
</body>
</html>
[/sourcecode]

Kết quả:
Lần chạy đầu tiên:
          Số lần đăng nhập = 1
Reload lại trang:
          Số lần đăng nhập = 2
Các lần chạy tiếp theo -> mỗi lần tăng lên 1.
Tắt trình duyệt và chạy lại trình duyệt vừa rồi:
          Số lần đăng nhập = 3
Các bạn có thể tham khảo thêm:
4. Ví dụ sử dụng localStorage để ghi nhớ thông tin đăng nhập:


[sourcecode language="html"]
<!DOCTYPE HTML>
<html>
<head>
<meta charset="utf-8">
<title>Lưu trữ cực bộ</title>
<script>
function loadData(){
if(('localStorage' in window)
&& window['localStorage'] != null
&& localStorage.getItem('ghinho')
){
document.frmDangNhap.txtDN.value = localStorage.getItem('tendangnhap');
document.frmDangNhap.txtMK.value = localStorage.getItem('matkhau');
}
}
function store()
{
var tendangnhap = document.getElementById("txtDN").value;
var matkhau = document.getElementById("txtMK").value;
var ghinho = document.getElementById("chkGhiNho");
if(('localStorage' in window) && window['localStorage'] != null){
localStorage.setItem('tendangnhap', tendangnhap);
localStorage.setItem('matkhau', matkhau);
alert("Tên người dùng : " + localStorage.getItem('tendangnhap') + ", Mật khẩu : " + localStorage.getItem('matkhau'));
}
else{
alert("Trình duyệt không hỗ trợ LocalStorage");
}

//ghi nho thong tin
if(ghinho.checked)
{
localStorage.setItem('ghinho', 1);
}
}
</script>
</head>
<body onLoad="loadData()" >

<form method="get" name="frmDangNhap" >

<table width="50%" border="1" align="center">

<tr>

<th colspan="2" scope="col">Đăng nhập </th>

</tr>


<tr>

<td>Tên đăng nhập: </td>


<td><input type="text" id="txtDN" name="txtDN" /></td>

</tr>


<tr>

<td>Mật khẩu:</td>


<td><input type="text" id="txtMK" name="txtMK" /></td>

</tr>


<tr>

<td></td>


<td><input type="button" value="Đăng nhập" onClick="store();"/>
<input type="checkbox" id="chkGhiNho" />Ghi nhớ thông tin</td>

</tr>

</table>

</form>

</body>
</html>
[/sourcecode]

Video tham khảo
[embed]https://youtu.be/LcLLxot5bmw[/embed]

Chúc các bạn hiểu được cơ bản về lưu trữ web trong HTML5

Tuesday, April 14, 2015

JavaScriptSerializer: JSON serialize và deserialize trong C#

Ngày này JSON đang trở nên phổ biến bởi tính tiện lợi của nó so với XML. Với .Net thư viện JavaScriptSerializer đã được phát triển giúp cho việc chuyển đổi dữ liệu dang định dạng JSON trở nên rất đơn giản.

Chúng ta cùng tìm hiểu một chút về thư viện này qua ví dụ sau:
Mã nguồn
Định nghĩa lớp

[sourcecode language="csharp"]

public class Student
{
public Student()
{
}
public Student(int id, string name)
{
_id = id;
_name = name;
}

int _id;
string _name;
public int ID
{
get
{
return _id;
}

set
{
_id = value;
}
}

public string Name
{
get
{
return _name;
}

set
{
_name = value;
}
}
}
[/sourcecode]

Chuyển đối tượng sang json
[sourcecode language="csharp"]
Student s = new Student(100, "Nguyễn Văn Mít");
string str = serializer.Serialize(s);
Response.Write("Object: " + str);
[/sourcecode]

Kết quả chạy có như sau:
Object: {"ID":100,"Name":"Nguyễn Văn Mít"}

Chuyển từ chuỗi JSON sang đối tượng Student
[sourcecode language="csharp"]
Student s1 = serializer.Deserialize<Student>(str);
Response.Write("<br/>Name: " + s1.Name);
[/sourcecode]

Tương tự như vậy chúng ta cũng có thể chuyển một mảng sang JSON và ngược lại
Tạo một mảng như sau
[sourcecode language="csharp"]
List<Student> list = new List<Student>();
list.Add(new Student(1, "Trần Văn Cam"));
list.Add(new Student(2, "Trần Thanh Long"));
list.Add(new Student(3, "Lê Thị Lựu"));

string strlist = serializer.Serialize(list);
Response.Write("<br/>List: " + strlist);

// in
Response.Write("<br/>List deserialize ");
List<Student> listDe = serializer.Deserialize<List<Student>>(strlist);
foreach (Student item in listDe)
{
Response.Write("<br/>Name: " + item.Name);
}
[/sourcecode]

Chạy lại ví dụ, chúng ta có kết quả
List: [{"ID":1,"Name":"Trần Văn Cam"},{"ID":2,"Name":"Trần Thanh Long"},{"ID":3,"Name":"Lê Thị Lựu"}]

Chuyển một DataTable sang JSON và ngược lại
Kết nối và đọc dữ liệu
[sourcecode language="csharp"]
SqlConnection conn = new SqlConnection("server=.;database=northwind;uid=sa;pwd=sa;");
SqlDataAdapter adp = new SqlDataAdapter("Select employeeid, firstname, lastname, birthdate, photopath from employees", conn);
DataSet ds = new DataSet();
adp.Fill(ds, "Emp");
[/sourcecode]

Chuyển sang JSON
[sourcecode language="csharp"]
List<Dictionary<string, object>> table = new List<Dictionary<string, object>>();
foreach (DataRow r in ds.Tables[0].Rows)
{
Dictionary<string, object> column = new Dictionary<string, object>();
foreach (DataColumn c in ds.Tables[0].Columns)
{
column.Add(c.ColumnName, r[c.ColumnName]);
}
table.Add(column);
}

string dsStr = serializer.Serialize(table);
Response.Write("<br/>Data table: " + dsStr);
[/sourcecode]

Chuyển từ JSON sang DataTable
[sourcecode language="csharp"]
List<Dictionary<string, object>> t2 = serializer.Deserialize<List<Dictionary<string, object>>>(dsStr);
DataTable dt = ds.Tables[0];
dt.Clear();
DataRow deRow;
foreach (Dictionary<string, object> d in t2)
{
deRow = dt.NewRow();
foreach (DataColumn col in dt.Columns)
{
deRow[col.ColumnName] = (d[col.ColumnName] == null ? DBNull.Value : d[col.ColumnName]);
}
dt.Rows.Add(deRow);
}
GridView1.DataSource = dt;
GridView1.DataBind();
[/sourcecode]

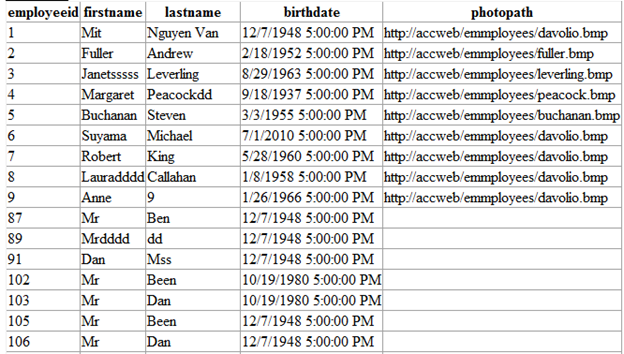
Tới đây chạy lại ví dụ có kết quả như sau:

Data table: [{"employeeid":1,"firstname":"Mit","lastname":"Nguyen Van","birthdate":"\/Date(-664786800000)\/","photopath":"http://accweb/emmployees/davolio.bmp"},{"employeeid":2,"firstname":"Fuller","lastname":"Andrew","birthdate":"\/Date(-563871600000)\/","photopath":"http://accweb/emmployees/fuller.bmp"},{"employeeid":3,"firstname":"Janetsssss","lastname":"Leverling","birthdate":"\/Date(-200127600000)\/","photopath":"http://accweb/emmployees/leverling.bmp"},{"employeeid":4,"firstname":"Margaret","lastname":"Peacockdd","birthdate":"\/Date(-1018854000000)\/","photopath":"http://accweb/emmployees/peacock.bmp"},{"employeeid":5,"firstname":"Buchanan","lastname":"Steven","birthdate":"\/Date(-468054000000)\/","photopath":"http://accweb/emmployees/buchanan.bmp"},{"employeeid":6,"firstname":"Suyama","lastname":"Michael","birthdate":"\/Date(1278003600000)\/","photopath":"http://accweb/emmployees/davolio.bmp"},{"employeeid":7,"firstname":"Robert","lastname":"King","birthdate":"\/Date(-302770800000)\/","photopath":"http://accweb/emmployees/davolio.bmp"},{"employeeid":8,"firstname":"Lauradddd","lastname":"Callahan","birthdate":"\/Date(-378025200000)\/","photopath":"http://accweb/emmployees/davolio.bmp"},{"employeeid":9,"firstname":"Anne","lastname":"9","birthdate":"\/Date(-124009200000)\/","photopath":"http://accweb/emmployees/davolio.bmp"},{"employeeid":87,"firstname":"Mr","lastname":"Ben","birthdate":"\/Date(-664786800000)\/","photopath":null},{"employeeid":89,"firstname":"Mrdddd","lastname":"dd","birthdate":"\/Date(-664786800000)\/","photopath":null},{"employeeid":91,"firstname":"Dan","lastname":"Mss","birthdate":"\/Date(-664786800000)\/","photopath":null},{"employeeid":102,"firstname":"Mr","lastname":"Been","birthdate":"\/Date(340822800000)\/","photopath":null},{"employeeid":103,"firstname":"Mr","lastname":"Dan","birthdate":"\/Date(340822800000)\/","photopath":null},{"employeeid":105,"firstname":"Mr","lastname":"Been","birthdate":"\/Date(-664786800000)\/","photopath":null},{"employeeid":106,"firstname":"Mr","lastname":"Dan","birthdate":"\/Date(-664786800000)\/","photopath":null}]


table

Như vậy là cơ bản chúng ta có thể chuyển đổi qua lại giữa JSON và một vài kiểu của .net.


Trong PHP

Wednesday, October 9, 2013

Very simple.net web service exception handling


  1. Create header exception

  2. Assign header  for special web method

  3. Exception handling at client: SoapException and SoapHeaderException


Header definition
[sourcecode language="csharp"]
public class WSHeader: SoapHeader
{
public WSHeader()
{

}
private DateTime _CallTime;
public DateTime CallTime
{
get { return _CallTime; }
set { _CallTime = value; }
}
}
[/sourcecode]

Webservice difinition and header assignment
[sourcecode language="csharp"]
[WebService(Namespace = "http://tempuri.org/")]
[WebServiceBinding(ConformsTo = WsiProfiles.BasicProfile1_1)]
public class TimingService : System.Web.Services.WebService
{
public WSHeader DiscountHeader;
public TimingService()
{

//Uncomment the following line if using designed components
//InitializeComponent();
}

[WebMethod]
[SoapHeader("DiscountHeader", Direction = SoapHeaderDirection.In)]
public double Discount(DateTime birthdate)
{
if (DiscountHeader == null)
throw new SoapHeaderException("User invalid", SoapException.ClientFaultCode);
else if (birthdate > DateTime.Now)
{
throw new SoapException("Birthdate invalid", SoapException.ClientFaultCode);
}
else
{
if (DateTime.Now.Year - birthdate.Year < 18)
return 0.1;
else
return 0.0;
}
}
}
[/sourcecode]

Call method from client
[sourcecode language="csharp"]
namespace Client
{
class Program
{
static void Main(string[] args)
{
try
{
WS.WSHeader header = new Client.WS.WSHeader();
header.CallTime = DateTime.Now.AddDays(-1);

WS.TimingService client = new Client.WS.TimingService();

client.WSHeaderValue = header;

Console.WriteLine("Discount per: "+ client.Discount(new DateTime(2013, 1, 1))*100 + "%");
}
catch (SoapHeaderException ex)
{
Console.WriteLine("Header error: " + ex.Message);
}
catch(SoapException ex)
{
Console.WriteLine("Call error: " + ex.Message);
}
}
}
}
[/sourcecode]

Wednesday, December 5, 2012

Wednesday, August 17, 2011

Gọi Webservice bằng Java script - (Java script client for webservice)

Web service một giải pháp tích hợp các module phát triển bằng những công nghệ khác nhau. Trong những phần trước tôi từng giới thiệu với các bạn các tạo và sử dụng webservice với java. Hôm nay tôi giới thiệu với các bạn cách sử dụng java script để gọi một phương thức từ webservice.

1. Download thư việc "webservice.htc" của microsoft đây là thư viện được viết sẵn cho phép gọi webservice bằng ngôn ngữ java.
2. Tạo file html chứa đoạn code java script sau
var callID = 0;
function getWSDL()
{
myWebService.useService(
"http://www.webservicex.net/CurrencyConvertor.asmx?WSDL",
"CurrencyConvertor");
}
function getResult()
{
country.innerText = event.result.value + " VND";
}
function Lookup()
{
callID = myWebService.CurrencyConvertor.callService("ConversionRate", txtIP.value,"VND");
}

3. Chúng ta sử dụng dịch vụ qui đổi tiền tệ từ trang "http://www.webservicex.net/CurrencyConvertor.asmx?WSDL"

[caption id="attachment_382" align="aligncenter" width="300" caption="Demo gọi webservice bằng javascript"]Demo gọi webservice bằng javascript[/caption]

Cung cấp thông tin như hình và nhấn Convert
[caption id="attachment_383" align="aligncenter" width="300" caption="Kết quả"]Kết quả[/caption]

Chúc bạn thành công. Download ở đây.

Wednesday, June 15, 2011

Webservice - java -video hướng dẫn từng bước tạo service và client

Đây là demo hướng dẫn các bạn xây dựng một web service đơn giản đầu tiên với netbean 5.5 hi vọng sẽ giúp ích cho các bạn.

[caption id="attachment_330" align="aligncenter" width="300" caption="Hướng dẫn tạo webservice"]Hướng dẫn tạo webservice[/caption]

Phần 01

[youtube="http://youtu.be/vqvMr7GGzw0"]

Phần 02

[youtube="http://youtu.be/awRhpUIm4F8"]

Download tại đây.

Translate