Wednesday, February 18, 2015

Chuyển dữ liệu từ SQL server 2008 về 2005


Thông thường chúng ta hay upgrade database sql server từ thấp lên phiên bản cao hơn (2005 lên 2008) nhưng một số tình huống chúng ta phải làm ngược lại downgrade từ 2008 về 2005 (không thể backup 2008 và restored lại vào 2005 được). Có một số giải pháp cho vấn đề này.

1. Export dữ liệu trực tiếp từ 2008 về 2005 thông qua công cụ import/export của sqlserver managemnet studio.

2. Generate Script của sqlserver managemnet studio cách này đơn giản và hiệu quả

Trong bài này chúng ta cùng tìm hiểu cách tạo script để chuyển dữ liệu từ 2008 về 2005.

- Nhấn chuột phải lên dữ liệu cần chuyển và chọn như hình

image- Chọn các tùy chon như hình sau

image  - Nhân Next để tiếp tục

image - Chọn tất cả hoặc chọn các đối tượng muốn tại script, Nhấn Next để tiếp tục

image - Chọn nút Advanced để chỉ định phiên bản sql và dữ liệu sẽ mang theo

image - Chú ý:

  1. Script for Server Version
  2. Types of data to script

Nhấn OK để xác nhận tùy chọn

  1. Nhấn 03 lần Next để phát sinh Script
  2. Nhấn Finish để hoàn thành.

Vậy là xong rồi.

Wednesday, December 17, 2014

Responsive web design (RWD) - Thiết kế giao diện web thích ứng với kích thước màn hình thiết bị

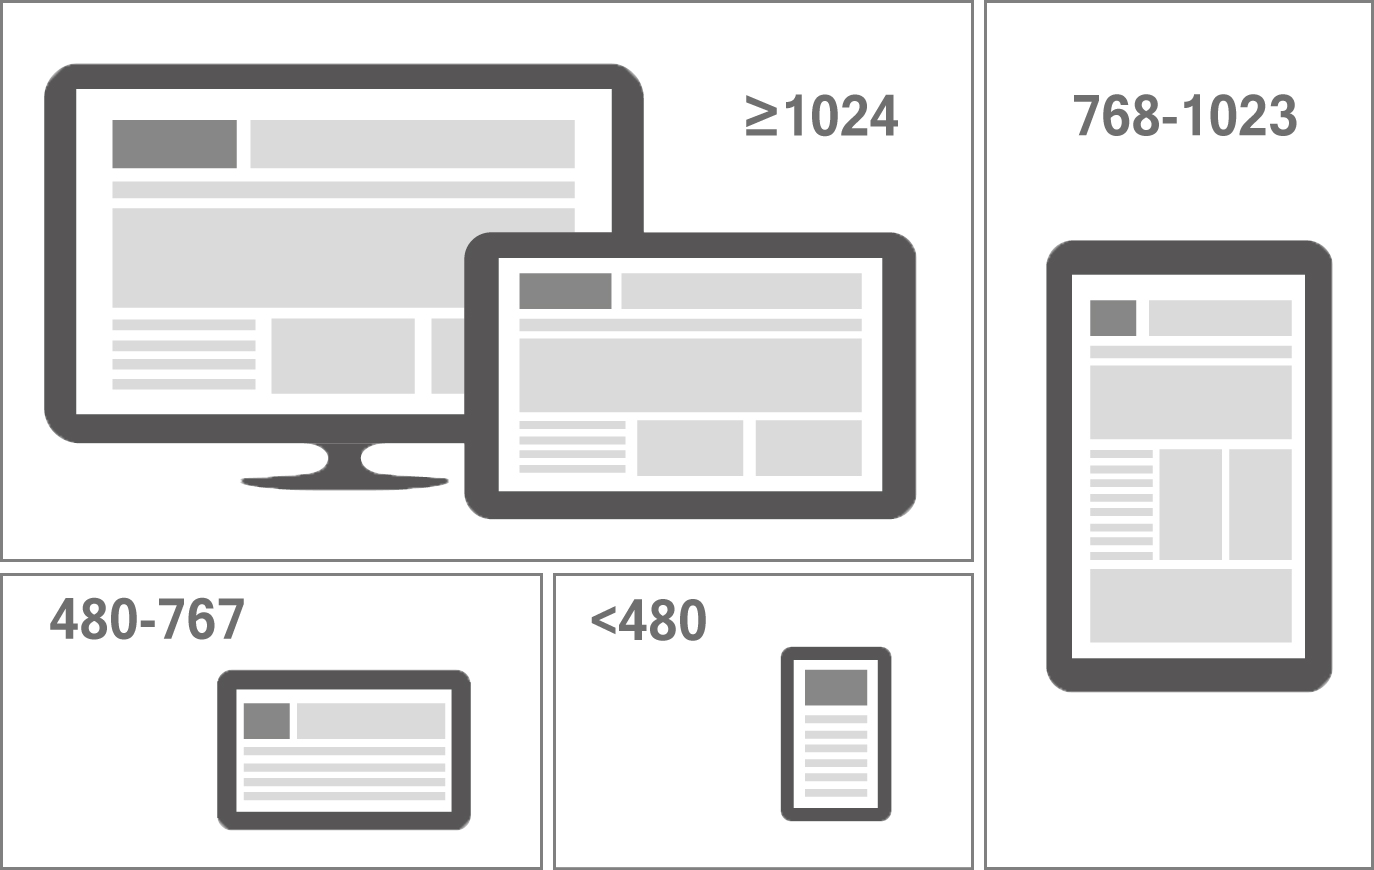
Trước đây để có thể hiển thị nội dung website của mình trên các thiết bị di động thi giải pháp được sử dụng là tạo thêm một website phiên bản di động, như giờ thi với phương pháp thiết kế giao diện thích ứng (Responsive web design) chúng ta hoàn toàn có thể sắp xếp nội dung trên trang web của chúng ta tùy theo màn hình thiết bị mà không cần phải viết thêm một website phiên bản di động nữa.
[caption id="attachment_1542" align="aligncenter" width="660"]Giao diện thích ứng với kích thước màn hình Giao diện thích ứng với kích thước màn hình[/caption]

Demo môn học PHP tại CUSC

Responsive web design (RWD) hiểu một cách đơn giản là chúng ta sẽ bố trí lại nội dung của trang web tùy theo kích thước màn hình của thiết bị (hình trên). Nói là bố trí lại vì Responsive web design (RWD) chỉ đơn thuần là ẩn/hiện hay sắp xếp trật tự của nội dung trên trang mà thôi.

Với sự hỗ trợ của CSS3 (Media Queries năm 2012) và HTML5 thì phương pháp thiết kế này trở nên rất dễ thực hiện.
Ví dụ:

[sourcecode language="css"]
@media screen and (min-width:500px) { ... }
[/sourcecode]

Giúp xác định kích thước của màn hình thiết bị và ràng buộc nếu nhỏ hơn 500px thì nội dung ở giữa sẽ được thực hiện. Như vậy chúng ta chỉ việc đặt tên cho các phần tử nội dung (html element) trên trang và xử lý chúng là được.

<html xmlns="http://www.0w3.org/1999/xhtml">
<head>
<!--viewport xac dinh kich thuot dung theo man hinh-->
<meta name="viewport" content="width=device-width, initial-scale=1, maximum-scale=1, user-scalable=0">
<meta http-equiv="Content-Type" content="text/html; charset=utf-8" />
<link rel="icon" type="image/ico" href="images/favorite.ico">
<title>Salomon shop</title>
<link href="css.css" rel="stylesheet" type="text/css" />
<link href="style.css" rel="stylesheet" type="text/css" />
</head>
<body>
<div id="main">
<div id="header">
<h1>SALOMON</h1>
</div>
<div id="Skin_Menu_Ngang">
<ul id="nav">
<li><a href="?home">TRANG CHỦ</a></li>
<li style="border-right: 0px"><a href="?function=dk">ĐĂNG KÝ</a></li>
</ul>
</div>
<div id="noidung">
<div id="cotPhai"> Cot phai </div>
<div id="cotTrai"> cot trai </div>
</div>
<div id="footer"> Footer </div>
</div>
</body>
</html>

Chúng ta có giao diện như sau:
salomon1

Lưu ý dòng

<meta name="viewport" content="width=device-width, initial-scale=1, maximum-scale=1, user-scalable=0">

Giúp xác định tỉ lệ scale và qui đổi điểm ảnh của màn hình thiết bị về px.
Ví dụ code css cho Demo môn học PHP tại CUSC như sau:

[sourcecode language="css"]
@media screen and (max-width: 800px) {
#main {
width:100%;
}

#header {
width: 100%;
background-image:none;
text-align:center;
vertical-align:middle;
height:70px;
}

#header h1{
visibility:visible;
display:inline-block;
font-family:Arial, Helvetica, sans-serif;
font-size:xx-large;
color:#FFF;
}

#trinhdon {
width: 100%;
}
#footer {
width: 100%;
}
#noidung {
width: 100%;
}
#cotTrai {
width: 100%;
}
#cotPhai {
width: 100%;
}
}

@media screen and (max-width: 600px) {
#main {
width: 100%;
}
#nav
{
display:none;
}
#header {
width: 100%;
background-image:none;
text-align:center;
vertical-align:middle;
height:70px;
}

#header h1{
display:inline-block;
font-family:Arial, Helvetica, sans-serif;
font-size:xx-large;
color:#FFF;
}

#trinhdon {
width: 100%;
}
#footer {
width: 100%;
}
#noidung {
width: 100%;
}
#cotTrai {
width: 100%;
}
#cotPhai {
width: 100%;
}
}
@media screen and (max-width:480px) {
#nav
{
display:none;
}
#main {
width: 100%;
}
#header {
width: 100%;
background-image:none;
text-align:center;
vertical-align:middle;
height:70px;
}

#header h1{
display:inline-block;
font-family:Arial, Helvetica, sans-serif;
font-size:xx-large;
color:#FFF;
}
#trinhdon {
width: 100%;
}
#footer {
width: 100%;
}
#noidung {
width: 100%;
}
#cotTrai {
width: 100%;
}
#cotPhai {
text-align:center;
width: 100%;
display:inline;
}
}
[/sourcecode]

Ở đây tôi qui định nếu màn hình kích thướt lớn hơn 800px thì chúng ta có giao diện web trên máy tính với header và nội dung bố trí mặc định. Nếu lớn hơn 600px và nhỏ hơn 800px thì bố trí lại 02 phần trái phải theo chiều dọc, ...

Gần đây Chrome hỗ trợ chức năng test giao diện trên các thiết bị động.
1. Nhấn F12 để vào chế độ developer
2. Chọn vào hình điện thoại ở của sổ code
3. Thay đôi kích thước màn hình bằng thướt đo hay chọn thiết bị.

Hi vọng là bài viết này có ích cho các bạn sinh viên tìm hiểu một cách căn bản nhất.

Tuesday, December 16, 2014

Sử dụng css đinh dạng trang in + php tạo nội dung (in hóa đơn)

Tạo mẫu in cho những sản phẩn đã chọn từ giỏ hàng như sau:

[caption id="attachment_1533" align="aligncenter" width="596"]Giỏ hàng Giỏ hàng[/caption]

Khi nhấn vào IN HÓA ĐƠN sẽ cho phép in với mẫu như sau

[caption id="attachment_1534" align="aligncenter" width="660"]Biên lai thanh toán Biên lai thanh toán[/caption]

Với mẫu code CSS sau sẽ giúp chúng ta định dạng mẫu giấy in theo mẫu A4.

[sourcecode language="css"]
body {
margin: 0;
padding: 0;
background-color: #FAFAFA;
font: 12pt "Tohoma";
}
* {
box-sizing: border-box;
-moz-box-sizing: border-box;
}
.page {
width: 21cm;
overflow:hidden;
min-height:297mm;
padding: 2.5cm;
margin-left:auto;
margin-right:auto;
background: white;
box-shadow: 0 0 5px rgba(0, 0, 0, 0.1);
}
.subpage {
padding: 1cm;
border: 5px red solid;
height: 237mm;
outline: 2cm #FFEAEA solid;
}
@page {
size: A4;
margin: 0;
}
button {
width:100px;
height: 24px;
}
.header {
overflow:hidden;
}
.logo {
background-color:#FFFFFF;
text-align:left;
float:left;
}
.company {
padding-top:24px;
text-transform:uppercase;
background-color:#FFFFFF;
text-align:right;
float:right;
font-size:16px;
}
.title {
text-align:center;
position:relative;
color:#0000FF;
font-size: 24px;
top:1px;
}
.footer-left {
text-align:center;
text-transform:uppercase;
padding-top:24px;
position:relative;
height: 150px;
width:50%;
color:#000;
float:left;
font-size: 12px;
bottom:1px;
}
.footer-right {
text-align:center;
text-transform:uppercase;
padding-top:24px;
position:relative;
height: 150px;
width:50%;
color:#000;
font-size: 12px;
float:right;
bottom:1px;
}
.TableData {
background:#ffffff;
font: 11px;
width:100%;
border-collapse:collapse;
font-family:Verdana, Arial, Helvetica, sans-serif;
font-size:12px;
border:thin solid #d3d3d3;
}
.TableData TH {
background: rgba(0,0,255,0.1);
text-align: center;
font-weight: bold;
color: #000;
border: solid 1px #ccc;
height: 24px;
}
.TableData TR {
height: 24px;
border:thin solid #d3d3d3;
}
.TableData TR TD {
padding-right: 2px;
padding-left: 2px;
border:thin solid #d3d3d3;
}
.TableData TR:hover {
background: rgba(0,0,0,0.05);
}
.TableData .cotSTT {
text-align:center;
width: 10%;
}
.TableData .cotTenSanPham {
text-align:left;
width: 40%;
}
.TableData .cotHangSanXuat {
text-align:left;
width: 20%;
}
.TableData .cotGia {
text-align:right;
width: 120px;
}
.TableData .cotSoLuong {
text-align: center;
width: 50px;
}
.TableData .cotSo {
text-align: right;
width: 120px;
}
.TableData .tong {
text-align: right;
font-weight:bold;
text-transform:uppercase;
padding-right: 4px;
}
.TableData .cotSoLuong input {
text-align: center;
}
@media print {
@page {
margin: 0;
border: initial;
border-radius: initial;
width: initial;
min-height: initial;
box-shadow: initial;
background: initial;
page-break-after: always;
}
}
[/sourcecode]

Và để có thể có được nội dung in chúng ta sẽ sử dụng PHP để phát sinh nội dung như sau:

[sourcecode language="php"]
<body onload="window.print();">
<div id="page" class="page">
<div class="header">
<div class="logo"><img src="../images/logo.jpg"/></div>
<div class="company">C.Ty TNHH Salomon</div>
</div>
<br/>
<div class="title">
HÓA ĐƠN THANH TOÁN
<br/>
-------oOo-------
</div>
<br/>
<br/>
<table class="TableData">
<tr>
<th>STT</th>
<th>Tên</th>
<th>Đơn giá</th>
<th>Số</th>
<th>Thành tiền</th>
</tr>
<?php
session_start();
$tongsotien = 0;
if(isset($_SESSION['giohang'])){
$pos = 1;
$tongsotien = 0;
foreach($_SESSION['giohang'] as $i => $row)
{
$tongsotien += $row['sp_soluong']*$row['sp_dongia'];
echo "<tr>";
echo "<td class=\"cotSTT\">".$pos++."</td>";
echo "<td class=\"cotTenSanPham\">".$row['sp_ten']."</td>";
echo "<td class=\"cotGia\"><div id='giasp".$row['sp_id']."' name='giasp".$row['sp_id']."' value='".$row['sp_dongia']."'>".number_format($row['sp_dongia'],0,",",".")."</div></td>";
echo "<td class=\"cotSoLuong\" align='center'>".$row['sp_soluong']."</td>";
echo "<td class=\"cotSo\">".number_format(($row['sp_soluong']*$row['sp_dongia']),0,",",".")."</td>";
echo "</tr>";
}
}
?>
<tr>
<td colspan="4" class="tong">Tổng cộng</td>
<td class="cotSo"><?php echo number_format(($tongsotien),0,",",".")?></td>
</tr>
</table>
<div class="footer-left"> Cần thơ, ngày 16 tháng 12 năm 2014<br/>
Khách hàng </div>
<div class="footer-right"> Cần thơ, ngày 16 tháng 12 năm 2014<br/>
Nhân viên </div>
</div>
</body>
[/sourcecode]

Chạy thử trang web chúng ta sẽ có hình như bên trên.

Xác định mật độ điểm ảnh trên Android

Đoạn code sau giúp chúng ta xác định mật độ điểm ảnh và qui đổi sang đơn vị đo px (tương đương 50DP)

Tỉ lệ mật độ điểm ảnh

[sourcecode language="java"]
DisplayMetrics metrics = new DisplayMetrics();
getWindowManager().getDefaultDisplay().getMetrics(metrics);
switch (metrics.densityDpi) {
case DisplayMetrics.DENSITY_LOW:
pxSize = 38;
break;
case DisplayMetrics.DENSITY_MEDIUM:
pxSize = 50;
break;
case DisplayMetrics.DENSITY_HIGH:
pxSize = 75;
break;
case DisplayMetrics.DENSITY_XHIGH:
pxSize = 100;
break;
case DisplayMetrics.DENSITY_XXHIGH:
pxSize = 150;
break;
case DisplayMetrics.DENSITY_XXXHIGH:
pxSize = 200;
break;
}
[/sourcecode]

Với sự hỗ trợ của thư viện này chúng ta xác định được tỉ lệ giữa độ đo DP và PX khá đơn giản.

Thursday, November 20, 2014

Mã hóa dữ liệu khi lưu trữ trong ứng dụng Java + SQL Server

Thông thường dữ liệu các nhân của người dùng khi lưu trữ vào csdl chúng ta nên che đi những dữ liệu nhạy cảm, trong ví dụ sau đây chúng ta cùng làm một demo nhỏ để che đi dữ liệu email và ngày sinh của người dùng (chỉ có ứng dụng của chúng ta mới giải mã được)

Tạo bảng để lưu được thông tin sau:
Order.    Name        Type
1.    Username    Text
2.    Password    Text
3.    Fullname    Text
4.    Address     Text
5.    Email       Text
6.    Birthdate   Date

Yêu cầu

Thiết kế form thêm thông tin người dùng vào bảng trên với các yêu cầu sau:
    1.    Mã hóa Password bằng giải thuật MD5
    2.    Mã hóa email và birthdate bằng giải thật mã hóa 02 chiều

Thiết kế form hiển thị ds người dùng thể hiện các cột: Username, Fullname và Address
Thiết kế form tìm người dùng dựa vào Username, kết quả hiển thị chi tiết người dùng gồm thông tin
   •    Username
    •    Fullname
    •    Address
    •    Email và Birthdate đã được giải mã

Giao diên thêm và tìm thông tin

image Dữ liệu đã mã hóa

image Dữ liệu được giải mã (nhấn nút find)

image

Bước 1: Tạo CSDL tên data và bảng nguoidung

1 SET ANSI_NULLS ON
2 GO
3
4 SET QUOTED_IDENTIFIER ON
5 GO
6
7 SET ANSI_PADDING ON
8 GO
9
10 CREATE TABLE [dbo].[users](
11 [username] [varchar](50) NULL,
12 [password] [varchar](100) NULL,
13 [fullname] [varchar](100) NULL,
14 [address] [varchar](250) NULL,
15 [email] [varbinary](max) NULL,
16 [birthdate] [varbinary](max) NULL
17 ) ON [PRIMARY] TEXTIMAGE_ON [PRIMARY]
18
19 GO
20
21 SET ANSI_PADDING OFF
22 GO

Bước 2: Tạo cập khóa cho ứng dụng và lưu trữ lại để sử dụng (file)


1 class KeyGen {
2 public static void main(String[] args) {
3 try {
4 if (!new File("src/lib/pri.key").exists()) {
5 KeyPairGenerator key = KeyPairGenerator.getInstance("RSA");
6 key.initialize(512);
7 KeyPair keys = key.genKeyPair();
8 // Tạo cặp khóa
9 PrivateKey privateKey = keys.getPrivate();
10 PublicKey publicKey = keys.getPublic();
11 // Lưu thông tin khóa để tái sử dụng, khóa công khai để giải mã
12 X509EncodedKeySpec x509EncodedKeySpec =
13 new X509EncodedKeySpec(publicKey.getEncoded());
14 FileOutputStream fos = new FileOutputStream("src/lib/pub.key");
15 fos.write(x509EncodedKeySpec.getEncoded());
16 fos.close();
17 // khóa mật để mã hóa
18 PKCS8EncodedKeySpec pkcs8EncodedKeySpec =
19 new PKCS8EncodedKeySpec(privateKey.getEncoded());
20 fos = new FileOutputStream("src/lib/pri.key");
21 fos.write(pkcs8EncodedKeySpec.getEncoded());
22 fos.close();
23 } else {
24 System.out.println("Khoa da co");
25 }
26 } catch (IOException ex) {
27 Logger.getLogger(KeyGen.class.getName()).log(Level.SEVERE, null, ex);
28 } catch (NoSuchAlgorithmException ex) {
29 Logger.getLogger(KeyGen.class.getName()).log(Level.SEVERE, null, ex);
30 }
31 }
32 }


Tới đây chúng ta đã có được cặp khóa để có thể mã hóa và giải mã những dữ liệu cần thiết.


Bước 3: Xây dựng lớp Encode để phục hồi khóa từ tập tin và tạo phương thức mã hóa, giải mã.


1 public class Encode {
2 private PrivateKey priKey;
3 private PublicKey pubKey;
4 public Encode() {
5 getKeys();
6 }
7 private void getKeys() {
8 try {
9 File pubKeyFile = new File("src/lib/pub.key");
10 File privKeyFile = new File("src/lib/pri.key");;
11 // đọc dữ liệu từ file và khởi tọa lại khóa công khai
12 DataInputStream dis = new DataInputStream(new FileInputStream(pubKeyFile));
13 byte[] pubKeyBytes = new byte[(int) pubKeyFile.length()];
14 dis.readFully(pubKeyBytes);
15 dis.close();
16
17 // đọc dữ liệu từ file và khởi tọa lại khóa mật
18 dis = new DataInputStream(new FileInputStream(privKeyFile));
19 byte[] privKeyBytes = new byte[(int) privKeyFile.length()];
20 dis.read(privKeyBytes);
21 dis.close();
22 //
23 KeyFactory keyFactory = KeyFactory.getInstance("RSA");
24 // Tạo khóa công khai
25 X509EncodedKeySpec pubSpec = new X509EncodedKeySpec(pubKeyBytes);
26 pubKey = (RSAPublicKey) keyFactory.generatePublic(pubSpec);
27 // tạo khóa mật
28 PKCS8EncodedKeySpec privSpec = new PKCS8EncodedKeySpec(privKeyBytes);
29 priKey = (RSAPrivateKey) keyFactory.generatePrivate(privSpec);
30 } catch (Exception ex) {
31 System.out.println("ERR: " + ex.toString());
32 }
33 }
34 // hàm mã hóa
35 public byte[] TwowayEncrypt(byte[] data) {
36 try {
37 Cipher c = Cipher.getInstance("RSA");
38 c.init(Cipher.ENCRYPT_MODE, priKey);
39 byte[] rs = c.doFinal(data);
40 return rs;
41 } catch (Exception ex) {
42 System.out.println("Err: " + ex.toString());
43 }
44 return null;
45 }
46 // hàm giải mã
47 public byte[] TwowayDecrypt(byte[] data) {
48 try {
49 Cipher c = Cipher.getInstance("RSA");
50 c.init(Cipher.DECRYPT_MODE, pubKey);
51 byte[] rs = c.doFinal(data);
52 return rs;
53 } catch (Exception ex) {
54 System.out.println("Err: " + ex.toString());
55 }
56 return null;
57 }
58 // dùng cho mã hóa mật khẩu
59 public byte[] OnewayEncrypt(byte[] data){
60 try {
61 MessageDigest dig = MessageDigest.getInstance("MD5");
62 return dig.digest(data);
63 } catch (Exception ex) {
64 System.out.println("ERR: "+ ex.toString());
65 }
66 return null;
67 }
68 }


Bước 4: Tích hợp lên giao diện


Xử lý sự kiện Click nút Add new


1 private void btnAddActionPerformed(java.awt.event.ActionEvent evt) {
2 try {
3 Connection conn = DriverManager.getConnection("jdbc:sqlserver://ntdan;databasename=data;", "sa", "sa");
4 PreparedStatement comm = conn.prepareStatement("Insert into users values(?,?,?,?,?,?)");
5 comm.setString(1, txtUser.getText());
6
7 byte[] ba1 = Charset.forName("UTF-8").encode(CharBuffer.wrap(txtPass.getPassword())).array();
8
9 comm.setString(2, new String(encode.OnewayEncrypt(ba1), "UTF-8"));
10 comm.setString(3, txtFull.getText());
11 comm.setString(4, txtAdd.getText());
12
13 comm.setBytes(5,encode.TwowayEncrypt(txtEmail.getText().getBytes("UTF-8")));
14 comm.setBytes(6, encode.TwowayEncrypt(txtBirth.getText().getBytes("UTF-8")));
15
16 comm.executeUpdate();
17 } catch (Exception ex) {
18 System.out.println("ERR: " + ex.toString());
19 }
20 }

Xử lý sự kiện Click nút Find


1 private void btnFindActionPerformed(java.awt.event.ActionEvent evt) {
2 try {
3 Connection conn = DriverManager.getConnection("jdbc:sqlserver://ntdan;databasename=data;", "sa", "sa");
4 PreparedStatement comm = conn.prepareStatement("Select * from Users where username=?");
5 comm.setString(1, txtUser.getText());
6 ResultSet rs = comm.executeQuery();
7 String found="";
8 if(rs.next())
9 {
10 found = "User: ";
11 found += rs.getString(1);
12 found += "\nFullname: "+rs.getString(3);
13 found += "\nAddress: "+rs.getString(4);
14 found += "\nEmail: "+ new String(encode.TwowayDecrypt(rs.getBytes(5)),"UTF-8");
15 found += "\nBirthDate: "+ new String(encode.TwowayDecrypt(rs.getBytes(6)),"UTF-8");
16 }
17
18 JOptionPane.showMessageDialog(this, found);
19 } catch (Exception ex) {
20 System.out.println("Err: "+ ex.toString());
21 }
22 }


OK, như vậy là cơ bản chúng ta đã một phần nào đó che đi dữ liệu email và ngày sinh khi lưu vào SQL Server.


Đây là một ví dụ nhỏ hi vọng sẽ giúp chúng ta có cái nhìn rất cơ bản về việc bảo vệ dữ liệu riêng tư cho ứng dụng.

Tuesday, November 18, 2014

Sử dụng thư viện PhpMailer để gởi thư


Sử dụng thư việc PhpMailer để gởi thư. Chúng ta sử dụng tài khoản gmail để gởi thư.

Thư viện phpmailer download từ website sourceforge.net

1 $mail = new PHPMailer(true);
2 $mail->IsSMTP();
3 try {
4 $mail->CharSet = "UTF-8";
5 $mail->Host = "salomon.com";
6 $mail->SMTPDebug = 1;
7 $mail->SMTPAuth = true;
8 $mail->SMTPSecure = "ssl";
9 $mail->Host = "smtp.gmail.com";
10 $mail->Port = 587;
11 $mail->Username = "ngotuongdan04";
12 $mail->Password = "ngotuongdan";
13 $mail->AddReplyTo('ntdan@ctu.edu.vn', 'Web master');
14 $mail->AddAddress($email, "Web master");
15 $mail->SetFrom('ntdan@ctu.edu.vn', 'Web master');
16 $mail->AddReplyTo('ntdan@ctu.edu.vn', 'Web master');
17 $mail->Subject = 'M?t kh?u m?i';
18 $mail->AltBody = 'S? d?ng tr?nh duy?t tương ?ng!';
19 $mail->Body = $newpass;
20 $mail->Send();
21 } catch (phpmailerException $e) {
22 echo $e->errorMessage();
23 } catch (Exception $e) {
24 echo $e->getMessage();
25 }
26


Lưu ý thay thế tài khoản và mật khẩu mail của bạn

Translate