Hi đây là tài liệu PHP và MySql khá hay tôi share ra đây để mọi người tham khảo nhé.
PHP and MySQL Web Development 4th Edition
Friday, October 12, 2012

Tuesday, October 9, 2012
RMI - ví dụ tạo ứng dụng phân tán đơn giản
Create RMI Application
- Create Remote Interface
- Create Remote Object
- Implement the Remote Interface
- Built RMI Server
- Built RMI Client
Step I. Create Java Application
Create the Java application with name RMI.
Create Remote Interface
[sourcecode language="csharp"]
/*Create Remote Interface
* To change this template, choose Tools | Templates
* and open the template in the editor.
*/
package rmi;
import java.rmi.Remote;
import java.rmi.RemoteException;
/**
*
* @author Administrator
*/
public interface WeatherInterface extends Remote{
public Weather getWeather() throws RemoteException;
}
[/sourcecode]
Step II. Create Remote Object
[sourcecode language="csharp"]
/*
* To change this template, choose Tools | Templates
* and open the template in the editor.
*/
package rmi;
import java.io.Serializable;
/**
*
* @author Administrator
*/
public class Weather implements Serializable{
private String name = "";
private float temperature = 0.0F;
/**
* @return the name
*/
public String getName() {
return name;
}
/**
* @param name the name to set
*/
public void setName(String name) {
this.name = name;
}
/**
* @return the degree
*/
public float getTemperature() {
return temperature;
}
/**
* @param degree the degree to set
*/
public void setTemperature(float temperature) {
this.temperature = temperature;
}
public Weather() {
name = "NoCity";
temperature = 0.0F;
}
}
[/sourcecode]
Step III. Implement the Remote Interface
[sourcecode language="csharp"]
/*
* To change this template, choose Tools | Templates
* and open the template in the editor.
*/
package rmi;
import java.rmi.RemoteException;
import java.rmi.server.UnicastRemoteObject;
/**
*
* @author Administrator
*/
public class WeatherImpl extends UnicastRemoteObject implements WeatherInterface{
Weather weather;
public WeatherImpl(Weather weatherObj) throws RemoteException
{
super();
this.weather = weatherObj;
}
public Weather getWeather() throws RemoteException {
return weather;
}
}
[/sourcecode]
Step IV. Built RMI Server
When click on Start server
[sourcecode language="csharp"]
private void jButton1ActionPerformed(java.awt.event.ActionEvent evt) {
// TODO add your handling code here:
weather = new Weather();
weather.setName("Can Tho");
weather.setTemperature(50.5F);
try {
weatherImpl = new WeatherImpl(weather);
LocateRegistry.createRegistry(5000);
Naming.rebind("rmi://localhost:5000/WeatherServer",weatherImpl);
JOptionPane.showMessageDialog(this, "Server started");
jButton1.setEnabled(false);
jButton2.setEnabled(true);
} catch (Exception ex) {
ex.printStackTrace();
}
}
[/sourcecode]
When click on Update
private void jButton2ActionPerformed(java.awt.event.ActionEvent evt) {
// TODO add your handling code here:
weather.setName(jTextField1.getText());
weather.setTemperature(Float.parseFloat(jTextField2.getText()));
}
Step V. Built RMI Client
When click on Get weather
[sourcecode language="csharp"]
Weather weather;
WeatherInterface weatherInter;
private void jButton1ActionPerformed(java.awt.event.ActionEvent evt) {
// TODO add your handling code here:
try {
weatherInter = (WeatherInterface)Naming.lookup("rmi://localhost:5000/WeatherServer");
weather = weatherInter.getWeather();
JOptionPane.showMessageDialog(this, weather.getName() + " is " + weather.getTemperature());
} catch (RemoteException ex) {
ex.printStackTrace();
} catch (MalformedURLException ex) {
ex.printStackTrace();
} catch (NotBoundException ex) {
ex.printStackTrace();
}
}
[/sourcecode]


Sunday, October 7, 2012
Lập trình phân tán với .Net - (.Net remoting)
DOT NET REMOTING
[sourcecode language="csharp" wrapline="false"]
using System;
using System.Collections.Generic;
using System.Linq;
using System.Text;
using System.Collections;
using System.Diagnostics;
using System.Security.Permissions;
using System.Data;
using System.Data.SqlClient;
namespace ProxyObject
{
public class MyProxy: MarshalByRefObject
{
ArrayList Re_list = new ArrayList();
/// <summary>
/// Ham khoi tao
/// </summary>
public MyProxy(){}
public bool MakeRequest(string UserName)
{
this.Re_list.Add(UserName + " - " + DateTime.Now.ToString("dd-MM-yyyy HH:mm:ss"));
return true;
}
public string GetInfor()
{
string re = "Hello: ";
for (int i = 0; i < this.Re_list.Count; i++)
{
re += "\n"+this.Re_list[i];
}
return re;
}
public DataSet GetEmployees()
{
DataSet ds = new DataSet();
SqlConnection conn = new SqlConnection("Server=.\\SqlExpress;database=Northwind;Integrated Security=SSPI;");
conn.Open();
SqlDataAdapter adp = new SqlDataAdapter("Select * from Employees", conn);
adp.Fill(ds, "Employee");
return ds;
}
[PrincipalPermissionAttribute(SecurityAction.Demand, Role = "Administrators")]
public string Shutdown()
{
Process.Start("shutdown", "/l");
return "OK";
}
}
}
[/sourcecode]

[sourcecode language="csharp" wrapline="false"]
using System;
using System.Collections.Generic;
using System.ComponentModel;
using System.Data;
using System.Drawing;
using System.Linq;
using System.Text;
using System.Windows.Forms;
using System.Runtime.Remoting;
using System.Runtime.Remoting.Channels;
using ProxyObject;
using System.Runtime.Remoting.Channels.Http;
namespace Server
{
public partial class FrmServer : Form
{
HttpChannel httpChanel;
public FrmServer()
{
InitializeComponent();
AppDomain.CurrentDomain.SetPrincipalPolicy(System.Security.Principal.PrincipalPolicy.WindowsPrincipal);
}
private void btnStart_Click(object sender, EventArgs e)
{
StartServer();
}
private void StopServer()
{
if (ChannelServices.GetChannel("http") != null)
ChannelServices.UnregisterChannel(httpChanel);
lstLog.Items.Add("Server stopped !");
}
private void StartServer()
{
StopServer();
int port = Convert.ToInt32(txtPort.Text);
WellKnownObjectMode mode = chkCall.Checked ? WellKnownObjectMode.SingleCall : WellKnownObjectMode.Singleton;
httpChanel = new HttpChannel(port);
ChannelServices.RegisterChannel(httpChanel, false);
RemotingConfiguration.RegisterWellKnownServiceType(typeof(MyProxy), "MyServices", mode);
lstLog.Items.Add("Server started !");
}
private void btnStop_Click(object sender, EventArgs e)
{
StopServer();
}
private void button1_Click(object sender, EventArgs e)
{
ProxyObject.MyProxy obj = new MyProxy();
obj.Shutdown();
}
}
}
[/sourcecode]

[sourcecode language="csharp"]
using System;
using System.Collections.Generic;
using System.ComponentModel;
using System.Data;
using System.Drawing;
using System.Linq;
using System.Text;
using System.Windows.Forms;
using System.Runtime.Remoting;
using ProxyObject;
using System.Security.Principal;
namespace Client
{
public partial class Form1 : Form
{
MyProxy obj;
public Form1()
{
InitializeComponent();
AppDomain.CurrentDomain.SetPrincipalPolicy(System.Security.Principal.PrincipalPolicy.WindowsPrincipal);
}
private void btnConnect_Click(object sender, EventArgs e)
{
string url = "http://" + txtServer.Text + ":" + txtPort.Text + "/MyServices";
RemotingConfiguration.RegisterWellKnownClientType(typeof(MyProxy), url);
btnGet.Enabled = true;
button1.Enabled = true;
obj = new MyProxy();
btnConnect.Enabled = false;
}
private void btnGet_Click(object sender, EventArgs e)
{
obj.MakeRequest(textBox1.Text);
rTContent.Text = obj.GetInfor();
}
private void button1_Click(object sender, EventArgs e)
{
try
{
obj = new MyProxy();
dataGridView1.DataSource = obj.GetEmployees().Tables[0];
}
catch (Exception ex)
{
MessageBox.Show(ex.ToString());
}
}
}
}
[/sourcecode]
Test application


 Chúc bạn thành công.
- Create Remote Object
- Create Server
- Create Client
- Create Class Library project
- Create a class MyProxy
[sourcecode language="csharp" wrapline="false"]
using System;
using System.Collections.Generic;
using System.Linq;
using System.Text;
using System.Collections;
using System.Diagnostics;
using System.Security.Permissions;
using System.Data;
using System.Data.SqlClient;
namespace ProxyObject
{
public class MyProxy: MarshalByRefObject
{
ArrayList Re_list = new ArrayList();
/// <summary>
/// Ham khoi tao
/// </summary>
public MyProxy(){}
public bool MakeRequest(string UserName)
{
this.Re_list.Add(UserName + " - " + DateTime.Now.ToString("dd-MM-yyyy HH:mm:ss"));
return true;
}
public string GetInfor()
{
string re = "Hello: ";
for (int i = 0; i < this.Re_list.Count; i++)
{
re += "\n"+this.Re_list[i];
}
return re;
}
public DataSet GetEmployees()
{
DataSet ds = new DataSet();
SqlConnection conn = new SqlConnection("Server=.\\SqlExpress;database=Northwind;Integrated Security=SSPI;");
conn.Open();
SqlDataAdapter adp = new SqlDataAdapter("Select * from Employees", conn);
adp.Fill(ds, "Employee");
return ds;
}
[PrincipalPermissionAttribute(SecurityAction.Demand, Role = "Administrators")]
public string Shutdown()
{
Process.Start("shutdown", "/l");
return "OK";
}
}
}
[/sourcecode]
- Combine project
- Create new Window Application Project
- Add References library project
- Add new form and design as
[sourcecode language="csharp" wrapline="false"]
using System;
using System.Collections.Generic;
using System.ComponentModel;
using System.Data;
using System.Drawing;
using System.Linq;
using System.Text;
using System.Windows.Forms;
using System.Runtime.Remoting;
using System.Runtime.Remoting.Channels;
using ProxyObject;
using System.Runtime.Remoting.Channels.Http;
namespace Server
{
public partial class FrmServer : Form
{
HttpChannel httpChanel;
public FrmServer()
{
InitializeComponent();
AppDomain.CurrentDomain.SetPrincipalPolicy(System.Security.Principal.PrincipalPolicy.WindowsPrincipal);
}
private void btnStart_Click(object sender, EventArgs e)
{
StartServer();
}
private void StopServer()
{
if (ChannelServices.GetChannel("http") != null)
ChannelServices.UnregisterChannel(httpChanel);
lstLog.Items.Add("Server stopped !");
}
private void StartServer()
{
StopServer();
int port = Convert.ToInt32(txtPort.Text);
WellKnownObjectMode mode = chkCall.Checked ? WellKnownObjectMode.SingleCall : WellKnownObjectMode.Singleton;
httpChanel = new HttpChannel(port);
ChannelServices.RegisterChannel(httpChanel, false);
RemotingConfiguration.RegisterWellKnownServiceType(typeof(MyProxy), "MyServices", mode);
lstLog.Items.Add("Server started !");
}
private void btnStop_Click(object sender, EventArgs e)
{
StopServer();
}
private void button1_Click(object sender, EventArgs e)
{
ProxyObject.MyProxy obj = new MyProxy();
obj.Shutdown();
}
}
}
[/sourcecode]
- Create new Window Application Project
- Add References library project
- Add new form and design as
[sourcecode language="csharp"]
using System;
using System.Collections.Generic;
using System.ComponentModel;
using System.Data;
using System.Drawing;
using System.Linq;
using System.Text;
using System.Windows.Forms;
using System.Runtime.Remoting;
using ProxyObject;
using System.Security.Principal;
namespace Client
{
public partial class Form1 : Form
{
MyProxy obj;
public Form1()
{
InitializeComponent();
AppDomain.CurrentDomain.SetPrincipalPolicy(System.Security.Principal.PrincipalPolicy.WindowsPrincipal);
}
private void btnConnect_Click(object sender, EventArgs e)
{
string url = "http://" + txtServer.Text + ":" + txtPort.Text + "/MyServices";
RemotingConfiguration.RegisterWellKnownClientType(typeof(MyProxy), url);
btnGet.Enabled = true;
button1.Enabled = true;
obj = new MyProxy();
btnConnect.Enabled = false;
}
private void btnGet_Click(object sender, EventArgs e)
{
obj.MakeRequest(textBox1.Text);
rTContent.Text = obj.GetInfor();
}
private void button1_Click(object sender, EventArgs e)
{
try
{
obj = new MyProxy();
dataGridView1.DataSource = obj.GetEmployees().Tables[0];
}
catch (Exception ex)
{
MessageBox.Show(ex.ToString());
}
}
}
}
[/sourcecode]
Test application
Chúc bạn thành công.
Saturday, August 11, 2012
Mốt số bài thực hành PHP căn bản
Thực hành căn bản về PHP
Bài tập 3.1: Tạo và kiểm tra kết quả của các trang PHP với Dreamveawer CS5, Apache server.
Bước 1. Tạo website với công cụ Dreamveawer

Hình 1.1 - Giao diện tạo site
Chọn New Site

Hình 1.2 - Thiết lặp tên
Chọn server để cấu hình server web phục vụ biên dịch PHP. Tiếp đến, nhấn vào dấu cộng (+) để thêm thông tin máy chủ web.

Hình 1.3 - Máy chủ web
Cung cấp thông tin như hình và chuyển sang tab Advanced

Hình 1.4 - Chọn công nghệ PHP MySQL
Nhấn lựa chọn từ hộp xổ (Server Model) như trên hình. Tiếp đến, nhấn Save để hoàn thành thiết lập máy chủ web.

Hình 1.5 - Xác nhận kiểm tra qua máy chủ
Nhấn vào Testing như hình trên. Nhấn Save để hoàn thành giai đoạn tạo và cấu hình website. Chúng ta sẽ có giao diện như sau.

Hình 1.6 - Giao diện sau khi thiết lập cấu hình
Bước 2. Tạo trang web đầu tiên
- Nhấn chuột phải lên tên website (salomon) và chọn New File.
- Đổi tên tập tin vừa sinh ra thành TrangDauTien.php.
- Nhấn đổi lên tập tin ta có giao diện sau
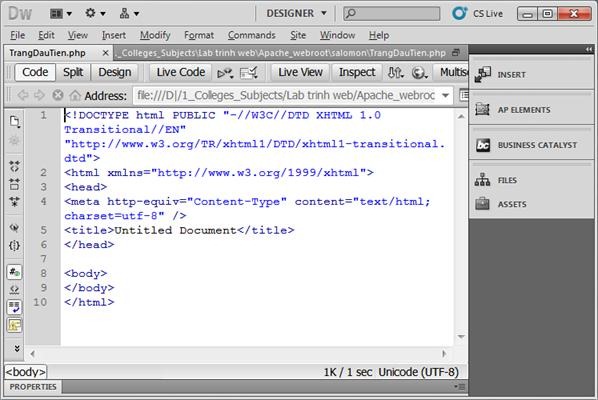
Hình 1.7 - Trang đầu tiên
- Bổ sung thông tin sau vào giữu thẻ body
<?php echo "<H1>Hello PHP World</H1>”; ?>
Bước 3. Chạy trang PHP và kiểm tra kết quả
- Để kiểm tra kết quả trang sau khi biên dịch chúng ta nhấn phím F12.

Hình 1.8 - Kết quả trang đầu tiên.
-Thao tác này lặp lại ở tất cả các trang chúng ta học về sau.
Bài tập 3.2: Xây dựng trang PHP đầu tiên
<html>
<head>
<title> In ra màn hình chuỗi Hello World</title>
</head>
<body>
<?php echo "<H1>Hello PHP World</H1>”; ?>
</body>
</html>

Hình 1.9 - Kết quả hiển thị
Bài tập 3.3: Sư dụng hằng số
<html><head>
<title>My Movie Site</title></head>
<body>
<?php
define ("FAVMOVIE", "The Life of Brian");
echo "My favorite movie is ";
echo FAVMOVIE;
?>
</body>
</html>
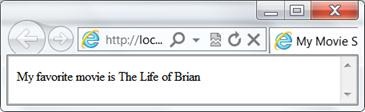
Hình 1.10 - Sử dụng hằng số
-Sử dụng hằng số
Bài tập 3.4: Câu lệnh if
<?php
//Khai báo và khởi tạo giá trị
$a = true;
$b = 2;
// biểu thức điều kiện
if (($b>=2 ) &&($b != true ))
// in kết quả
echo “Kết quả đúng”;
if (($b < 2 ) || ($b == true ))
echo “Kết quả sai”;
?>
Bài tập 3.5: Hiển thị table có số cột và dòng có thể thay đổi dòng và cột theo biến $cot và $dong.
Bước 1. Tạo một table có 1 dòng và 1 cột trước cái đã
<table width="300px" border="0" cellspacing="0" cellpadding="3">
<tr>
<td> </td>
</tr>
</table>
Bước 2. Đặt vòng for thứ nhất vào code table bạn vừa tạo để lặp số dòng.
<?php $cot=3; $dong=5;?>
<table width="100px" border="1" cellspacing="0" cellpadding="3">
<?php for($i=1;$i<=$dong;$i++){?>
<tr>
<td> </td>
</tr>
<?php } ?>
</table>
Bước 3. Đặt vòng FOR thứ 2 để lặp số cột (ô) trong mỗi dòng và hoàn thành code
<?php $cot=3; $dong=5;?>
<table width="100px" border="1" cellspacing="0" cellpadding="3">
<?php for($i=1;$i<=$dong;$i++){?>
<tr>
<?php for($j=1;$j<=$cot;$j++){?>
<td> </td>
<?php } ?>
</tr>
<?php } ?>
</table>
Bây giờ bạn chỉ cần thay đổi biến $cot và $dong là có thể tạo table với số dòng và cột theo ý muốn.
Bài tập 3.6: Cho biến n=10, và chuỗi "Lập trình PHP". Thực hiện in ra 10 dòng với nội dung là chuỗi lập trình PHP. Dòng chẳn có màu nền xanh, dòng lẻ không tô màu nền.

Hình 1.11 - Demo if, for
-Sử dụng if, for và toán tử % lấy phần dư
<html>
<head>
<meta http-equiv="Content-Type" content="text/html; charset=utf-8" />
<title>Demo if, for</title>
</head>
<body>
<table align="center" width="400px" border="1px" cellspacing="0" cellpadding="3" >
<tr>
<th>STT</th>
<th>Nội dung</th>
</th>
<?php $n=10; $chuoi="Lập trình PHP";?>
<?php for($i=1;$i<=$n;$i++){
if($i % 2 == 0)
echo "<tr bgcolor='#669933'>";
else
echo "<tr>";
?>
<td><?php echo $i;?></td>
<td>Dòng <?php echo $i . " : " . $chuoi; ?></td>
</tr>
<?php }
?>
</table>
</body>
</html>
Bài tập 3.7: Cho dãy số từ 0 -100. Viết code để lấy những số chia hết cho 7 và hiển thị như sau:

Hình 1.12 - Số chia hết cho 7 trong 100 số đầu tiên
-Sử dụng if, foreach, for, mảng để thực hiện
Mã nguồn thực hiện
<?php $n=100;
for($i=7;$i<=$n;$i++)
{
if($i%7==0)
{
$mang[]=$i;
}
}
$dem = count($mang);
echo "Tìm được: " . $dem . " số<hr>";
echo "Các số đó là: ";
foreach ($mang as $bien)
{
echo $bien . " ";
}
?>
Bài tập 3.8: Viết ứng dụng đơn giản để chọn ngày tháng năm.

Hình 1.13 - Kết quả ứng dụng ngày, tháng, năm
-Kết hợp html, for, wilde, do…while
<!DOCTYPE html PUBLIC "-//W3C//DTD XHTML 1.0 Transitional//EN" "http://www.w3.org/TR/xhtml1/DTD/xhtml1-transitional.dtd">
<html xmlns="http://www.w3.org/1999/xhtml">
<head>
<meta http-equiv="Content-Type" content="text/html; charset=utf-8" />
<title>Ngày Tháng Năm</title>
</head>
<body>
<table border="0">
<tr>
<td>Ngày:
<select name="ngay" id="ngay">
<?php for($i=1;$i<=31;$i++){?>
<option value="<?php echo $i;?>"><?php echo $i;?></option>
<?php }?>
</select></td>
<td>tháng:
<select name="thang" id="thang">
<?php $i=1;
while($i<=12){ ?>
<option value="<?php echo $i; ?>"><?php echo $i; ?> </option>
<?php $i++;}?>
</select></td>
<td>năm:
<select name="nam" id="nam">
<?php $i=1900;
do{ ?>
<option value="<?php echo $i; ?>"><?php echo $i; ?> </option>
<?php $i++;}while($i<=2011);?>
</select></td>
<td> </td>
</tr>
</table>
</body>
</html>
Bài tập 3.9: Xây dựng trang hiển thị sản phẩm như sau:

Hình 1.14 - Hiển thị hình ảnh
-Sử dụng PHP để tạo trang bên trên.
Bài tập 3.10: Hiển thị danh sách sản phẩm như sau:

Hình 1.15 - Danh sách sản phẩm
-Sử dụng vòng lặp và điều kiện để xác định màu cảu dòng khi vẽ.
Bài tập 3.11: Sử dụng các hàm định dạng thời gian
- Lấy ngày, tháng, năm, giờ, phút, giây hiện tại của server.
- In ra màn hình với nhiều định dạng khác nhau

Hình 1.16 - Thời gian
Mã nguồn tham khảo
<!DOCTYPE html PUBLIC "-//W3C//DTD XHTML 1.0 Transitional//EN" "http://www.w3.org/TR/xhtml1/DTD/xhtml1-transitional.dtd">
<html xmlns="http://www.w3.org/1999/xhtml">
<head>
<meta http-equiv="Content-Type" content="text/html; charset=utf-8" />
<title>Thời gian</title>
</head>
<body>
<?php
echo "Hôm này: Ngày ".date("d")." tháng ".date("m")." năm ".date("y");
echo "</br>".date("Y/m/d - h:m:s") . "<br />";
echo date("Y.m.d - H:m:s") . "<br />";
echo date("Y-m-d - h:m:s");
$ngaymai = mktime(0,0,0,date("m"),date("d")+1,date("y"));
echo "</br>Ngày mai: ".date("d - m - y",$ngaymai);
?>
</body>
</html>
Bài tập 3.12: Hàm chuyển đổi ngày tháng
- Trong cơ sở dữ liệu MySQL với dữ liệu dạng Date(ngày tháng) được lưu dưới dạng YYYY-MM-DD, nhưng chúng ta thường viết ngày tháng dạng DD-MM-YYYY, vậy vấn đề đặt ra là chúng ta phải chuyển đổi dạng mà người dùng nhập vào để lưu vào Database.
- Chúng sẽ viết hàm này như sau:
<?php$Time="14-02-2012";function ChangeDate($Date){ // Change Date format to insert DB$m = explode("-",$Date);return $Date = $m[2]."-".$m[1]."-".$m[0];}$date = ChangeDate($Time);echo $date;?>
Kết quả lả: 2012-02-14
- Trong hàm trên chúng ta dùng explode() để tách chuỗi $Time dựa vào dấu "-" và tôi sắp sếp lại mảng tìm được, đưa vào biến $Date.
Bài tập 3.13: Xây dựng trang nhận thông tin tài khoản và mật khẩu của người dùng có giao diện như sau:
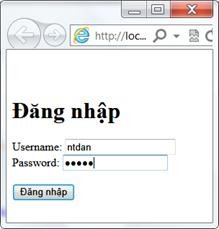
Hình 1.17 - Giao diện đăng nhập
Khi người dùng nhập thông tin về tài khoản và nhấn Đăng nhập
§ Thực hiện đọc thông tin trên giao diện
§ Kiểm tra nếu tài khoản là “admin” và mật khẩu là “admin” thì xem như chứng thực thành công, in ra màn hình “Chào bạn, rất vui gặp lại bạn”
§ Ngược lại in ra màn hình “Tôi không tìm thấy thông tin của bạn cung cấp.”

Hình 1.18 - Giao diện chứng thực đúng

Hình 1.19 - Giao diện chứng thực sai
Mã nguồn tham khảo
<!DOCTYPE html PUBLIC "-//W3C//DTD XHTML 1.0 Transitional//EN" "http://www.w3.org/TR/xhtml1/DTD/xhtml1-transitional.dtd">
<html xmlns="http://www.w3.org/1999/xhtml">
<head>
<meta http-equiv="Content-Type" content="text/html; charset=utf-8" />
<title>Untitled Document</title>
</head>
<?php
#nhận giá trị của form
if(isset($_GET['uname']))
{
$strUName = $_GET["uname"];
$strPWord = $_GET["pword"];
if($strUName=="admin" && $strPWord=="admin")
{
echo "Chào bạn, rất vui gặp lại bạn";
}
else
{
echo "Tôi không tìm thấy thông tin của bạn cung cấp.";
}
}
?>
<body>
<br />
<br />
<h1>Đăng nhập</h1>
<form name="form1" method="get" action="dangnhap.php">
Username:
<input type="text" name="uname"><br>
Password:
<input type="password" name="pword"><br><br>
<input type="submit" name="Submit" value="Đăng nhập">
</form>
</body>
</html>
-Trong mã nguồn bên trên có sử dụng hàm isset() đây là hàm kiểm tra sự tồn tại của một biến. Kết quả trả về true nếu biến đã tồn tại.
Bài tập 3.14: Xây dựng trang đăng ký người dùng với giao diện như sau (DangKy.html)

Hình 1.20 - Giao diện trang đăng ký.
-Trong trang này chúng ta nhúng thêm style.css đã xây dựng ở phần 01 chương trình học lập trình web chuyên nghiệp để định dạng giao diện như bên trên.
Khi nhấn “Đăng ký” đọc thông tin trên giao diện và in ra màn hình ở trang thứ 2 như sau (DangKy.php):

Mã nguồn tham khảo
<title>Kết quả đăng ký</title>
<?php
if(isset($_POST["txtTenDangNhap"]))
{
echo "Chúc mừng bạn đã đăng ký thành công ! Thông tin đăng ký như sau: <br/>";
echo "Tên đăng nhập: <b>". $_POST["txtTenDangNhap"]."</b>";
echo "<br/>Họ tên: <b>". $_POST["txtHoTen"]."</b>";
echo "<br/>Địa chỉ: <b>". $_POST["txtDiaChi"]."</b>";
echo "<br/>Số điện thoại: <b>". $_POST["txtDienThoai"]."</b>";
echo "<br/>Email: <b>". $_POST["txtEmail"]."</b>";
}
?>
-Qui định thuộc tính method của form là POST và action là DangKy.php
Friday, August 10, 2012
Một số video hướng dẫn lớp web 02
Cài đặt mysql workbench
Cài đặt XAMPP
Tạo site với DreamVeawer CS5
Thiết kế database
Viết SQL
Import và export dữ liệu
Sử dụng phpMyAdmin
Friday, July 6, 2012
Demo bulkcopy với ADO.NET
Trong phần này tôi demo khả năng sao chép nhanh dữ liệu hàng loạt với ADO.NET

[sourcecode language="CSharp" wraplines="false"]
using System;
using System.Collections.Generic;
using System.ComponentModel;
using System.Data;
using System.Drawing;
using System.Linq;
using System.Text;
using System.Windows.Forms;
using System.Data.SqlClient;
using System.Security.Principal;
namespace BulkCopy
{
public partial class Copy : Form
{
SqlConnection conn;
SqlConnection DesConn;
SqlBulkCopy bulk;
public Copy()
{
InitializeComponent();
conn = new SqlConnection("Server=.;database=Northwind;uid=sa;pwd=sa;");
DesConn = new SqlConnection("Server=.;database=Northwind;uid=sa;pwd=sa;");
conn.Open();
DesConn.Open();
bulk = new SqlBulkCopy(DesConn);
}
private void button1_Click(object sender, EventArgs e)
{
listBox1.Items.Insert(0, "BulkCopy started " + DateTime.Now.ToString("HH - MM - ss"));
// Perform an initial count on the destination table.
SqlCommand command = new SqlCommand("SELECT * FROM Items", conn);
SqlDataReader reader = command.ExecuteReader();
bulk.DestinationTableName = "NewItems";
bulk.WriteToServer(reader);
reader.Close();
listBox1.Items.Insert(0, "BulkCopy end " + DateTime.Now.ToString("HH - MM - ss"));
}
private void button2_Click(object sender, EventArgs e)
{
SqlCommand comm = new SqlCommand("Delete NewItems", DesConn);
comm.ExecuteNonQuery();
}
private void button3_Click(object sender, EventArgs e)
{
listBox1.Items.Insert(0, "Copy started " + DateTime.Now.ToString("HH - MM - ss"));
// Perform an initial count on the destination table.
SqlCommand command = new SqlCommand("SELECT * FROM Items", conn);
SqlDataReader reader = command.ExecuteReader();
SqlCommand comm = new SqlCommand("", DesConn);
while (reader.Read())
{
comm.CommandText = "Insert into NewItems values(" + reader.GetValue(0).ToString() + ",'" + reader.GetValue(1).ToString() + "')";
comm.ExecuteNonQuery();
}
reader.Close();
listBox1.Items.Insert(0, "Copy end " + DateTime.Now.ToString("HH - MM - ss"));
}
private void Copy_Load(object sender, EventArgs e)
{
WindowsIdentity user = System.Security.Principal.WindowsIdentity.GetCurrent();
this.Text = user.Name;
toolStripStatusLabel1.Text = user.Name;
}
}
}
[/sourcecode]
[sourcecode language="CSharp" wraplines="false"]
using System;
using System.Collections.Generic;
using System.ComponentModel;
using System.Data;
using System.Drawing;
using System.Linq;
using System.Text;
using System.Windows.Forms;
using System.Data.SqlClient;
using System.Security.Principal;
namespace BulkCopy
{
public partial class Copy : Form
{
SqlConnection conn;
SqlConnection DesConn;
SqlBulkCopy bulk;
public Copy()
{
InitializeComponent();
conn = new SqlConnection("Server=.;database=Northwind;uid=sa;pwd=sa;");
DesConn = new SqlConnection("Server=.;database=Northwind;uid=sa;pwd=sa;");
conn.Open();
DesConn.Open();
bulk = new SqlBulkCopy(DesConn);
}
private void button1_Click(object sender, EventArgs e)
{
listBox1.Items.Insert(0, "BulkCopy started " + DateTime.Now.ToString("HH - MM - ss"));
// Perform an initial count on the destination table.
SqlCommand command = new SqlCommand("SELECT * FROM Items", conn);
SqlDataReader reader = command.ExecuteReader();
bulk.DestinationTableName = "NewItems";
bulk.WriteToServer(reader);
reader.Close();
listBox1.Items.Insert(0, "BulkCopy end " + DateTime.Now.ToString("HH - MM - ss"));
}
private void button2_Click(object sender, EventArgs e)
{
SqlCommand comm = new SqlCommand("Delete NewItems", DesConn);
comm.ExecuteNonQuery();
}
private void button3_Click(object sender, EventArgs e)
{
listBox1.Items.Insert(0, "Copy started " + DateTime.Now.ToString("HH - MM - ss"));
// Perform an initial count on the destination table.
SqlCommand command = new SqlCommand("SELECT * FROM Items", conn);
SqlDataReader reader = command.ExecuteReader();
SqlCommand comm = new SqlCommand("", DesConn);
while (reader.Read())
{
comm.CommandText = "Insert into NewItems values(" + reader.GetValue(0).ToString() + ",'" + reader.GetValue(1).ToString() + "')";
comm.ExecuteNonQuery();
}
reader.Close();
listBox1.Items.Insert(0, "Copy end " + DateTime.Now.ToString("HH - MM - ss"));
}
private void Copy_Load(object sender, EventArgs e)
{
WindowsIdentity user = System.Security.Principal.WindowsIdentity.GetCurrent();
this.Text = user.Name;
toolStripStatusLabel1.Text = user.Name;
}
}
}
[/sourcecode]
Transaction with ADO.NET - Quản lý phiên làm việc với ADO.NET
Transaction là một trong những thuật ngữ rất phổ biến đố với lập trình viên. Với SQLServer hay bấc kỳ một hệ quản trị csdl nào đều phải đảm bảo tính ACID, trong trường hợp thực thi hàng loạt các thao tác thay đổi đến csdl thì sẽ có những tình huống cần ràng buộc hoạt là tất cả hoàn thành hoạt là không tác vụ nào hoàn thành. Trong nội dung của bài này tôi giới thiệu với các bạn các thức cài đặc Transacton trên nền ADO.NET.
[caption id="attachment_668" align="aligncenter" width="300"] Transaction with ADO.NET[/caption]
Tham khảo sources nguồn tại đây:
[sourcecode language="CSharp" wraplines="false"]
using System;
using System.Collections.Generic;
using System.ComponentModel;
using System.Data;
using System.Drawing;
using System.Linq;
using System.Text;
using System.Windows.Forms;
using System.Data.SqlClient;
namespace Transaction
{
public partial class Form1 : Form
{
SqlConnection conn;
public Form1()
{
InitializeComponent();
conn = new SqlConnection("Server=.;database=Northwind;uid=sa;pwd=sa;");
}
private void button1_Click(object sender, EventArgs e)
{
if (conn.State == ConnectionState.Closed)
conn.Open();
listBox1.Items.Insert(0, "Connected");
}
private void button2_Click(object sender, EventArgs e)
{
listBox1.Items.Insert(0, "Transaction started");
SqlTransaction tran = conn.BeginTransaction("AddItems");
SqlCommand comm = new SqlCommand("", conn);
try
{
comm.Transaction = tran;
string strSql = "";
for (int i = 0; i < 10000; i++)
{
strSql += "Insert into Items values(" + i + ",'Name" + i + "')";
}
comm.CommandText = strSql;
int count = comm.ExecuteNonQuery();
if (count < 10000)
{
comm.Transaction.Rollback("AddItems");
listBox1.Items.Insert(0, "Transaction rollback");
}
else
{
comm.Transaction.Commit();
listBox1.Items.Insert(0, "Transaction commit");
}
}
catch
{
comm.Transaction.Rollback("AddItems");
listBox1.Items.Insert(0, "Exception raise -> Transaction rollback");
}
}
private void button3_Click(object sender, EventArgs e)
{
SqlCommand comm = new SqlCommand("Delete items", conn);
comm.ExecuteNonQuery();
}
}
}
[/sourcecode]
[caption id="attachment_668" align="aligncenter" width="300"]
Transaction with ADO.NET[/caption]Tham khảo sources nguồn tại đây:
[sourcecode language="CSharp" wraplines="false"]
using System;
using System.Collections.Generic;
using System.ComponentModel;
using System.Data;
using System.Drawing;
using System.Linq;
using System.Text;
using System.Windows.Forms;
using System.Data.SqlClient;
namespace Transaction
{
public partial class Form1 : Form
{
SqlConnection conn;
public Form1()
{
InitializeComponent();
conn = new SqlConnection("Server=.;database=Northwind;uid=sa;pwd=sa;");
}
private void button1_Click(object sender, EventArgs e)
{
if (conn.State == ConnectionState.Closed)
conn.Open();
listBox1.Items.Insert(0, "Connected");
}
private void button2_Click(object sender, EventArgs e)
{
listBox1.Items.Insert(0, "Transaction started");
SqlTransaction tran = conn.BeginTransaction("AddItems");
SqlCommand comm = new SqlCommand("", conn);
try
{
comm.Transaction = tran;
string strSql = "";
for (int i = 0; i < 10000; i++)
{
strSql += "Insert into Items values(" + i + ",'Name" + i + "')";
}
comm.CommandText = strSql;
int count = comm.ExecuteNonQuery();
if (count < 10000)
{
comm.Transaction.Rollback("AddItems");
listBox1.Items.Insert(0, "Transaction rollback");
}
else
{
comm.Transaction.Commit();
listBox1.Items.Insert(0, "Transaction commit");
}
}
catch
{
comm.Transaction.Rollback("AddItems");
listBox1.Items.Insert(0, "Exception raise -> Transaction rollback");
}
}
private void button3_Click(object sender, EventArgs e)
{
SqlCommand comm = new SqlCommand("Delete items", conn);
comm.ExecuteNonQuery();
}
}
}
[/sourcecode]
Subscribe to:
Posts (Atom)