JSF (Java Server Face) 2.2 bổ sung thêm thẻ inputFile cho phép upload file lên server web trở nên đơn giản hơn bao giờ hết.
[embed]https://youtu.be/caDsv_-EHPY[/embed]
1. Tạo Website sử dụng JSF 2.2
2. Tạo managebean như sau:
[sourcecode language="java"]
package codes;
import java.io.IOException;
import java.util.logging.Level;
import java.util.logging.Logger;
import javax.faces.bean.ManagedBean;
import javax.faces.bean.RequestScoped;
import javax.faces.context.FacesContext;
import javax.servlet.http.Part;
/**
*
* @author ntdan
*/
@ManagedBean
@RequestScoped
public class Upload_File {
private Part file;
private String fileName;
private long fileSize;
/**
* Creates a new instance of Upload_File
*/
public Upload_File() {
}
public Part getFile() {
return file;
}
public void setFile(Part file) {
this.file = file;
}
public String getFileName() {
return fileName;
}
public void setFileName(String fileName) {
this.fileName = fileName;
}
public String upload()
{
try {
// get name of selected file
fileName = file.getSubmittedFileName();
// get file's size
fileSize = file.getSize();
// get fullpath of opload folder in web root
String dirPath= FacesContext.getCurrentInstance().getExternalContext().getRealPath("/upload");
// write file to upload folder
file.write(dirPath + "/" + fileName);
} catch (IOException ex) {
Logger.getLogger(Upload_File.class.getName()).log(Level.SEVERE, null, ex);
}
return "view";
}
public long getFileSize() {
return fileSize;
}
public void setFileSize(long fileSize) {
this.fileSize = fileSize;
}
}
[/sourcecode]
3. Tạo trang index.xhtml để upload file như sau:
[sourcecode language="html"]
<?xml version='1.0' encoding='UTF-8' ?>
<!DOCTYPE html PUBLIC "-//W3C//DTD XHTML 1.0 Transitional//EN" "http://www.w3.org/TR/xhtml1/DTD/xhtml1-transitional.dtd">
<html xmlns="http://www.w3.org/1999/xhtml"
xmlns:h="http://xmlns.jcp.org/jsf/html"
xmlns:f="http://xmlns.jcp.org/jsf/core">
<h:head>
<title>Facelet Title</title>
</h:head>
<h:body>
Demo for upload file
<f:view>
<h:form enctype="multipart/form-data">
File:<br/>
<h:inputFile value="#{upload_File.file}"/>
<br/>
<h:commandButton value="Upload" action="#{upload_File.upload()}"/>
<br/>
File:${upload_File.fileName} - #{upload_File.fileSize} bytes !
</h:form>
</f:view>
</h:body>
</html>
[/sourcecode]
4. Tạo trang xem ảnh vừa upload và thông tin về hình
[sourcecode language="html"]
<?xml version='1.0' encoding='UTF-8' ?>
<!DOCTYPE html PUBLIC "-//W3C//DTD XHTML 1.0 Transitional//EN" "http://www.w3.org/TR/xhtml1/DTD/xhtml1-transitional.dtd">
<html xmlns="http://www.w3.org/1999/xhtml"
xmlns:h="http://xmlns.jcp.org/jsf/html"
xmlns:f="http://xmlns.jcp.org/jsf/core">
<h:head>
<title>Facelet Title</title>
</h:head>
<h:body>
<f:view>
<br/>
File:${upload_File.fileName} - #{upload_File.fileSize} bytes !
<br/>
<h:graphicImage url="/upload/#{upload_File.fileName}" width="400px"/>
</f:view>
</h:body>
</html>
[/sourcecode]
OK, chạy trang index.xhtml --> chonj file upload hệ thống sẽ chuyển qua trang view.xhtml để xem ảnh vừa upload.
Friday, September 25, 2015
Thursday, September 24, 2015
Hướng dẫn cài đặt, cấu hình và chạy chương trình Java đơn giản đầu tiên
- Download JDK
Các bạn vào địa chỉ sau để download JDK (hỗ trợ nhiều phiên bản):
http://www.oracle.com/technetwork/java/javase/downloads/index.html

Chọn Accept License Agreement -> Chọn hệ điều hành đúng để tiến hành tải về.
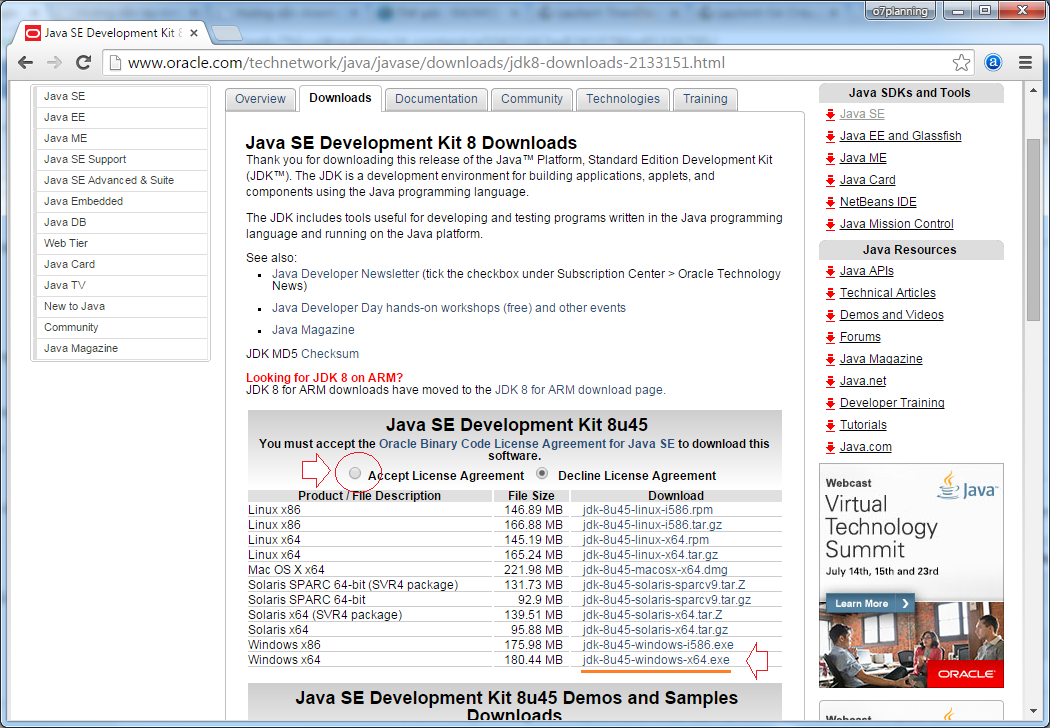
Sau khi tải về, cài đặt như các ứng dụng bình thường.

2. Cài đặt JDK

Các bạn có thể để đường dẫn mặc định khi cài đặt (C:\) hoặc chọn nơi cài đặt tùy chọn.
Sau khi cài đặt, chúng ta sẽ có 2 thư mục để có thể biên dịch và thông dịch một chương trình java:

3. Cấu hình biến môi trường cho java
Cấu hình trên CMD mỗi lần chạy 1 chương trình java bằng dòng lệnh:
- Copy thư mục JDK đã cài đặt : C:\Program Files\Java\jdk1.8.0_20\bin
- Thiết lập 2 biến PATH và CLASSPATH mỗi lần thực thi chương trình:
Giả sử, chương trình nằm trong ổ đĩa D:\

Cấu hình trên biến môi trường của Window:
 Đi đến Advanced system settings, chọn Enviroment Variables:
Tìm đến 2 biến Path và CLASSPATH để thiết lập các giá trị cho 2 biến này.
 4. Chạy chương trình đơn giản đầu tiên
Viết một chương trình đầu tiên với lớp Hello trong Notepad và lưu lại với tên Hello.java:
 Biên dịch Hello.java thành file Hello.class bằng chương trình javac.exe trong bộ JDK vừa cài đặt ở trên:
 - Vào thư mục chứa tập tin Hello.java, chúng ta sẽ thấy có tập tin Hello.class -> chính là tập tin sau khi biên dịch ra mã byte code.
- Tiến hành thông dịch tập tin Hello.class để thực thi bằng chương trình java.exe:
 Vậy là, chúng ta đã thực thi được một chương trình java đơn giản.
Chúc các bạn thành công.
Code tham khảo Hello.java
[source language="java"]
public class Hello {
/**
* @param args the command line arguments
*/
public static void main(String[] args) {
System.out.println("Hello you");
}
}
[/source]
Tham khảo video:
[embed]https://youtu.be/rT0cldaEf0w[/embed]
Tuesday, September 22, 2015
Bài tập IXJ - Object/ Object List to XML File and XML File to Object/ Object List
Trong bài tập này chúng ta sẽ chuyển đổi qua lại giữa XML và List<Object>. Bài tập chuyển từ Object <-> XML
Ví dụ danh sách chứa các Emp như sau:
[sourcecode language="java"]
Emp emp = new Emp();
emp.setCode("A001");
emp.setName("Nguyen Van Mit");
emp.setAddress("Can Tho");
emp.setTel("+8499999999");
Emp emp1 = new Emp();
emp1.setCode("A002");
emp1.setName("Tran Van Cam");
emp1.setAddress("Can Tho");
emp1.setTel("+848888888");
List<Emp> emplist = new ArrayList<Emp>();
emplist.add(emp);
emplist.add(emp1);
[/sourcecode]
Sẽ được chuyển thành file XML có nội dung như sau:
[sourcecode language="xml"]
<?xml version="1.0" encoding="UTF-8" standalone="yes"?>
<emplist>
<emp code="A001">
<address>Can Tho</address>
<name>Nguyen Van Mit</name>
<tel>+8499999999</tel>
</emp>
<emp code="A002">
<address>Can Tho</address>
<name>Tran Van Cam</name>
<tel>+848888888</tel>
</emp>
</emplist>
[/sourcecode]
Để thực thực việc chuyển đổi này chúng ta sử dụng thư viện JAXB của Java.
1. Tạo lớp Emp
[sourcecode language="java"]
package jaxb_object_list;
import javax.xml.bind.annotation.XmlAttribute;
import javax.xml.bind.annotation.XmlRootElement;
//the goc
@XmlRootElement(name = "emp")
public class Emp {
private String code;
private String name;
private String address;
private String tel;
public String getAddress() {
return address;
}
public void setAddress(String address) {
this.address = address;
}
public String getCode() {
return code;
}
@XmlAttribute
public void setCode(String code) {
this.code = code;
}
public String getName() {
return name;
}
public void setName(String name) {
this.name = name;
}
public String getTel() {
return tel;
}
public void setTel(String tel) {
this.tel = tel;
}
@Override
public String toString() {
return "Emp [code:" + code + ", name:" + name + ", address:"
+ address + ", tel:" + tel + "]";
}
}
[/sourcecode]
2. EmpList
[sourcecode language="java"]
package jaxb_object_list;
import java.util.ArrayList;
import java.util.List;
import javax.xml.bind.annotation.XmlAccessType;
import javax.xml.bind.annotation.XmlAccessorType;
import javax.xml.bind.annotation.XmlElement;
import javax.xml.bind.annotation.XmlRootElement;
// cac thuoc tinh duoc luu duoi dang the
@XmlAccessorType(XmlAccessType.FIELD)
// the goc
@XmlRootElement(name = "emplist")
public class EmpList {
// moi phan tu trong danh sach luu thanh the emp
// cau truc the emp mo ta qua lop Emp
@XmlElement(name = "emp", type = Emp.class)
private List<Emp> emplist = new ArrayList<Emp>();
public EmpList() {}
public EmpList(List<Emp> emplist) {
this.emplist = emplist;
}
public List<Emp> getEmpList() {
return emplist;
}
public void setEmpList(List<Emp> emplist) {
this.emplist = emplist;
}
}
[/sourcecode]
3. Tạo 2 phương thức để chuyển đổi
[sourcecode language="java"]
// chuyen ds doi tuong thanh xml
public static void marshal(List<Emp> emplist, File selectedFile)
throws IOException, JAXBException {
JAXBContext context;
BufferedWriter writer = null;
writer = new BufferedWriter(new FileWriter(selectedFile));
context = JAXBContext.newInstance(EmpList.class);
Marshaller m = context.createMarshaller();
m.setProperty(Marshaller.JAXB_FORMATTED_OUTPUT, true);
m.marshal(new EmpList(emplist), writer);
writer.close();
}
// chuyen XML thanh danh sach doi tuong
public static List<Emp> unmarshal(File importFile) throws JAXBException {
EmpList empList = new EmpList();
JAXBContext context = JAXBContext.newInstance(EmpList.class);
Unmarshaller um = context.createUnmarshaller();
empList = (EmpList) um.unmarshal(importFile);
return empList.getEmpList();
}
[/sourcecode]
4. Test
[sourcecode language="java"]
public static void main(String[] args) {
Emp emp = new Emp();
emp.setCode("A001");
emp.setName("Nguyen Van Mit");
emp.setAddress("Can Tho");
emp.setTel("+8499999999");
Emp emp1 = new Emp();
emp1.setCode("A002");
emp1.setName("Tran Van Cam");
emp1.setAddress("Can Tho");
emp1.setTel("+848888888");
List<Emp> emplist = new ArrayList<Emp>();
emplist.add(emp);
emplist.add(emp1);
//Marshalling: ghi ds doi tuong ra file xml
try {
JAXBXMLHandler.marshal(emplist, new File("src/jaxb_object_list/EmpList.xml"));
} catch (IOException e) {
e.printStackTrace();
} catch (JAXBException e) {
e.printStackTrace();
}
try {
// khoi tao ds tu XML
emplist = JAXBXMLHandler.unmarshal(new File("src/jaxb_object_list/EmpList.xml"));
} catch (JAXBException e) {
e.printStackTrace();
}
System.out.println(emplist);
}
[/sourcecode]
Tới đây chạy ứng dụng chúng ta sẽ có file xml sinh ra và mẫu in ra của sổ output
[sourcecode language="text"]
[Emp [code:A001, name:Nguyen Van Mit, address:Can Tho, tel:+8499999999], Emp [code:A002, name:Tran Van Cam, address:Can Tho, tel:+848888888]]
[/sourcecode]
Mã nguồn tham khảo tại đây
Monday, September 21, 2015
Bài tập IXJ - Import XML to WebApplication
Trong bài này chúng ta sẽ upload file XML có mẫu qui định trước lên web server và rút trích dữ liệu đề đưa vào SQL server.
Nội dung mẫu XML
[sourcecode language="xml"]
<emplist>
<emp status="off">
<id>1</id>
<name>Been</name>
</emp>
<emp status="on">
<id>2</id>
<name>Andrew</name>
</emp>
</emplist>
[/sourcecode]
Tạo một web site, sử dụng JSF 2.2
Tạo managebean như sau:
[sourcecode language="java"]
package codes;
import java.io.File;
import java.io.IOException;
import java.sql.Connection;
import java.sql.DriverManager;
import java.sql.PreparedStatement;
import java.sql.SQLException;
import java.util.logging.Level;
import java.util.logging.Logger;
import javax.faces.bean.ManagedBean;
import javax.faces.bean.RequestScoped;
import javax.faces.context.FacesContext;
import javax.servlet.http.Part;
import javax.xml.parsers.DocumentBuilder;
import javax.xml.parsers.DocumentBuilderFactory;
import javax.xml.parsers.ParserConfigurationException;
import org.w3c.dom.Document;
import org.w3c.dom.NodeList;
import org.xml.sax.SAXException;
/**
*
* @author ntdan
*/
@ManagedBean
@RequestScoped
public class FileUploadBean {
private Part file;
private String fileName = "";
/**
* Creates a new instance of FileUploadBean
*/
public FileUploadBean() {
}
public Part getFile() {
return file;
}
public void setFile(Part file) {
this.file = file;
}
public String upload() {
try {
fileName = file.getSubmittedFileName() + " "
+ file.getSize() + " bytes";
String filePath = FacesContext.getCurrentInstance().getExternalContext()
.getRealPath("/upload") + "/" + file.getSubmittedFileName();
// luu file
file.write(filePath);
// luu du lieu
importXML(filePath);
} catch (Exception ex) {
System.out.println(ex.toString());
}
return "index";
}
public String getFileName() {
return fileName;
}
public void setFileName(String fileName) {
this.fileName = fileName;
}
private void importXML(String filename) {
try {
Class.forName("com.microsoft.sqlserver.jdbc.SQLServerDriver");
Connection conn = DriverManager.getConnection("jdbc:sqlserver://172.16.160.54\\sql2008;database=northwind;user=sa;password=sa;");
PreparedStatement comm = conn.prepareStatement("insert into Employees(FirstName,LastName) values(?,?)");
DocumentBuilderFactory fac = DocumentBuilderFactory.newInstance();
DocumentBuilder db = fac.newDocumentBuilder();
Document doc = db.parse(new File(filename));
NodeList list = doc.getElementsByTagName("emp");
int pos = 0;
while (pos < list.getLength()) {
NodeList emp = list.item(pos).getChildNodes();
comm.setString(1, emp.item(3).getTextContent());
comm.setString(2, "L_" + emp.item(3).getTextContent());
// them du lieu
comm.executeUpdate();
pos++;
}
fileName += "\n" + pos +" rows added!";
} catch (ClassNotFoundException ex) {
Logger.getLogger(FileUploadBean.class.getName()).log(Level.SEVERE, null, ex);
} catch (SQLException ex) {
Logger.getLogger(FileUploadBean.class.getName()).log(Level.SEVERE, null, ex);
} catch (ParserConfigurationException ex) {
Logger.getLogger(FileUploadBean.class.getName()).log(Level.SEVERE, null, ex);
} catch (SAXException ex) {
Logger.getLogger(FileUploadBean.class.getName()).log(Level.SEVERE, null, ex);
} catch (IOException ex) {
Logger.getLogger(FileUploadBean.class.getName()).log(Level.SEVERE, null, ex);
}
}
}
[/sourcecode]
Hiệu chỉnh lại trang index.xhtml
[sourcecode language="html"]
<?xml version='1.0' encoding='UTF-8' ?>
<!DOCTYPE html PUBLIC "-//W3C//DTD XHTML 1.0 Transitional//EN" "http://www.w3.org/TR/xhtml1/DTD/xhtml1-transitional.dtd">
<html xmlns="http://www.w3.org/1999/xhtml"
xmlns:h="http://xmlns.jcp.org/jsf/html"
xmlns:f="http://xmlns.jcp.org/jsf/core">
<h:head>
<title>Upload</title>
</h:head>
<h:body>
<f:view>
<h:form enctype="multipart/form-data">
<h:inputFile value="#{fileUploadBean.file}"/>
<h:commandButton value="Upload"
action="#{fileUploadBean.upload()}"/><br/>
File: <h:outputText value="#{fileUploadBean.fileName}"/>
</h:form>
</f:view>
</h:body>
</html>
[/sourcecode]
Chạy trang index.xhtml --> chọn file emp.xml chứa nội dung và nhấn Upload chúng ta có giao diện như sau:

Mã nguồn tham khảo -->> ở đây
OK vậy là chúng ta đã import nội dung XML vào csdl.
Bài tập IXJ - FO sử dụng Apache FOP chuyển XML sang PDF
XSL-FO (XSL Formatting Objects) chuyển đổi dữ liệu XML sang các định dạng khác.

Trong bài thực hành này chúng ta sẽ sử dụng thư viện FOP của Apache tích hợp vào chương trình Java để chuyển tài liệu XML chứa CustomerOrders mua sản phẩm sang biểu mẩu PDF.
CustomerOrders

Các thư viện hỗ trợ -->> đây
Mã nguồn tham khảo như sau:
[sourcecode language="java"]
package fop_ex;
import java.io.File;
import java.io.OutputStream;
import javax.xml.transform.Result;
import javax.xml.transform.Source;
import javax.xml.transform.Transformer;
import javax.xml.transform.TransformerFactory;
import javax.xml.transform.sax.SAXResult;
import javax.xml.transform.stream.StreamSource;
import org.apache.fop.apps.FOUserAgent;
import org.apache.fop.apps.Fop;
import org.apache.fop.apps.FopFactory;
import org.apache.fop.apps.MimeConstants;
public class FOP_EX {
public static void main(String[] args) {
try {
// Setup directories
File baseDir = new File(".");
File outDir = new File(baseDir, "src/out");
outDir.mkdirs();
// Setup input and output files
File xmlfile = new File(baseDir, "src/xml/CustomerOrders.xml");
File xsltfile = new File(baseDir, "src/xslt/Customer_fo.xsl");
File pdffile = new File(outDir, "CustomerOrders.pdf");
// configure fopFactory as desired
final FopFactory fopFactory = FopFactory.newInstance(new File(".").toURI());
// configure foUserAgent as desired
FOUserAgent foUserAgent = fopFactory.newFOUserAgent();
// Setup output
OutputStream out = new java.io.FileOutputStream(pdffile);
out = new java.io.BufferedOutputStream(out);
try {
// Construct fop with desired output format
Fop fop = fopFactory.newFop(MimeConstants.MIME_PDF, foUserAgent, out);
// Setup XSLT
TransformerFactory factory = TransformerFactory.newInstance();
Transformer transformer = factory.newTransformer(new StreamSource(xsltfile));
// Set the value of a <param> in the stylesheet
transformer.setParameter("author", "Nguyen Van Mit");
// Setup input for XSLT transformation
Source src = new StreamSource(xmlfile);
// Resulting SAX events (the generated FO) must be piped through to FOP
Result res = new SAXResult(fop.getDefaultHandler());
// Start XSLT transformation and FOP processing
transformer.transform(src, res);
} finally {
out.close();
}
} catch (Exception e) {
e.printStackTrace(System.err);
System.exit(-1);
}
}
}
[/sourcecode]
File XSL-FO như sau:
[sourcecode language="xml"]
<?xml version="1.0" encoding="UTF-8"?>
<xsl:stylesheet version="1.1" xmlns:xsl="http://www.w3.org/1999/XSL/Transform" xmlns:fo="http://www.w3.org/1999/XSL/Format" exclude-result-prefixes="fo">
<xsl:output method="xml" version="1.0" omit-xml-declaration="no" indent="yes"/>
<xsl:param name="author" select="'Tran Van Cam'"/>
<xsl:template match="customers">
<fo:root xmlns:fo="http://www.w3.org/1999/XSL/Format">
<fo:layout-master-set>
<fo:simple-page-master master-name="simpleA4" page-height="29.7cm" page-width="21cm" margin-top="2cm" margin-bottom="2cm" margin-left="2cm" margin-right="2cm">
<fo:region-body/>
</fo:simple-page-master>
</fo:layout-master-set>
<fo:page-sequence master-reference="simpleA4">
<fo:flow flow-name="xsl-region-body">
<fo:block font-size="16pt" text-align="center" font-weight="bold" space-after="5mm">CUSTOMER ORDER LIST<xsl:value-of select="customers"/>
</fo:block>
<fo:block font-size="12pt" text-align="center" space-after="5mm">----oOo----</fo:block>
<fo:block font-size="10pt">
<fo:table table-layout="fixed" width="100%"
border-collapse="separate" border="solid"
border-separation="3pt">
<xsl:attribute-set name="table.cell.padding">
<xsl:attribute name="padding-left">2pt</xsl:attribute>
<xsl:attribute name="padding-right">2pt</xsl:attribute>
<xsl:attribute name="padding-top">2pt</xsl:attribute>
<xsl:attribute name="padding-bottom">2pt</xsl:attribute>
</xsl:attribute-set>
<fo:table-column column-width="2cm"/>
<fo:table-column column-width="5cm"/>
<fo:table-column column-width="5cm"/>
<fo:table-column column-width="2cm"/>
<fo:table-column column-width="3cm"/>
<fo:table-header>
<fo:table-row background-color="#0000FF" color="#FFFFFF">
<fo:table-cell text-align="center">
<fo:block>Order.</fo:block>
</fo:table-cell>
<fo:table-cell>
<fo:block>Customer name</fo:block>
</fo:table-cell>
<fo:table-cell>
<fo:block>Product name</fo:block>
</fo:table-cell>
<fo:table-cell text-align="right">
<fo:block>Quantity</fo:block>
</fo:table-cell>
<fo:table-cell text-align="right">
<fo:block>Price</fo:block>
</fo:table-cell>
</fo:table-row>
</fo:table-header>
<fo:table-body>
<xsl:apply-templates select="customer"/>
</fo:table-body>
</fo:table>
</fo:block>
<fo:block font-size="12pt" text-align="right" space-before="1cm">Signature</fo:block>
<fo:block font-size="12pt" text-align="right" space-before="2cm" space-after="5mm"> <xsl:value-of select="$author"/> </fo:block>
</fo:flow>
</fo:page-sequence>
</fo:root>
</xsl:template>
<xsl:template match="customer">
<xsl:variable name="bgclr">
<xsl:choose>
<xsl:when test="position() mod 2">#A7BFDE</xsl:when>
<xsl:otherwise>#EDF2F8</xsl:otherwise>
</xsl:choose>
</xsl:variable>
<fo:table-row background-color="{$bgclr}">
<xsl:if test="item='Laptop'">
<xsl:attribute name="font-weight">bold</xsl:attribute>
</xsl:if>
<fo:table-cell text-align="center">
<fo:block>
<xsl:value-of select="position()" format="1."/>
</fo:block>
</fo:table-cell>
<fo:table-cell>
<fo:block>
<xsl:value-of select="name"/>
</fo:block>
</fo:table-cell>
<fo:table-cell>
<fo:block>
<xsl:value-of select="item"/>
</fo:block>
</fo:table-cell>
<fo:table-cell text-align="right">
<fo:block>
<xsl:value-of select="quantity"/>
</fo:block>
</fo:table-cell>
<fo:table-cell text-align="right">
<xsl:attribute name="font-weight">bold</xsl:attribute>
<fo:block>
<xsl:value-of select="price"/>
</fo:block>
</fo:table-cell>
</fo:table-row>
</xsl:template>
</xsl:stylesheet>
[/sourcecode]
Căn bản là vậy !!!
Saturday, September 19, 2015
Bài tập IXJ - Schema Validator (DOM, SAX)
Mục tiêu:
XML Schema là dạng tài liệu theo chuẩn XML được đề xuất bởi tổ chức W3C năm 2001. XML Schema được dùng để mô tả cấu trúc và các kiểu dữ liệu của một tài liệu XML thay thế cho chuẩn DTD (Document Type Definition) trước đây. Việc này giúp định nghĩa một tài liệu XML hợp lệ cũng như các metadata cần thiết để sử dụng trong nhiều loại ứng dụng và công nghệ hiện nay như XAML, ADO.NET, WebService,… Với schema chúng ta có thể định nghĩa cấu trúc cũng như kiểu dữ liệu cho mẫu XML được rõ ràng hơn.
Ví dụ với mẫu XML sau
[sourcecode language="xml"]
<emplist>
<emp status="off">
<id>1</id>
<name>Ngo Ngo Tuong Dan</name>
</emp>
<emp status="on">
<id>2</id>
<name>Andrew Fuller</name>
</emp>
<emp status="on">
<id1>3</id1>
<name>Janet Leverling</name>
</emp>
</emplist>
[/sourcecode]
Chúng ta có thể định nghĩa schema như sau (có thể sử dụng netbean để tạo mẫu xsd)
[sourcecode language="xml"]
<?xml version="1.0"?> <!-- Một số kiểu dữ liệu
xs:string , xs:decimal , xs:integer
xs:boolean, xs:date , xs:time -->
<!-- tham chiếu đến namespace của schema-->
<xs:schema version="1.0" xmlns:xs="http://www.w3.org/2001/XMLSchema" elementFormDefault="qualified">
<xs:element name="emplist">
<!-- mô tả cho kiểu phức tạp-->
<xs:complexType>
<xs:sequence>
<!-- mô tả một element/node.
maxOccurs="unbounded" ==> là không hạn chế số thẻ con
maxOccurs="1" là giá trị mặc định ==> một thẻ con duy nhất
maxOccurs="0" là thẻ rổng -->
<xs:element name="emp" maxOccurs="unbounded">
<xs:complexType>
<!-- các thẻ con của thẻ hiện tại-->
<xs:sequence>
<xs:element name="id" type="xs:integer" />
<xs:element name="name" type="xs:string" />
</xs:sequence>
<!-- thuộc tính của thẻ hiện tại-->
<xs:attribute name="status" type="xs:string"/>
</xs:complexType>
</xs:element>
</xs:sequence>
</xs:complexType>
</xs:element>
</xs:schema>
[/sourcecode]
Tham khảo ghi chú trong ví dụ trên để biết thêm về xml schema
Trong Java để có thể kiểm tra tính hợp lệ của mẫu XML trên như sau:
[sourcecode language="java"]
import java.io.File;
import javax.xml.XMLConstants;
import javax.xml.parsers.DocumentBuilder;
import javax.xml.parsers.DocumentBuilderFactory;
import javax.xml.transform.Source;
import javax.xml.transform.stream.StreamSource;
import javax.xml.validation.Schema;
import javax.xml.validation.SchemaFactory;
import javax.xml.validation.Validator;
import org.w3c.dom.Document;
import javax.xml.transform.dom.DOMSource;
import org.xml.sax.ErrorHandler;
import org.xml.sax.SAXException;
import org.xml.sax.SAXParseException;
public class EMPValidator {
public static void main(String[] args) {
try {
// create an object of DocumentBuilder class
DocumentBuilder parser = DocumentBuilderFactory.newInstance().newDocumentBuilder();
// parse an XML document into a DOM tree
Document document = parser.parse("src/emp.xml");
// create a SchemaFactory capable of understanding WXS schemas
SchemaFactory factory = SchemaFactory.newInstance(XMLConstants.W3C_XML_SCHEMA_NS_URI);
// create an object of Source class
Source schemaFile = new StreamSource(new File("src/emp.xsd"));
// load a WXS schema, represented by a Schema instance
Schema schema = factory.newSchema(schemaFile);
// create a Validator instance, which can be used to validate an instance document
Validator validator = schema.newValidator();
// register for listening the error while XML parsing
ErrHandler err = new ErrHandler();
validator.setErrorHandler(err);
// validate the DOM tree
validator.validate(new DOMSource(document));
System.out.println("emp.xml document is valid!");
} catch (Exception ex) {
ex.printStackTrace();
}
}
public static class ErrHandler implements ErrorHandler
{
public void warning(SAXParseException exception) throws SAXException {
System.out.println("warning: "+ exception.toString());
}
public void error(SAXParseException exception) throws SAXException {
System.out.println("error: "+ exception.toString());
}
public void fatalError(SAXParseException exception) throws SAXException {
System.out.println("fatalError: "+ exception.toString());
}
}
}
[/sourcecode]
Đến đây chạy code trên chúng ta sẽ nhận được thông báo
emp.xml document is valid!
Việc quản lý lỗi trong quá trình kiểm tra sẽ do ErrorHandler xử lý như code trên.
Tương tự như vậy cho SAX
[sourcecode language="java"]
try {
System.out.println("Validating xml document with SAX");
InputSource is = new InputSource(new BufferedReader(new FileReader(xmlDocument2)));
SchemaFactory sf = SchemaFactory.newInstance(XMLConstants.W3C_XML_SCHEMA_NS_URI);
Source src = new StreamSource(schema2);
Schema schema = sf.newSchema(src);
Validator valid = schema.newValidator();
valid.validate(new SAXSource(is));
System.out.println("Document is valid !");
System.out.println("-----------------------------------------------");
} catch (Exception ex) {
System.out.println("Document is invalid !");
System.out.println("-----------------------------------------------");
}
[/sourcecode]
- Căn bản schema
- Sử dụng dụng Validator để kiểm tra tính hợp lệ của dữ liệu XML
- DOM
- SAX
XML Schema là dạng tài liệu theo chuẩn XML được đề xuất bởi tổ chức W3C năm 2001. XML Schema được dùng để mô tả cấu trúc và các kiểu dữ liệu của một tài liệu XML thay thế cho chuẩn DTD (Document Type Definition) trước đây. Việc này giúp định nghĩa một tài liệu XML hợp lệ cũng như các metadata cần thiết để sử dụng trong nhiều loại ứng dụng và công nghệ hiện nay như XAML, ADO.NET, WebService,… Với schema chúng ta có thể định nghĩa cấu trúc cũng như kiểu dữ liệu cho mẫu XML được rõ ràng hơn.
Ví dụ với mẫu XML sau
[sourcecode language="xml"]
<emplist>
<emp status="off">
<id>1</id>
<name>Ngo Ngo Tuong Dan</name>
</emp>
<emp status="on">
<id>2</id>
<name>Andrew Fuller</name>
</emp>
<emp status="on">
<id1>3</id1>
<name>Janet Leverling</name>
</emp>
</emplist>
[/sourcecode]
Chúng ta có thể định nghĩa schema như sau (có thể sử dụng netbean để tạo mẫu xsd)
[sourcecode language="xml"]
<?xml version="1.0"?> <!-- Một số kiểu dữ liệu
xs:string , xs:decimal , xs:integer
xs:boolean, xs:date , xs:time -->
<!-- tham chiếu đến namespace của schema-->
<xs:schema version="1.0" xmlns:xs="http://www.w3.org/2001/XMLSchema" elementFormDefault="qualified">
<xs:element name="emplist">
<!-- mô tả cho kiểu phức tạp-->
<xs:complexType>
<xs:sequence>
<!-- mô tả một element/node.
maxOccurs="unbounded" ==> là không hạn chế số thẻ con
maxOccurs="1" là giá trị mặc định ==> một thẻ con duy nhất
maxOccurs="0" là thẻ rổng -->
<xs:element name="emp" maxOccurs="unbounded">
<xs:complexType>
<!-- các thẻ con của thẻ hiện tại-->
<xs:sequence>
<xs:element name="id" type="xs:integer" />
<xs:element name="name" type="xs:string" />
</xs:sequence>
<!-- thuộc tính của thẻ hiện tại-->
<xs:attribute name="status" type="xs:string"/>
</xs:complexType>
</xs:element>
</xs:sequence>
</xs:complexType>
</xs:element>
</xs:schema>
[/sourcecode]
Tham khảo ghi chú trong ví dụ trên để biết thêm về xml schema
Trong Java để có thể kiểm tra tính hợp lệ của mẫu XML trên như sau:
[sourcecode language="java"]
import java.io.File;
import javax.xml.XMLConstants;
import javax.xml.parsers.DocumentBuilder;
import javax.xml.parsers.DocumentBuilderFactory;
import javax.xml.transform.Source;
import javax.xml.transform.stream.StreamSource;
import javax.xml.validation.Schema;
import javax.xml.validation.SchemaFactory;
import javax.xml.validation.Validator;
import org.w3c.dom.Document;
import javax.xml.transform.dom.DOMSource;
import org.xml.sax.ErrorHandler;
import org.xml.sax.SAXException;
import org.xml.sax.SAXParseException;
public class EMPValidator {
public static void main(String[] args) {
try {
// create an object of DocumentBuilder class
DocumentBuilder parser = DocumentBuilderFactory.newInstance().newDocumentBuilder();
// parse an XML document into a DOM tree
Document document = parser.parse("src/emp.xml");
// create a SchemaFactory capable of understanding WXS schemas
SchemaFactory factory = SchemaFactory.newInstance(XMLConstants.W3C_XML_SCHEMA_NS_URI);
// create an object of Source class
Source schemaFile = new StreamSource(new File("src/emp.xsd"));
// load a WXS schema, represented by a Schema instance
Schema schema = factory.newSchema(schemaFile);
// create a Validator instance, which can be used to validate an instance document
Validator validator = schema.newValidator();
// register for listening the error while XML parsing
ErrHandler err = new ErrHandler();
validator.setErrorHandler(err);
// validate the DOM tree
validator.validate(new DOMSource(document));
System.out.println("emp.xml document is valid!");
} catch (Exception ex) {
ex.printStackTrace();
}
}
public static class ErrHandler implements ErrorHandler
{
public void warning(SAXParseException exception) throws SAXException {
System.out.println("warning: "+ exception.toString());
}
public void error(SAXParseException exception) throws SAXException {
System.out.println("error: "+ exception.toString());
}
public void fatalError(SAXParseException exception) throws SAXException {
System.out.println("fatalError: "+ exception.toString());
}
}
}
[/sourcecode]
Đến đây chạy code trên chúng ta sẽ nhận được thông báo
emp.xml document is valid!
Việc quản lý lỗi trong quá trình kiểm tra sẽ do ErrorHandler xử lý như code trên.
Tương tự như vậy cho SAX
[sourcecode language="java"]
try {
System.out.println("Validating xml document with SAX");
InputSource is = new InputSource(new BufferedReader(new FileReader(xmlDocument2)));
SchemaFactory sf = SchemaFactory.newInstance(XMLConstants.W3C_XML_SCHEMA_NS_URI);
Source src = new StreamSource(schema2);
Schema schema = sf.newSchema(src);
Validator valid = schema.newValidator();
valid.validate(new SAXSource(is));
System.out.println("Document is valid !");
System.out.println("-----------------------------------------------");
} catch (Exception ex) {
System.out.println("Document is invalid !");
System.out.println("-----------------------------------------------");
}
[/sourcecode]
Thursday, September 17, 2015
Bài tập IXJ - Sử dụng XPath - XQuery trong Java
Mục tiêu: Tìm hiểu một số bước căn bản để chạy một đường dần theo qui ước XPath trong Java.
Về XPath là gì có thể tham khảo Căn bản XPath hay XPaht Tiếng việt trang 23
Ví dụ file XML như sau (Bài tập 1 DOM):
[sourcecode language="xml"]
<?xml version="1.0" encoding="UTF-8" standalone="no"?>
<emplist>
<!--danh sach nhan vien-->
<emp status="on">
<id>1</id>
<name>Nancy Davolio</name>
</emp>
<emp status="on">
<id>2</id>
<name>Andrew Fuller</name>
</emp>
<emp status="on">
<id>3</id>
<name>Janet Leverling</name>
</emp>
<emp status="on">
<id>4</id>
<name>Margaret Peacock</name>
</emp>
<emp status="on">
<id>5</id>
<name>Steven Buchanan</name>
</emp>
<emp status="on">
<id>6</id>
<name>Michael Suyama</name>
</emp>
<emp status="on">
<id>7</id>
<name>Robert King</name>
</emp>
<emp status="on">
<id>8</id>
<name>Laura Callahan</name>
</emp>
<emp status="on">
<id>9</id>
<name>Anne Dodsworth</name>
</emp>
<emp status="on">
<id>10</id>
<name> </name>
</emp>
<emp status="on">
<id>11</id>
<name> </name>
</emp>
<emp status="on">
<id>12</id>
<name>mit nguyen</name>
</emp>
<!--Nhan vien cuoi cung-->
<emp status="on">
<id>13</id>
<name>mit nguyen</name>
</emp>
</emplist>
[/sourcecode]
Thiết kế XPath lấy tên nhân viên có thuộc tính status = on
[sourcecode language="java"]
//emplist/emp[@status='on']/name
[/sourcecode]
Để phân tích XPath Java cung cấp 2 Interface XPathFactory và XPath.
Code mẫu phân tích và hiển thị tên nhân viên như sau:
[sourcecode language="java"]
public static void main(String[] args) {
int count = 0;
try {
// load XML tao DOM tree
DocumentBuilderFactory factory = DocumentBuilderFactory.newInstance();
DocumentBuilder builder = factory.newDocumentBuilder();
Document doc = builder.parse(new File("src/emp.xml"));
// Xu ly tim kiem qua XPath
// Khoi tao doi tuong phan tich xpath
XPathFactory xpathFactory = XPathFactory.newInstance();
// tao xpath
XPath xpath = xpathFactory.newXPath();
// tao duong dan tren xml va gan phan tich voi xpath
// ham evaluate de tien hanh phan tich
NodeList list = (NodeList) xpath.evaluate("//emplist/emp[@status='on']/name",
doc, XPathConstants.NODESET);
for (int i = 0; i < list.getLength(); i++) {
// hiển thị tên
System.out.println("Name:"+list.item(i).getTextContent());
}
} catch (Exception e) {
e.printStackTrace();
}
}
[/sourcecode]
Chạy code trên ta có như sau:
[sourcecode language="html"]
Name:Nancy Davolio
Name:Andrew Fuller
Name:Janet Leverling
Name:Margaret Peacock
Name:Steven Buchanan
Name:Michael Suyama
Name:Robert King
Name:Laura Callahan
Name:Anne Dodsworth
Name:
Name:
Name:mit nguyen
Name:mit nguyen
[/sourcecode]
Cùng ý nghĩa như trên chúng ta có thể sử dụng XQuery như sau:
[sourcecode language="java"]
import java.io.File;
import nu.xom.Builder;
import nu.xom.Document;
import nu.xom.Nodes;
import nux.xom.xquery.XQueryUtil;
public class XQueryExample {
public static void main(String[] args) {
try {
// Parse XML document with XOM
Document doc = new Builder().build(new File("src/emp.xml"));
// Call the xquery method of the XQueryUtil class to query the XML document.
Nodes nodes = XQueryUtil.xquery(doc, "//emplist/emp");
// Print employees
System.out.print("There are " + nodes.size() + " employees ");
nodes = XQueryUtil.xquery(doc, "//emplist/emp[@status='on']/name");
// Print employees who have been work
System.out.println("but " + nodes.size() + " of them is working !");
for (int i = 0; i < nodes.size(); i++) {
System.out.println("Name: "+nodes.get(i).getValue());
}
} catch (Exception e) {
System.out.println(e.toString());
}
}
}
[/sourcecode]
Kết quả:
[sourcecode language="html"]
There are 13 employees but 12 of them is working !
Name: Nancy Davolio
Name: Andrew Fuller
Name: Janet Leverling
Name: Margaret Peacock
Name: Steven Buchanan
Name: Michael Suyama
Name: Robert King
Name: Laura Callahan
Name: Anne Dodsworth
Name:
Name:
Name: mit nguyen
[/sourcecode]
Download thư viện hỗ trợ tại đây
OK, Trên đây chỉ là một ví dụ nhỏ đề hình dung về XPath trong môn học IXJ mà thôi.
Load danh sách sản phẩm từ MySQL với hiệu ứng CSS3
Khi các bạn xây dựng một website bán hàng trực tuyến chẳng hạn, phần nội dung trang chủ của các bạn phải thể hiện được danh sách các sản phẩm.
Vì thế, ở ví dụ này, chúng ta sẽ xây dựng một trang chủ đơn giản với dữ liệu động load từ cơ sở dữ liệu, kết hợp với CSS3 tạo giao diện thân thiện người dùng.
Giao diện sẽ xây dựng:

Trước khi thực hiện, yêu cầu:

Trong thư mục images, copy 4 hình sản phẩm và đặt tên lần lượt là: 1.png, 2.png, 3.png, 4.png.
Khi mọi thứ sẵn sàng, các bạn làm theo các bước sau:
Bước 1: Vào phpmyadmin, tạo cơ sở dữ liệu tên là quanlybanhang với cấu trúc bảng sanpham như sau:

Sau đó, chèn 4 sản phẩm vào bảng:

Bước 2: Tạo các file css để định dạng danh sách và hiển thị hiệu ứng:
[sourcecode language="css"]
@import url('reset.css');
/* General Demo Style */
body{
background:#f9f9f9 url(../images/white_texture.jpg) repeat top left;
color: #333;
font-family: 'Oswald', Arial, sans-serif;
font-size: 13px;
}
.container{
position:relative;
}
a{
color: #fff;
text-decoration: none;
}
.clr{
clear: both;
}
.main{
position:relative;
width:680px;
margin: 0 auto;
}
h1{
margin:0px;
padding:20px 20px 10px 20px;
font-size:34px;
color:#333;
text-shadow:1px 1px 1px #fff;
text-align:left;
font-weight:400;
text-align:center;
}
h1 span{
display:block;
font-size: 14px;
font-family: Georgia, serif;
font-style: italic;
color:#b2891b;
padding-top:10px;
}
/* Header Style */
.header{
font-family:'Arial Narrow', Arial, sans-serif;
line-height: 24px;
font-size: 11px;
background: #000;
opacity: 0.9;
text-transform: uppercase;
z-index: 9999;
position: relative;
-moz-box-shadow: 1px 0px 2px #000;
-webkit-box-shadow: 1px 0px 2px #000;
box-shadow: 1px 0px 2px #000;
}
.header a{
padding: 0px 10px;
letter-spacing: 1px;
color: #ddd;
display: block;
float: left;
}
.header a:hover{
color: #fff;
}
.header span.right{
float: right;
}
.header span.right a{
float: none;
display: inline;
}
.more{
position:relative;
clear:both;
font-family:'Arial Narrow', Arial, sans-serif;
text-transform: uppercase;
font-size: 11px;
padding: 5px 0px 10px;
width: 540px;
margin: 0 auto;
}
.more ul{
display:block;
text-align:center;
height: 30px;
}
.more ul li{
display: block;
padding: 4px 2px;
float:left;
}
.more ul li.selected a,
.more ul li.selected a:hover{
background:#b2891b;
color:#fff;
text-shadow:none;
}
.more ul li a{
color:#555;
float:left;
background:#fff;
width:40px;
padding: 2px 5px;
-moz-box-shadow:1px 1px 2px #aaa;
-webkit-box-shadow:1px 1px 2px #aaa;
box-shadow:1px 1px 2px #aaa;
}
.more ul li a:hover{
background:#000;
color:#fff;
}
[/sourcecode]
[sourcecode language="css"]
.view {
width: 300px;
height: 200px;
margin: 10px;
float: left;
border: 10px solid #fff;
overflow: hidden;
position: relative;
text-align: center;
-webkit-box-shadow: 1px 1px 2px #e6e6e6;
-moz-box-shadow: 1px 1px 2px #e6e6e6;
box-shadow: 1px 1px 2px #e6e6e6;
cursor: default;
background: #fff url(../images/bgimg.jpg) no-repeat center center;
}
.view .mask,.view .content {
width: 300px;
height: 200px;
position: absolute;
overflow: hidden;
top: 0;
left: 0;
}
.view img {
display: block;
position: relative;
}
.view h2 {
text-transform: uppercase;
color: #fff;
text-align: center;
position: relative;
font-size: 17px;
padding: 10px;
background: rgba(0, 0, 0, 0.8);
margin: 20px 0 0 0;
}
.view p {
font-family: Georgia, serif;
font-style: italic;
font-size: 12px;
position: relative;
color: #fff;
padding: 10px 20px 20px;
text-align: center;
}
.view a.info {
display: inline-block;
text-decoration: none;
padding: 7px 14px;
background: #000;
color: #fff;
text-transform: uppercase;
-webkit-box-shadow: 0 0 1px #000;
-moz-box-shadow: 0 0 1px #000;
box-shadow: 0 0 1px #000;
}
.view a.info: hover {
-webkit-box-shadow: 0 0 5px #000;
-moz-box-shadow: 0 0 5px #000;
box-shadow: 0 0 5px #000;
}
[/sourcecode]
[sourcecode language="css"]
.view-first img {
-webkit-transition: all 0.2s linear;
-moz-transition: all 0.2s linear;
-o-transition: all 0.2s linear;
-ms-transition: all 0.2s linear;
transition: all 0.2s linear;
}
.view-first .mask {
-ms-filter: "progid: DXImageTransform.Microsoft.Alpha(Opacity=0)";
filter: alpha(opacity=0);
opacity: 0;
background-color: rgba(219,127,8, 0.7);
-webkit-transition: all 0.4s ease-in-out;
-moz-transition: all 0.4s ease-in-out;
-o-transition: all 0.4s ease-in-out;
-ms-transition: all 0.4s ease-in-out;
transition: all 0.4s ease-in-out;
}
.view-first h2 {
-webkit-transform: translateY(-100px);
-moz-transform: translateY(-100px);
-o-transform: translateY(-100px);
-ms-transform: translateY(-100px);
transform: translateY(-100px);
-ms-filter: "progid: DXImageTransform.Microsoft.Alpha(Opacity=0)";
filter: alpha(opacity=0);
opacity: 0;
-webkit-transition: all 0.2s ease-in-out;
-moz-transition: all 0.2s ease-in-out;
-o-transition: all 0.2s ease-in-out;
-ms-transition: all 0.2s ease-in-out;
transition: all 0.2s ease-in-out;
}
.view-first p {
-webkit-transform: translateY(100px);
-moz-transform: translateY(100px);
-o-transform: translateY(100px);
-ms-transform: translateY(100px);
transform: translateY(100px);
-ms-filter: "progid: DXImageTransform.Microsoft.Alpha(Opacity=0)";
filter: alpha(opacity=0);
opacity: 0;
-webkit-transition: all 0.2s linear;
-moz-transition: all 0.2s linear;
-o-transition: all 0.2s linear;
-ms-transition: all 0.2s linear;
transition: all 0.2s linear;
}
.view-first:hover img {
-webkit-transform: scale(1.1,1.1);
-moz-transform: scale(1.1,1.1);
-o-transform: scale(1.1,1.1);
-ms-transform: scale(1.1,1.1);
transform: scale(1.1,1.1);
}
.view-first a.info {
-ms-filter: "progid: DXImageTransform.Microsoft.Alpha(Opacity=0)";
filter: alpha(opacity=0);
opacity: 0;
-webkit-transition: all 0.2s ease-in-out;
-moz-transition: all 0.2s ease-in-out;
-o-transition: all 0.2s ease-in-out;
-ms-transition: all 0.2s ease-in-out;
transition: all 0.2s ease-in-out;
}
.view-first:hover .mask {
-ms-filter: "progid: DXImageTransform.Microsoft.Alpha(Opacity=100)";
filter: alpha(opacity=100);
opacity: 1;
}
.view-first:hover h2,
.view-first:hover p,
.view-first:hover a.info {
-ms-filter: "progid: DXImageTransform.Microsoft.Alpha(Opacity=100)";
filter: alpha(opacity=100);
opacity: 1;
-webkit-transform: translateY(0px);
-moz-transform: translateY(0px);
-o-transform: translateY(0px);
-ms-transform: translateY(0px);
transform: translateY(0px);
}
.view-first:hover p {
-webkit-transition-delay: 0.1s;
-moz-transition-delay: 0.1s;
-o-transition-delay: 0.1s;
-ms-transition-delay: 0.1s;
transition-delay: 0.1s;
}
.view-first:hover a.info {
-webkit-transition-delay: 0.2s;
-moz-transition-delay: 0.2s;
-o-transition-delay: 0.2s;
-ms-transition-delay: 0.2s;
transition-delay: 0.2s;
}
[/sourcecode]
Bước 3: Tạo file kết nối với cơ sở dữ liệu
[sourcecode language="php"]
<!--?php $connect = mysql_connect("localhost", "root", "") or die("Không kết nối được với MYSQL"); mysql_select_db("quanlybanhang", $connect) or die ("Không tìm thấy cơ sở dữ liệu"); mysql_query("SET NAMES utf8"); ?-->
[/sourcecode]
Bước 4: Tạo trang index
[sourcecode language="php"]
<!DOCTYPE html>
<html>
<head>
<title>Danh sách sản phẩm</title>
<meta charset="UTF-8" />
<link rel="stylesheet" type="text/css" href="css/demo.css" />
<link rel="stylesheet" type="text/css" href="css/style_common.css" />
<link rel="stylesheet" type="text/css" href="css/style1.css" />
</head>
<body>
<div class="container">
<div class="main">
<?php include ("dbconnect.php"); $rs = mysql_query("select * from sanpham"); while($row = mysql_fetch_array($rs)){ ?>
<div class="view view-first">
<img src="images/<?php echo $row['hinhanh']; ?>" />
<div class="mask">
<h2><?php echo $row['tensanpham']; ?></h2>
<?php echo $row['mota']; ?>
<a href="#" class="info">MUA HÀNG</a>
</div>
</div>
<?php } ?>
</div>
</div>
</body>
</html>
[/sourcecode]
Chúc các bạn thành công.
- Trong danh sách này, về mặt hình thức, các bạn có thể bố trí các sản phẩm sắp xếp theo dạng bảng, sử dụng các định dạng CSS để trông đẹp mắt.
- Tiếp đến là phần nội dung, các bạn sử dụng ngôn ngữ để load trực tiếp dữ liệu từ cơ sở dữ liệu MySQL.
Vì thế, ở ví dụ này, chúng ta sẽ xây dựng một trang chủ đơn giản với dữ liệu động load từ cơ sở dữ liệu, kết hợp với CSS3 tạo giao diện thân thiện người dùng.
Giao diện sẽ xây dựng:

Trước khi thực hiện, yêu cầu:
- Cài đặt chương trình Xampp để sử dụng ngôn ngữ PHP và MySQL.
- Tạo một thư mục gốc danhsachsanpham với các thành phần sau:
Trong thư mục images, copy 4 hình sản phẩm và đặt tên lần lượt là: 1.png, 2.png, 3.png, 4.png.
Khi mọi thứ sẵn sàng, các bạn làm theo các bước sau:
Bước 1: Vào phpmyadmin, tạo cơ sở dữ liệu tên là quanlybanhang với cấu trúc bảng sanpham như sau:

Sau đó, chèn 4 sản phẩm vào bảng:

Bước 2: Tạo các file css để định dạng danh sách và hiển thị hiệu ứng:
- demo.css
[sourcecode language="css"]
@import url('reset.css');
/* General Demo Style */
body{
background:#f9f9f9 url(../images/white_texture.jpg) repeat top left;
color: #333;
font-family: 'Oswald', Arial, sans-serif;
font-size: 13px;
}
.container{
position:relative;
}
a{
color: #fff;
text-decoration: none;
}
.clr{
clear: both;
}
.main{
position:relative;
width:680px;
margin: 0 auto;
}
h1{
margin:0px;
padding:20px 20px 10px 20px;
font-size:34px;
color:#333;
text-shadow:1px 1px 1px #fff;
text-align:left;
font-weight:400;
text-align:center;
}
h1 span{
display:block;
font-size: 14px;
font-family: Georgia, serif;
font-style: italic;
color:#b2891b;
padding-top:10px;
}
/* Header Style */
.header{
font-family:'Arial Narrow', Arial, sans-serif;
line-height: 24px;
font-size: 11px;
background: #000;
opacity: 0.9;
text-transform: uppercase;
z-index: 9999;
position: relative;
-moz-box-shadow: 1px 0px 2px #000;
-webkit-box-shadow: 1px 0px 2px #000;
box-shadow: 1px 0px 2px #000;
}
.header a{
padding: 0px 10px;
letter-spacing: 1px;
color: #ddd;
display: block;
float: left;
}
.header a:hover{
color: #fff;
}
.header span.right{
float: right;
}
.header span.right a{
float: none;
display: inline;
}
.more{
position:relative;
clear:both;
font-family:'Arial Narrow', Arial, sans-serif;
text-transform: uppercase;
font-size: 11px;
padding: 5px 0px 10px;
width: 540px;
margin: 0 auto;
}
.more ul{
display:block;
text-align:center;
height: 30px;
}
.more ul li{
display: block;
padding: 4px 2px;
float:left;
}
.more ul li.selected a,
.more ul li.selected a:hover{
background:#b2891b;
color:#fff;
text-shadow:none;
}
.more ul li a{
color:#555;
float:left;
background:#fff;
width:40px;
padding: 2px 5px;
-moz-box-shadow:1px 1px 2px #aaa;
-webkit-box-shadow:1px 1px 2px #aaa;
box-shadow:1px 1px 2px #aaa;
}
.more ul li a:hover{
background:#000;
color:#fff;
}
[/sourcecode]
- style_common.css:
[sourcecode language="css"]
.view {
width: 300px;
height: 200px;
margin: 10px;
float: left;
border: 10px solid #fff;
overflow: hidden;
position: relative;
text-align: center;
-webkit-box-shadow: 1px 1px 2px #e6e6e6;
-moz-box-shadow: 1px 1px 2px #e6e6e6;
box-shadow: 1px 1px 2px #e6e6e6;
cursor: default;
background: #fff url(../images/bgimg.jpg) no-repeat center center;
}
.view .mask,.view .content {
width: 300px;
height: 200px;
position: absolute;
overflow: hidden;
top: 0;
left: 0;
}
.view img {
display: block;
position: relative;
}
.view h2 {
text-transform: uppercase;
color: #fff;
text-align: center;
position: relative;
font-size: 17px;
padding: 10px;
background: rgba(0, 0, 0, 0.8);
margin: 20px 0 0 0;
}
.view p {
font-family: Georgia, serif;
font-style: italic;
font-size: 12px;
position: relative;
color: #fff;
padding: 10px 20px 20px;
text-align: center;
}
.view a.info {
display: inline-block;
text-decoration: none;
padding: 7px 14px;
background: #000;
color: #fff;
text-transform: uppercase;
-webkit-box-shadow: 0 0 1px #000;
-moz-box-shadow: 0 0 1px #000;
box-shadow: 0 0 1px #000;
}
.view a.info: hover {
-webkit-box-shadow: 0 0 5px #000;
-moz-box-shadow: 0 0 5px #000;
box-shadow: 0 0 5px #000;
}
[/sourcecode]
- style1.css
[sourcecode language="css"]
.view-first img {
-webkit-transition: all 0.2s linear;
-moz-transition: all 0.2s linear;
-o-transition: all 0.2s linear;
-ms-transition: all 0.2s linear;
transition: all 0.2s linear;
}
.view-first .mask {
-ms-filter: "progid: DXImageTransform.Microsoft.Alpha(Opacity=0)";
filter: alpha(opacity=0);
opacity: 0;
background-color: rgba(219,127,8, 0.7);
-webkit-transition: all 0.4s ease-in-out;
-moz-transition: all 0.4s ease-in-out;
-o-transition: all 0.4s ease-in-out;
-ms-transition: all 0.4s ease-in-out;
transition: all 0.4s ease-in-out;
}
.view-first h2 {
-webkit-transform: translateY(-100px);
-moz-transform: translateY(-100px);
-o-transform: translateY(-100px);
-ms-transform: translateY(-100px);
transform: translateY(-100px);
-ms-filter: "progid: DXImageTransform.Microsoft.Alpha(Opacity=0)";
filter: alpha(opacity=0);
opacity: 0;
-webkit-transition: all 0.2s ease-in-out;
-moz-transition: all 0.2s ease-in-out;
-o-transition: all 0.2s ease-in-out;
-ms-transition: all 0.2s ease-in-out;
transition: all 0.2s ease-in-out;
}
.view-first p {
-webkit-transform: translateY(100px);
-moz-transform: translateY(100px);
-o-transform: translateY(100px);
-ms-transform: translateY(100px);
transform: translateY(100px);
-ms-filter: "progid: DXImageTransform.Microsoft.Alpha(Opacity=0)";
filter: alpha(opacity=0);
opacity: 0;
-webkit-transition: all 0.2s linear;
-moz-transition: all 0.2s linear;
-o-transition: all 0.2s linear;
-ms-transition: all 0.2s linear;
transition: all 0.2s linear;
}
.view-first:hover img {
-webkit-transform: scale(1.1,1.1);
-moz-transform: scale(1.1,1.1);
-o-transform: scale(1.1,1.1);
-ms-transform: scale(1.1,1.1);
transform: scale(1.1,1.1);
}
.view-first a.info {
-ms-filter: "progid: DXImageTransform.Microsoft.Alpha(Opacity=0)";
filter: alpha(opacity=0);
opacity: 0;
-webkit-transition: all 0.2s ease-in-out;
-moz-transition: all 0.2s ease-in-out;
-o-transition: all 0.2s ease-in-out;
-ms-transition: all 0.2s ease-in-out;
transition: all 0.2s ease-in-out;
}
.view-first:hover .mask {
-ms-filter: "progid: DXImageTransform.Microsoft.Alpha(Opacity=100)";
filter: alpha(opacity=100);
opacity: 1;
}
.view-first:hover h2,
.view-first:hover p,
.view-first:hover a.info {
-ms-filter: "progid: DXImageTransform.Microsoft.Alpha(Opacity=100)";
filter: alpha(opacity=100);
opacity: 1;
-webkit-transform: translateY(0px);
-moz-transform: translateY(0px);
-o-transform: translateY(0px);
-ms-transform: translateY(0px);
transform: translateY(0px);
}
.view-first:hover p {
-webkit-transition-delay: 0.1s;
-moz-transition-delay: 0.1s;
-o-transition-delay: 0.1s;
-ms-transition-delay: 0.1s;
transition-delay: 0.1s;
}
.view-first:hover a.info {
-webkit-transition-delay: 0.2s;
-moz-transition-delay: 0.2s;
-o-transition-delay: 0.2s;
-ms-transition-delay: 0.2s;
transition-delay: 0.2s;
}
[/sourcecode]
Bước 3: Tạo file kết nối với cơ sở dữ liệu
- dbconnect.php
[sourcecode language="php"]
<!--?php $connect = mysql_connect("localhost", "root", "") or die("Không kết nối được với MYSQL"); mysql_select_db("quanlybanhang", $connect) or die ("Không tìm thấy cơ sở dữ liệu"); mysql_query("SET NAMES utf8"); ?-->
[/sourcecode]
Bước 4: Tạo trang index
[sourcecode language="php"]
<!DOCTYPE html>
<html>
<head>
<title>Danh sách sản phẩm</title>
<meta charset="UTF-8" />
<link rel="stylesheet" type="text/css" href="css/demo.css" />
<link rel="stylesheet" type="text/css" href="css/style_common.css" />
<link rel="stylesheet" type="text/css" href="css/style1.css" />
</head>
<body>
<div class="container">
<div class="main">
<?php include ("dbconnect.php"); $rs = mysql_query("select * from sanpham"); while($row = mysql_fetch_array($rs)){ ?>
<div class="view view-first">
<img src="images/<?php echo $row['hinhanh']; ?>" />
<div class="mask">
<h2><?php echo $row['tensanpham']; ?></h2>
<?php echo $row['mota']; ?>
<a href="#" class="info">MUA HÀNG</a>
</div>
</div>
<?php } ?>
</div>
</div>
</body>
</html>
[/sourcecode]
Chúc các bạn thành công.
Wednesday, September 16, 2015
Bài tập IXJ (JAXB)
JAXB, stands for Java Architecture for XML Binding, using JAXB annotation to convert Java object to / from XML file.
In this tutorial, we show you how to use JAXB to do following stuffs
Working with JAXB is easy, just annotate object with JAXB annotation, later use jaxbMarshaller.marshal() or jaxbMarshaller.unmarshal() to do the object / XML conversion.
Create Java class
[sourcecode language="java"]
import javax.xml.bind.annotation.XmlAttribute;
import javax.xml.bind.annotation.XmlElement;
import javax.xml.bind.annotation.XmlRootElement;
// Customer will become root node in XML file
@XmlRootElement
public class Customer {
String name;
int age;
int id;
public String getName() {
return name;
}
//Name as tag
@XmlElement
public void setName(String name) {
this.name = name;
}
public int getAge() {
return age;
}
// Age as tag
@XmlElement
public void setAge(int age) {
this.age = age;
}
public int getId() {
return id;
}
// id as attribute of customer tag
@XmlAttribute
public void setId(int id) {
this.id = id;
}
}
[/sourcecode]
Convert Object to XML: JAXB marshalling example, convert customer object into a XML file. The jaxbMarshaller.marshal() contains a lot of overloaded methods, find one that suit your output.
[sourcecode language="java"]
import java.io.File;
import javax.xml.bind.JAXBContext;
import javax.xml.bind.JAXBException;
import javax.xml.bind.Marshaller;
public class JAXBExample {
public static void main(String[] args) {
// create customer object
Customer customer = new Customer();
customer.setId(100);
customer.setName("nvmit");
customer.setAge(29);
try {
File file = new File("C:\\file.xml");
JAXBContext jaxbContext = JAXBContext.newInstance(Customer.class);
Marshaller jaxbMarshaller = jaxbContext.createMarshaller();
// output pretty printed
jaxbMarshaller.setProperty(Marshaller.JAXB_FORMATTED_OUTPUT, true);
// convert to XML and write to file
jaxbMarshaller.marshal(customer, file);
jaxbMarshaller.marshal(customer, System.out);
} catch (JAXBException e) {
e.printStackTrace();
}
}
}
[/sourcecode]
Run this code, we have XML as
[sourcecode language="xml"]
<?xml version="1.0" encoding="UTF-8" standalone="yes"?>
<customer id="100">
<age>29</age>
<name>nvmit</name>
</customer>
[/sourcecode]
Convert XML to Object: JAXB unmarshalling example, convert a XML file content into a customer object. The jaxbMarshaller.unmarshal() contains a lot of overloaded methods
[sourcecode language="java"]
import java.io.File;
import javax.xml.bind.JAXBContext;
import javax.xml.bind.JAXBException;
import javax.xml.bind.Unmarshaller;
public class JAXBExample {
public static void main(String[] args) {
try {
File file = new File("C:\\file.xml");
JAXBContext jaxbContext = JAXBContext.newInstance(Customer.class);
Unmarshaller jaxbUnmarshaller = jaxbContext.createUnmarshaller();
Customer customer = (Customer) jaxbUnmarshaller.unmarshal(file);
System.out.println(customer);
} catch (JAXBException e) {
e.printStackTrace();
}
}
}
[/sourcecode]
Run this code
Customer [name=nvmit, age=29, id=100]
OK, very simple.
In this tutorial, we show you how to use JAXB to do following stuffs
- Marshalling – Convert a Java object into a XML file.
- Unmarshalling – Convert XML content into a Java Object.
Working with JAXB is easy, just annotate object with JAXB annotation, later use jaxbMarshaller.marshal() or jaxbMarshaller.unmarshal() to do the object / XML conversion.
Create Java class
[sourcecode language="java"]
import javax.xml.bind.annotation.XmlAttribute;
import javax.xml.bind.annotation.XmlElement;
import javax.xml.bind.annotation.XmlRootElement;
// Customer will become root node in XML file
@XmlRootElement
public class Customer {
String name;
int age;
int id;
public String getName() {
return name;
}
//Name as tag
@XmlElement
public void setName(String name) {
this.name = name;
}
public int getAge() {
return age;
}
// Age as tag
@XmlElement
public void setAge(int age) {
this.age = age;
}
public int getId() {
return id;
}
// id as attribute of customer tag
@XmlAttribute
public void setId(int id) {
this.id = id;
}
}
[/sourcecode]
Convert Object to XML: JAXB marshalling example, convert customer object into a XML file. The jaxbMarshaller.marshal() contains a lot of overloaded methods, find one that suit your output.
[sourcecode language="java"]
import java.io.File;
import javax.xml.bind.JAXBContext;
import javax.xml.bind.JAXBException;
import javax.xml.bind.Marshaller;
public class JAXBExample {
public static void main(String[] args) {
// create customer object
Customer customer = new Customer();
customer.setId(100);
customer.setName("nvmit");
customer.setAge(29);
try {
File file = new File("C:\\file.xml");
JAXBContext jaxbContext = JAXBContext.newInstance(Customer.class);
Marshaller jaxbMarshaller = jaxbContext.createMarshaller();
// output pretty printed
jaxbMarshaller.setProperty(Marshaller.JAXB_FORMATTED_OUTPUT, true);
// convert to XML and write to file
jaxbMarshaller.marshal(customer, file);
jaxbMarshaller.marshal(customer, System.out);
} catch (JAXBException e) {
e.printStackTrace();
}
}
}
[/sourcecode]
Run this code, we have XML as
[sourcecode language="xml"]
<?xml version="1.0" encoding="UTF-8" standalone="yes"?>
<customer id="100">
<age>29</age>
<name>nvmit</name>
</customer>
[/sourcecode]
Convert XML to Object: JAXB unmarshalling example, convert a XML file content into a customer object. The jaxbMarshaller.unmarshal() contains a lot of overloaded methods
[sourcecode language="java"]
import java.io.File;
import javax.xml.bind.JAXBContext;
import javax.xml.bind.JAXBException;
import javax.xml.bind.Unmarshaller;
public class JAXBExample {
public static void main(String[] args) {
try {
File file = new File("C:\\file.xml");
JAXBContext jaxbContext = JAXBContext.newInstance(Customer.class);
Unmarshaller jaxbUnmarshaller = jaxbContext.createUnmarshaller();
Customer customer = (Customer) jaxbUnmarshaller.unmarshal(file);
System.out.println(customer);
} catch (JAXBException e) {
e.printStackTrace();
}
}
}
[/sourcecode]
Run this code
Customer [name=nvmit, age=29, id=100]
OK, very simple.
Friday, September 11, 2015
SAX căn bản - phân tích XML (dữ liệu thời tiết trực tuyến)
Ví dụ sử dụng SAX phân tích nội dung XML trực tuyến (thông tin dự báo thời tiết)
Nội dung XML

Nội dung hiện thị sau phân tích

Mã nguồn ví dụ
[sourcecode language="java"]
package codes;
import java.io.IOException;
import java.net.MalformedURLException;
import java.net.URL;
import java.net.URLConnection;
import java.util.logging.Level;
import java.util.logging.Logger;
import javax.xml.parsers.ParserConfigurationException;
import javax.xml.parsers.SAXParser;
import javax.xml.parsers.SAXParserFactory;
import org.xml.sax.Attributes;
import org.xml.sax.InputSource;
import org.xml.sax.SAXException;
import org.xml.sax.helpers.DefaultHandler;
/**
* @author ntdan
*/
public class SAXParser_RSS extends DefaultHandler {
String urlPath = "http://api.openweathermap.org/data/2.5/forecast?q=can+tho,vn&mode=xml";
String strresult = "";
int count = 1;
boolean namefound = false;
boolean itemfound = false;
public String parse() {
try {
SAXParserFactory fac = SAXParserFactory.newInstance();
SAXParser sax = fac.newSAXParser();
// ket noi truc tiep
URL url = new URL(urlPath);
URLConnection conn = url.openConnection();
InputSource in = new InputSource(conn.getInputStream());
// phan tich tu luon truc tuyen
sax.parse(in, this);
return strresult;
} catch (ParserConfigurationException ex) {
Logger.getLogger(SAXParser_RSS.class.getName()).log(Level.SEVERE, null, ex);
} catch (SAXException ex) {
Logger.getLogger(SAXParser_RSS.class.getName()).log(Level.SEVERE, null, ex);
} catch (MalformedURLException ex) {
Logger.getLogger(SAXParser_RSS.class.getName()).log(Level.SEVERE, null, ex);
} catch (IOException ex) {
Logger.getLogger(SAXParser_RSS.class.getName()).log(Level.SEVERE, null, ex);
}
return strresult;
}
@Override
public void characters(char[] ch, int start, int length) throws SAXException {
super.characters(ch, start, length); //To change body of generated methods, choose Tools | Templates.
if (namefound) {
strresult += "<b>Location</b>: " + new String(ch, start, length) + "!<br/>";
namefound = false;
}
}
@Override
public void endElement(String uri, String localName, String qName) throws SAXException {
super.endElement(uri, localName, qName); //To change body of generated methods, choose Tools | Templates.
if (qName.equalsIgnoreCase("item")) {
strresult += "<br/>";
itemfound = false;
}
}
@Override
public void startElement(String uri, String localName, String qName, Attributes attributes) throws SAXException {
super.startElement(uri, localName, qName, attributes); //To change body of generated methods, choose Tools | Templates.
if (qName.equalsIgnoreCase("name")) {
namefound = true;
}
if (qName.equalsIgnoreCase("item")) {
itemfound = true;
}
if (qName.equalsIgnoreCase("time")) {
strresult += count++ + ". <i>Time<i> <b>From</b>: " + attributes.getValue("from")
+ " <b>To</b>: " + attributes.getValue("to");
}
if (qName.equalsIgnoreCase("humidity")) {
strresult += " <i>Humidity</i>: " + attributes.getValue("value")
+ attributes.getValue("unit") + "<br/>";
}
if (qName.equalsIgnoreCase("temperature")) {
strresult += " <b>Temperature</b>: <b>from</b> "
+ attributes.getValue("min") + " <b>to</b> "
+ attributes.getValue("max") + "-"
+ attributes.getValue("unit");
}
}
@Override
public void endDocument() throws SAXException {
super.endDocument(); //To change body of generated methods, choose Tools | Templates.
strresult += "<br/>End parsing ...";
}
@Override
public void startDocument() throws SAXException {
super.startDocument(); //To change body of generated methods, choose Tools | Templates.
strresult += "Start parsing ... <br/>";
}
}
[/sourcecode]
goodluck!!!
Parsing XML using DOM (Basic)
Objectives
- Overview XML parse using DOM
- Create DOM with content loaded from SQL Server
- Save DOM to XML file
- Find information in XML file
- Update content in XML file
Load Data form XML
Create java class JavaApplication1 and declare 02 variable
static ResultSet rs;
static Document doc;
Load Data from Employees table
[sourcecode language="java"]
Class.forName("com.microsoft.sqlserver.jdbc.SQLServerDriver");
Connection conn = DriverManager.getConnection("jdbc:sqlserver://"
+ "172.16.160.81\\sql2008;database=northwind;user=sa;password=sa;");
PreparedStatement comm = conn.prepareStatement(""
+ "Select EmployeeID, FirstName,LastName From Employees");
rs = comm.executeQuery();
[/sourcecode]
Create createDom method to transform RS to DOM
[sourcecode language="java"]
void createDom() {
try {
DocumentBuilderFactory fac = DocumentBuilderFactory.newInstance();
DocumentBuilder db = fac.newDocumentBuilder();
doc = db.newDocument();
Element root = doc.createElement("emplist");
// tao nut goc
doc.appendChild(root);
Comment comment = doc.createComment("danh sach nhan vien");
// tao nut goc
root.appendChild(comment);
// doc du lieu va tao lai voi xml
while (rs.next()) {
// tao the emp
Element emp = doc.createElement("emp");
emp.setAttribute("status", "on");
// the id
Element id = doc.createElement("id");
id.setTextContent(rs.getString("EmployeeID"));
emp.appendChild(id);
// the name
Element name = doc.createElement("name");
name.setTextContent(rs.getString("FirstName") + " " + rs.getString("LastName"));
emp.appendChild(name);
// gan vao root
root.appendChild(emp);
}
Comment comment1 = doc.createComment("Nhan vien cuoi cung");
// gan ghi chu vao phan tu cuoi cung
root.insertBefore(comment1, root.getLastChild());
} catch (Exception ex) {
Logger.getLogger(JavaApplication1.class.getName()).log(Level.SEVERE, null, ex);
}
}
[/sourcecode]
Write DOM to XML file
[sourcecode language="java"]
void writeToXML(String filename) {
try {
if(new File(filename).exists())
{
if(JOptionPane.showConfirmDialog(
null, filename + " đ? t?n t?i ! \nB?n có mu?n ghi đè không?",
"Xác nh?n!", JOptionPane.YES_NO_OPTION) == JOptionPane.NO_OPTION)
return;
}
// Create a DOM document for writing
Source source = new DOMSource(doc);
// Prepare the output file
Result result = new StreamResult(filename);
// Create an instance of Transformer
Transformer xformer = TransformerFactory.newInstance().newTransformer();
xformer.setOutputProperty(OutputKeys.OMIT_XML_DECLARATION, "no");
xformer.setOutputProperty(OutputKeys.INDENT, "yes");
xformer.setOutputProperty("{http://xml.apache.org/xslt}indent-amount", "4");
// Write the DOM document to the file
xformer.transform(source, result);
} catch (TransformerException ex) {
System.out.println(ex.toString());
}
}
[/sourcecode]
Update status attribute of emp tag with content of id tag equal id
[sourcecode language="java"]
void deactive(int id) {
// lay danh sach cac the con
NodeList list = doc.getElementsByTagName("emp");
// duyet qua ca the con
for (int i = 0; i < list.getLength(); i++) {
// tim con dau tien (the id) va kiem tra gia tri
// neu bang voi id thi thuc hien
if (Integer.parseInt(list.item(i).getFirstChild().getTextContent()) == id) {
// cap nhat gia tri thuoc tinh status cua the emp
list.item(i).getAttributes().getNamedItem("status").setNodeValue("off");
break;
}
}
}
[/sourcecode]
Find an employee in XML file with id tag content equal id
[sourcecode language="java"]
boolean exist(int id) {
try {
DocumentBuilderFactory fac = DocumentBuilderFactory.newInstance();
DocumentBuilder db = fac.newDocumentBuilder();
doc = db.parse(new File("src/emp.xml"));
// lay danh sach cac the con
NodeList list = doc.getElementsByTagName("id");
// duyet qua ca the con
for (int i = 0; i < list.getLength(); i++) {
// tim con dau tien (the id) va kiem tra gia tri
// neu bang voi id thi thuc hien
if (Integer.parseInt(list.item(i).getTextContent()) == id) {
return true;
}
}
} catch (ParserConfigurationException ex) {
Logger.getLogger(JavaApplication1.class.getName()).log(Level.SEVERE, null, ex);
} catch (SAXException ex) {
Logger.getLogger(JavaApplication1.class.getName()).log(Level.SEVERE, null, ex);
} catch (IOException ex) {
Logger.getLogger(JavaApplication1.class.getName()).log(Level.SEVERE, null, ex);
}
return false;
}
[/sourcecode]
Add new emp tag to existing XML file if emp id tag do not exist in XML file
[sourcecode language="java"]
void add(int newId, String newName) {
try {
DocumentBuilderFactory fac = DocumentBuilderFactory.newInstance();
DocumentBuilder db = fac.newDocumentBuilder();
doc = db.parse(new File("src/emp.xml"));
if (exist(newId)) {
JOptionPane.showMessageDialog(null, newId + " đ? t?n t?i !");
return;
}
// lay the emplist
Node root = doc.getDocumentElement();
// tao the emp
Element emp = doc.createElement("emp");
emp.setAttribute("status", "on");
// the id
Element id = doc.createElement("id");
id.setTextContent(newId + "");
emp.appendChild(id);
// the name
Element name = doc.createElement("name");
name.setTextContent(newName);
emp.appendChild(name);
// gan vao root
root.appendChild(emp);
} catch (ParserConfigurationException ex) {
Logger.getLogger(JavaApplication1.class.getName()).log(Level.SEVERE, null, ex);
} catch (SAXException ex) {
Logger.getLogger(JavaApplication1.class.getName()).log(Level.SEVERE, null, ex);
} catch (IOException ex) {
Logger.getLogger(JavaApplication1.class.getName()).log(Level.SEVERE, null, ex);
}
}
[/sourcecode]
Test app
[sourcecode language="java"]
public class JavaApplication1 {
static ResultSet rs;
static Document doc;
/**
* @param args the command line arguments
*/
public static void main(String[] args) {
try {
Class.forName("com.microsoft.sqlserver.jdbc.SQLServerDriver");
Connection conn = DriverManager.getConnection("jdbc:sqlserver://"
+ "172.16.160.81\\sql2008;database=northwind;user=sa;password=sa;");
PreparedStatement comm = conn.prepareStatement(""
+ "Select EmployeeID, FirstName,LastName From Employees");
rs = comm.executeQuery();
JavaApplication1 xmlDOM = new JavaApplication1();
// tao doi tuong t? SQL Server
xmlDOM.createDom();
// ghi ra file
xmlDOM.writeToXML("src/emp.xml");
// cap nhat
xmlDOM.deactive(5);
// luu thay doi
xmlDOM.writeToXML("src/emp.xml");
// them node
xmlDOM.add(100, "Nguyen Van Mit");
// luu thay doi
xmlDOM.writeToXML("src/emp.xml");
} catch (Exception ex) {
System.out.println(ex.toString());
}
}
}
[/sourcecode]
}
}
Shifl + F6 to run
Android Notification (căn bản về thông báo trong Android)
Notification là dạng thông báo xuất hiện ở phần trên cùng của màn hình, dạng thông báo này hiện giời được hỗ trợ trên cả 3 nền tảng phổ biến hiện này: Android, iOS và WindowPhone.


Android cung cấp thư viện NotificationCompat.Builder, Notification để tạo các thông báo này.
Ví dụ tạo một thông báo:
[sourcecode language="java"]
Notification.Builder mBuilder = new Notification.Builder(this);
mBuilder.setContentTitle("Tin nhắn mới");
mBuilder.setContentText("Có điểm thực hành môn Android.");
mBuilder.setTicker("Thông báo!"); mBuilder.setSmallIcon(R.drawable.ic_launcher);
[/sourcecode]
Cập nhật thông báo
[sourcecode language="java"]
mNotificationManager = (NotificationManager) getSystemService(Context.NOTIFICATION_SERVICE);
/* cập nhật thông báo */
mNotificationManager.notify(notificationID, mBuilder.build());
[/sourcecode]
Thông thường các ứng dụng cấu hình khi người dùng chạm lên thông báo thì hệ thống sẽ mở lại ứng dụng đã phát sinh thông báo. Để Android có thể mở lại một ứng dụng đã thông báo (có thể là bất kỳ ứng dụng nào) hợp lệ thì chúng ta cần phải thông qua đối tượng hỗ trợ là PendingIntent
Ví dụ sau đây thực hiện theo mô tả bên trên.
[sourcecode language="java"]
/* Tạo đối tượng chỉ đến activity sẽ mở khi chọn thông báo */
Intent resultIntent = new Intent(this, NotificationView.class);
TaskStackBuilder stackBuilder = TaskStackBuilder.create(this);
stackBuilder.addParentStack(NotificationView.class);
// kèm dữ liệu theo activity để xử lý
resultIntent.putExtra("events",new String[] { "Có điểm thực hành môn Android" });
resultIntent.putExtra("id",notificationID);
/* Đăng ký activity được gọi khi chọn thông báo */
stackBuilder.addNextIntent(resultIntent);
PendingIntent resultPendingIntent = stackBuilder.getPendingIntent(0,
PendingIntent.FLAG_UPDATE_CURRENT);
mBuilder.setContentIntent(resultPendingIntent);
[/sourcecode]
Sau khi mở ứng dụng (NotificationView) đã phát sinh thông báo qua hỗ trợ của PendingIntent chúng ta có thể xóa thông báo báo với phương thức cancel từ NotificartioManager
Ví dụ như sau:
[sourcecode language="java"]
NotificationManager mNotificationManager = (NotificationManager) getSystemService(Context.NOTIFICATION_SERVICE);
mNotificationManager.cancel(i.getIntExtra("id", 0));
[/sourcecode]
Notification có 2 dạng cơ bản là dạng đơn và dạng danh sách.
Ví dụ:

Mã nguồn ở
đây
Android cung cấp thư viện NotificationCompat.Builder, Notification để tạo các thông báo này.
- NotificationCompat.Builder.build(): để tạo một thông báo
- Phương thức notify() của Notification: để cập nhật thông báo
- setSmalIcon: chỉ định icon của thông báo
- setContentTitle: Tiêu đề thông báo
- setContentText: Nội dung thông báo
Ví dụ tạo một thông báo:
[sourcecode language="java"]
Notification.Builder mBuilder = new Notification.Builder(this);
mBuilder.setContentTitle("Tin nhắn mới");
mBuilder.setContentText("Có điểm thực hành môn Android.");
mBuilder.setTicker("Thông báo!"); mBuilder.setSmallIcon(R.drawable.ic_launcher);
[/sourcecode]
Cập nhật thông báo
[sourcecode language="java"]
mNotificationManager = (NotificationManager) getSystemService(Context.NOTIFICATION_SERVICE);
/* cập nhật thông báo */
mNotificationManager.notify(notificationID, mBuilder.build());
[/sourcecode]
Thông thường các ứng dụng cấu hình khi người dùng chạm lên thông báo thì hệ thống sẽ mở lại ứng dụng đã phát sinh thông báo. Để Android có thể mở lại một ứng dụng đã thông báo (có thể là bất kỳ ứng dụng nào) hợp lệ thì chúng ta cần phải thông qua đối tượng hỗ trợ là PendingIntent
Ví dụ sau đây thực hiện theo mô tả bên trên.
[sourcecode language="java"]
/* Tạo đối tượng chỉ đến activity sẽ mở khi chọn thông báo */
Intent resultIntent = new Intent(this, NotificationView.class);
TaskStackBuilder stackBuilder = TaskStackBuilder.create(this);
stackBuilder.addParentStack(NotificationView.class);
// kèm dữ liệu theo activity để xử lý
resultIntent.putExtra("events",new String[] { "Có điểm thực hành môn Android" });
resultIntent.putExtra("id",notificationID);
/* Đăng ký activity được gọi khi chọn thông báo */
stackBuilder.addNextIntent(resultIntent);
PendingIntent resultPendingIntent = stackBuilder.getPendingIntent(0,
PendingIntent.FLAG_UPDATE_CURRENT);
mBuilder.setContentIntent(resultPendingIntent);
[/sourcecode]
Sau khi mở ứng dụng (NotificationView) đã phát sinh thông báo qua hỗ trợ của PendingIntent chúng ta có thể xóa thông báo báo với phương thức cancel từ NotificartioManager
Ví dụ như sau:
[sourcecode language="java"]
NotificationManager mNotificationManager = (NotificationManager) getSystemService(Context.NOTIFICATION_SERVICE);
mNotificationManager.cancel(i.getIntExtra("id", 0));
[/sourcecode]
Notification có 2 dạng cơ bản là dạng đơn và dạng danh sách.
Ví dụ:

Mã nguồn ở
đây
Thursday, September 10, 2015
Direct access to SQL Server From Android
Sử dụng thư viện JTDS --> http://sourceforge.net/projects/jtds/ để truy cập SQL Server từ Android
[embed]https://youtu.be/8cp8ykUNmL4[/embed]
Download thư viện từ đây
Kết nối với SQL Server như sau:
[sourcecode language="java"]
StrictMode.ThreadPolicy policy = new StrictMode.ThreadPolicy.Builder().permitAll().build();
StrictMode.setThreadPolicy(policy);
Class.forName("net.sourceforge.jtds.jdbc.Driver").newInstance();
conn = DriverManager
.getConnection(""
+ "jdbc:jtds:sqlserver://172.16.160.81/northwind;instance=SQL2008;"
+ "user=sa;password=sa;");
[/sourcecode]
net.sourceforge.jtds.jdbc.Driver là dạng Drive truy cập SQL Server.
Thêm dữ liệu
[sourcecode language="java"]
comm = conn.prepareStatement("insert into Employees("
+ "firstname, lastname) values(?,?)");
comm.setString(1, etFirst.getText().toString());
comm.setString(2, etLast.getText().toString());
comm.executeUpdate();
[/sourcecode]
Đọc dữ liệu
[sourcecode language="java"]
comm = conn.createStatement();
ResultSet rs = comm.executeQuery("Select EmployeeID, Firstname From Employees");
String msg = "";
while (rs.next()) {
msg += "\nID: " + rs.getInt("EmployeeID") + " Name: "
+ rs.getString("Firstname");
[/sourcecode]
Giao diện
[sourcecode language="html"]
<LinearLayout xmlns:android="http://schemas.android.com/apk/res/android"
xmlns:tools="http://schemas.android.com/tools"
android:id="@+id/LinearLayout1"
android:layout_width="match_parent"
android:layout_height="match_parent"
android:orientation="vertical"
tools:context="${relativePackage}.${activityClass}" >
<EditText
android:id="@+id/etFirstName"
android:layout_width="match_parent"
android:layout_height="wrap_content"
android:padding="4dp"
android:background="#eeeeee"
android:hint="Firstname"
android:textColor="#000000"
android:textSize="24dp" >
<requestFocus />
</EditText>
<EditText
android:id="@+id/etLastName"
android:layout_width="match_parent"
android:layout_height="wrap_content"
android:background="#eeeeee"
android:hint="Lastname"
android:padding="4dp"
android:textColor="#000000"
android:textSize="24dp" />
<LinearLayout
android:layout_width="match_parent"
android:layout_height="wrap_content"
android:padding="4dp" >
<Button
android:id="@+id/btnConnect"
android:layout_width="wrap_content"
android:layout_height="wrap_content"
android:layout_weight="1"
android:text="Connect" />
<Button
android:id="@+id/btnAdd"
android:layout_width="wrap_content"
android:layout_height="wrap_content"
android:layout_weight="1"
android:text="Add new" />
</LinearLayout>
<TextView
android:id="@+id/tvDs"
android:layout_width="match_parent"
android:layout_height="match_parent"
android:background="#ffffff"
android:padding="8dp"
android:text=""
android:textAppearance="?android:attr/textAppearanceMedium" />
</LinearLayout>
[/sourcecode]
Mã nguồn tham khảo https://drive.google.com/file/d/0B2F9IAasWwaNYVZSc2tiZDNlNTA/view?usp=sharing
Wednesday, September 9, 2015
kiểm tra tính tương thích của ứng Android trên các thiết bị chạy chip intel
http://testdroid.com/news/free-android-app-game-and-web-testing-on-intel-devices
một bài hướng dẫn kiểm tra tương thích rất chi tiết
một bài hướng dẫn kiểm tra tương thích rất chi tiết
Tuesday, September 8, 2015
https://www.aspsms.com một dịch vụ gởi tin nhắn SMS
Tìm mãi mới thấy cái dịch vụ này
https://www.aspsms.com
https://www.aspsms.com
Http/Https Client cho Android
Thư viện giao tiếp qua http và https cho Android
https://github.com/loopj/android-async-http/wiki
https://github.com/loopj/android-async-http/wiki
Friday, September 4, 2015
Sử dụng ValueChangeEvent tren Java Server Face
Một ví dụ sử dụng sự kiện ValueChangeEvent trên Face cho các bạn học viên mới tìm hiểu JSF

Chọn loại sản phẩm -> danh sách sản phẩm sẽ được lọc lại:

1. Tạo website sử dụng framework Face 2x (1x cũng được)
2. Định nghĩa 2 ManageBean (Products và Categories) và 2 JavaBean (Product và Category)
3. Thiết kế giao diện trang index.xhtml
Trong ví dụng này tôi sử dụng Netbean để demo
Tạo ManageBean (Products và Categories)
- File -> New File -> Other -> Java Server Face -> JSF ManageBean
Products
[sourcecode language="java"]
package codes;
import java.sql.Connection;
import java.sql.DriverManager;
import java.sql.PreparedStatement;
import java.sql.ResultSet;
import java.util.ArrayList;
import java.util.Collection;
import javax.faces.bean.ManagedBean;
import javax.faces.bean.RequestScoped;
import javax.faces.event.ValueChangeEvent;
/**
*
* @author ntdan
*/
@ManagedBean
@RequestScoped
public class Products {
/**
* Creates a new instance of Products
*/
public Products() {
}
private Collection list;
private int id;
private int cid;
public int getCid() {
return cid;
}
public void setCid(int cid) {
this.cid = cid;
}
private String name;
private String price;
public int getId() {
return id;
}
public void setId(int id) {
this.id = id;
}
public String getName() {
return name;
}
public void setName(String name) {
this.name = name;
}
public String getPrice() {
return price;
}
public void setPrice(String price) {
this.price = price;
}
public Collection getList() {
return list;
}
public void select_cid_change(ValueChangeEvent event)
{
try {
Class.forName("com.microsoft.sqlserver.jdbc.SQLServerDriver");
Connection conn = DriverManager.getConnection("jdbc:sqlserver://172.16.160.81\\sql2008;"
+ "database=northwind;","sa","sa");
PreparedStatement comm = conn.prepareStatement("Select categoryid, productid, productname, unitprice"
+ " from products where categoryID=?");
comm.setInt(1, Integer.parseInt(event.getNewValue().toString()));
ResultSet rs = comm.executeQuery();
list = new ArrayList<Product>();
Product pro;
while(rs.next())
{
pro = new Product();
pro.setId(rs.getInt("productid"));
pro.setcId(rs.getInt("categoryid"));
pro.setName(rs.getString("productname"));
pro.setPrice(rs.getString("unitprice"));
list.add(pro);
}
} catch (Exception e) {
list = null;
}
}
}
[/sourcecode]
Categories
[sourcecode language="java"]
package codes;
import java.sql.Connection;
import java.sql.DriverManager;
import java.sql.PreparedStatement;
import java.sql.ResultSet;
import java.util.ArrayList;
import java.util.Collection;
import javax.faces.bean.ManagedBean;
import javax.faces.bean.RequestScoped;
/**
*
* @author ntdan
*/
@ManagedBean
@RequestScoped
public class Categories {
public Categories() {
}
private int id;
private String name;
public int getId() {
return id;
}
public void setId(int id) {
this.id = id;
}
public String getName() {
return name;
}
public void setName(String name) {
this.name = name;
}
private Collection list;
public Collection getList() {
try {
Class.forName("com.microsoft.sqlserver.jdbc.SQLServerDriver");
Connection conn = DriverManager.getConnection("jdbc:sqlserver://172.16.160.81\\sql2008;"
+ "database=northwind;", "sa", "sa");
PreparedStatement comm = conn.prepareStatement("Select categoryid, categoryname"
+ " from categories");
ResultSet rs = comm.executeQuery();
list = new ArrayList<Category>();
Category ca;
while (rs.next()) {
ca = new Category();
ca.setId(rs.getInt("categoryid"));
ca.setName(rs.getString("categoryname"));
list.add(ca);
}
} catch (Exception e) {
list = null;
}
return list;
}
}
[/sourcecode]
Tạo 2 javabean như sau
- File -> New File -> Java Class
Product
[sourcecode language="java"]
package codes;
public class Product {
public Product() {
}
private int id;
private int cId;
private String name;
private String price;
public int getId() {
return id;
}
public void setId(int id) {
this.id = id;
}
public int getcId() {
return cId;
}
public void setcId(int cId) {
this.cId = cId;
}
public String getName() {
return name;
}
public void setName(String name) {
this.name = name;
}
public String getPrice() {
return price;
}
public void setPrice(String price) {
this.price = price;
}
}
[/sourcecode]
Category
[sourcecode language="java"]
package codes;
public class Category {
public Category() {
}
private int id;
private String name;
public int getId() {
return id;
}
public void setId(int id) {
this.id = id;
}
public String getName() {
return name;
}
public void setName(String name) {
this.name = name;
}
}
[/sourcecode]
Thiết kế giao diện xhtml
[sourcecode language="html"]
<?xml version='1.0' encoding='UTF-8' ?>
<!DOCTYPE html PUBLIC "-//W3C//DTD XHTML 1.0 Transitional//EN" "http://www.w3.org/TR/xhtml1/DTD/xhtml1-transitional.dtd">
<html xmlns="http://www.w3.org/1999/xhtml"
xmlns:h="http://xmlns.jcp.org/jsf/html"
xmlns:f="http://xmlns.jcp.org/jsf/core">
<h:head>
<title>Value Change Event</title>
<link type="text/css" rel="stylesheet" href="//codeproject.cachefly.net/App_Themes/CodeProject/Css/Main.min.css?dt=2.8.150901.1"></link>
</h:head>
<h:body>
<f:view>
<h:form>
Categories:<br/>
<h:selectOneMenu onchange="submit();"
value="#{products.cid}"
valueChangeListener="#{products.select_cid_change}">
<f:selectItems value="#{categories.list}" var="sate"
itemLabel="#{sate.name}"
itemValue="#{sate.id}"/>
</h:selectOneMenu>
<h:dataTable border="1" id="t" width="100%"
value="#{products.list}" var="product">
<h:column>
<f:facet name="header">
ID
</f:facet>
<h:outputText value="#{product.id}"/>
</h:column>
<h:column>
<f:facet name="header">
Name
</f:facet>
<h:outputText value="#{product.name}"/>
</h:column>
<h:column>
<f:facet name="header">
Price
</f:facet>
<h:outputText value="#{product.price}"/>
</h:column>
<h:column>
<f:facet name="header">
Operation
</f:facet>
<h:commandLink value="Delete" action="index"/>
</h:column>
</h:dataTable>
</h:form>
</f:view>
</h:body>
</html>
[/sourcecode]
f:selectItems: sẽ render các phần tử (thẻ option của HTML) cho hộp chọn (thẻ select của HTML) với nội dung giữa thẻ option là tên nhóm sản phẩm (itemLabel="#{sate.name}") và thuộc tính value của option sẽ được điền mã nhóm (itemValue="#{sate.id}").
Mỗi khi chọn một phần tử trong hộp chọn sự kiện onchange sẽ phát sinh (HTML), chúng ta có thể đón nhận sự kiện này dưới ManageBean qua thuộc tính valueChangeListener="#{products.select_cid_change}" của selectOneMenu để xử lý sự kiên và cập nhật lại danh sách sản phẩm.
Mã nguồn tham khảo --> ở đây
Subscribe to:
Comments (Atom)